- (Please disconnect the device from the charging station, then turn it on/off.)
- 1)Turn On:
- Press the “Enter” button for 10 Sec to turn on the device.
- 2.)Turn Off:
- Press the “X” button for 10 sec to turn off the device.
- Two interfaces and how to switch
- 1)Manually enter the payment amount in EFTPOS Device:
- Enter the amount directly in the Menu interface.
- The amount shows in the manual payment interface, confirm the amount then press “Enter”
- (etc: $25, input 2 — 5 — 0 — 0 keys confirm then press “Enter”)
- Place Bank Card close to EFTPOS Device, then the payment is completed.
- Payment success is shown below.
- Ask the customers whether print the extra Card Payment receipt or not.
- Press the “Cancel” to cancel the card payment.
- 2)Manually input the refund amount in EFTPOS Device:
- Press “Menu” on the screen to choose the first function “Refund”.
- Input EFTPOS Device six numbers passwords to activate the refund function.
- (The Device passwords are provided by Westpac Bank; the user will receive passwords through email from Westpac. Please confirm with Westpac if the user does not receive the passwords.)
- Input the passwords to enter the “Refund” interface.
- When turning to the refund interface, manually input the refund amount and press” Enter” to confirm.
- Etc: $25, input 2 — 5 — 0 — 0 keys, then press “Enter” to confirm.
- Meanwhile, put the bank card close to EFTPOS Device for a refund.
- When EFTPOS Device receives the bank message, the cardholder needs to input the passwords or signature.
- After Passwords are inputted or signed, the screen shows refund success.
- Choose to print the customer receipt or not, the refund is complete.
- 3)Use the EFTPOS Device to calculate daily total payments:
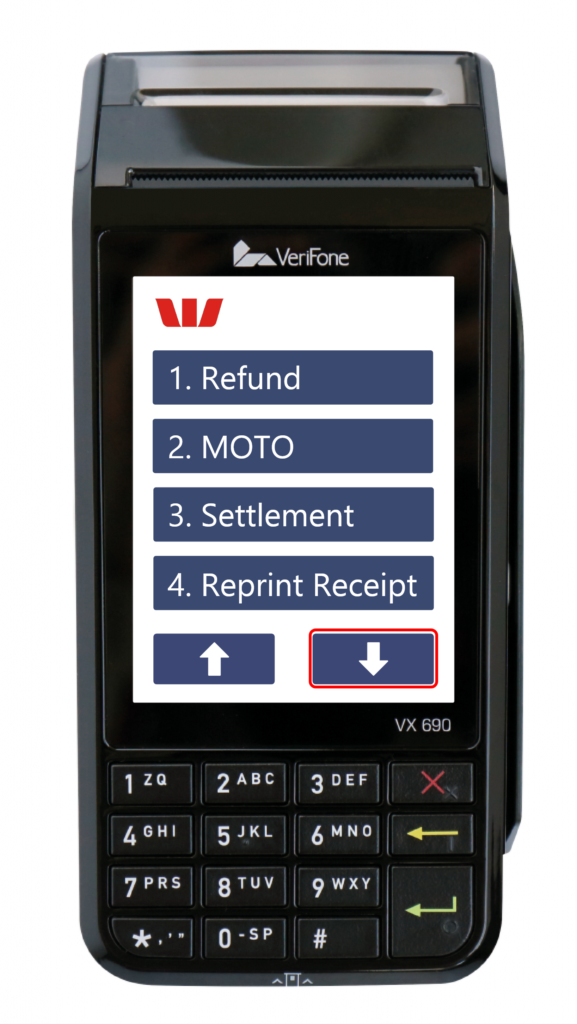
- Choose the “settlement” in Menu to enter the settlement interface.
- Choose the first option to start a settlement.
- Choose the date for settlement.
- Confirm the date, the device will auto-print the daily settlement ticket, the total amount will be count and transferred to the business account.
- Notice:(Settlement function is only available once daily, it will calculate the total amount from the last settlement; when the user chooses the settlement function, the bank will transfer the settlement amount to the business account.)。
- 4) Print the EFTPOS Device receipt again:
- Choose the “Print” in Menu to enter the printing interface.
- The user can choose to print the last receipt or another receipt.
- There are three methods to search the receipt needed to print: Search RRN, search time, and search all receipts.
- Search RRN
- Search the receipt time,input date/month/year/hour/minute
- Confirm the receipt to print, EFTPOS Device will auto-print the receipt.
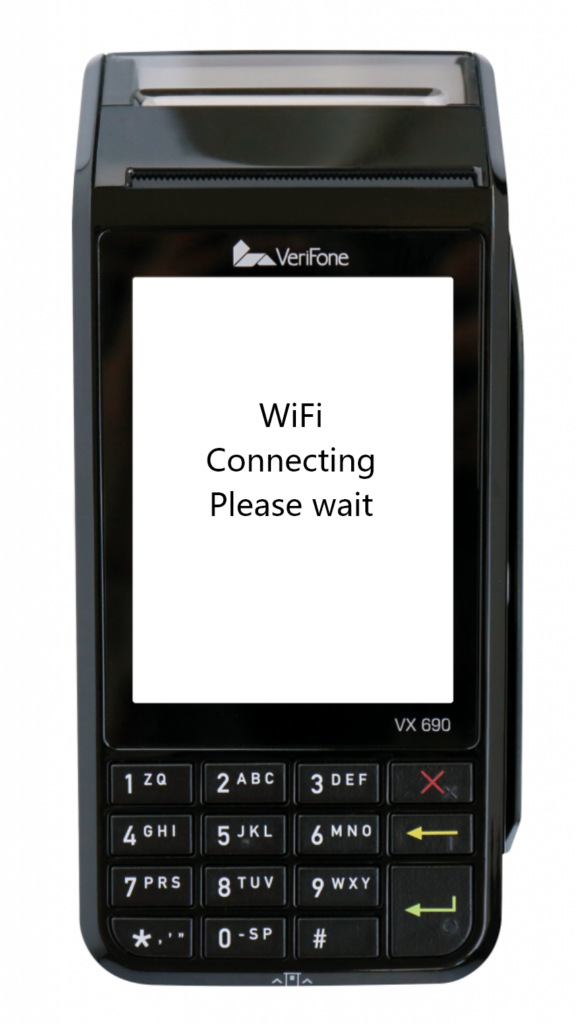
- WIFI Network Setting:
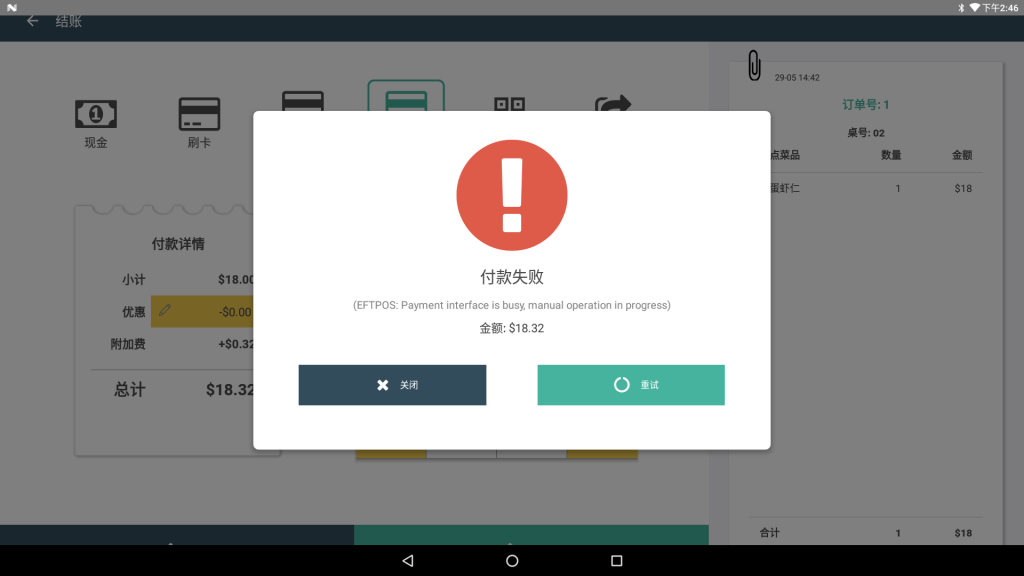
- Payment Declined?
- No Worries, address the issue initially!
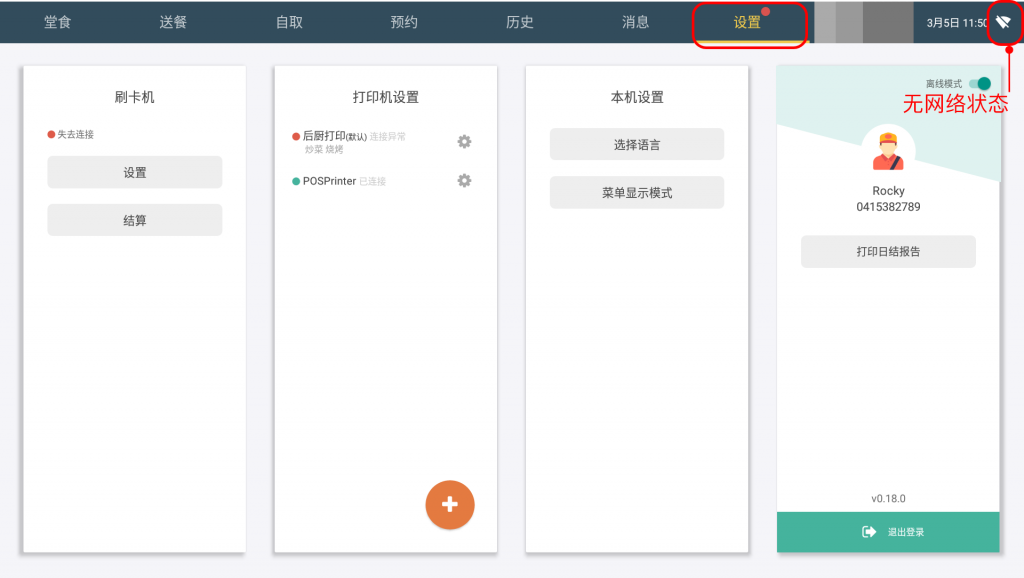
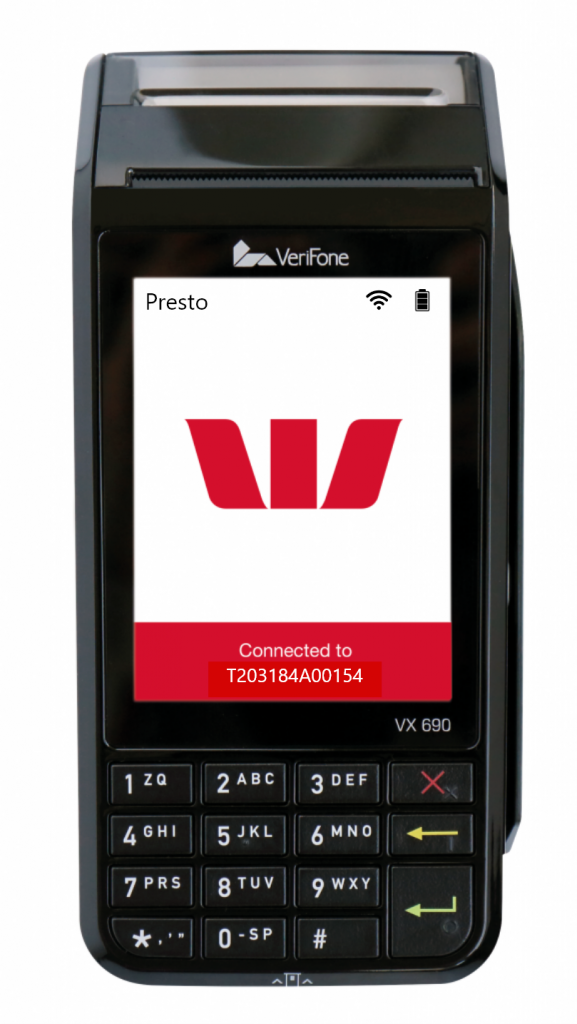
- First Step: Check EFTPOS Device network status. Normally it should be a red “Connected” interface.:
- Payment Declined, issues and solutions are listed below:
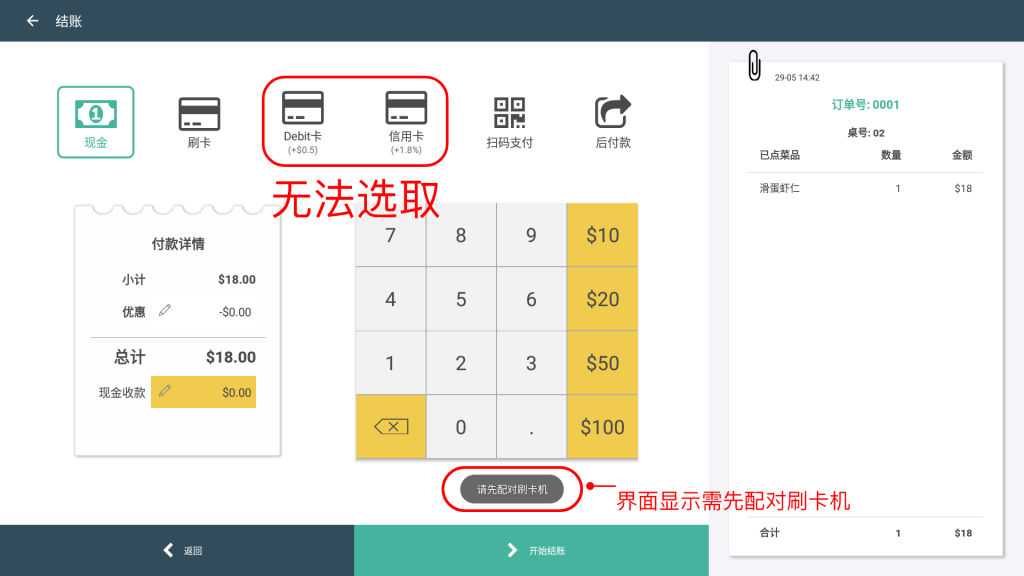
- 1. EFTPOS Device and LinkPOS fail to pair.
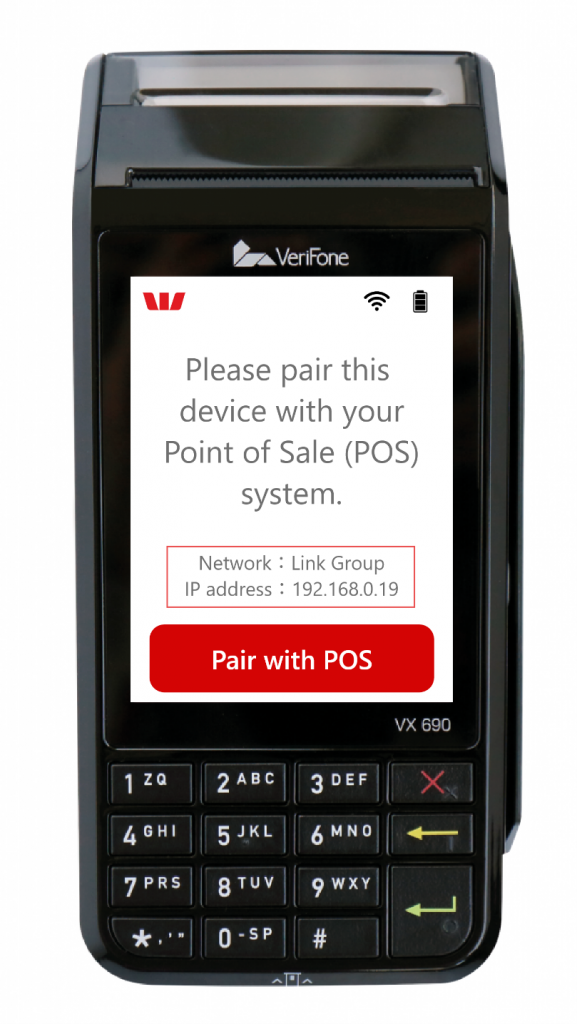
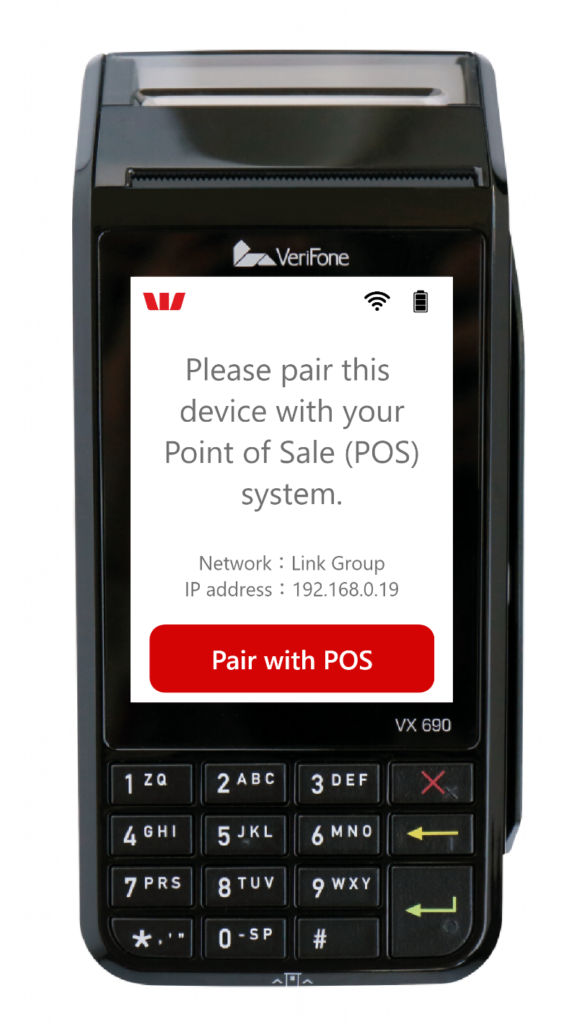
- When EFTPOS Device and LinkPOS fail to pay, EFTPOS Device will show the red sign “Pair with POS”.
- While EFTPOS Device is not paired with LinkPOS, the user cannot choose the EFTPOS payment on LinkPOS Check-in interface. Then need to exit the payment interface, and back to the main menu to pair the EFTPOS Device with LinPOS.
- If EFTPOS Device and LinkPOS are connected to the network, both are not paired. Please check the paring method with this link below:
- https://www.linkpos.com.au/guide.html#posConfig
- 2. EFTPOS Device Menu Interface
- EFTPOS Device, if the menu does not show the “Connected” interface. The LinkPOS will fail to call the EFTPOS Device.
- If an issue is caused by the menu interface, solutions are as below:
- 1)Press “X”3-5 times in the Menu interface. If the network of the EFTPOS Device is connected, should go back to the red “Connected” interface, and then both LinkPOS and EFTPOS Device will work.
- 2)If EFTPOS Device remains on the Menu interface after the first step, that means EFTPOS Device has lost connection, need to reconnect the network and pair it to LinkPOS.
- 3)When the device connects network successfully, will back to the red “Pair with POS” interface, follow the steps to pair the device with LinkPOS
- 3. EFTPOS Device shows “Disconnected”
- 4. EFTPOS and LinkPOS Disconnect
- In some special situations, EFTPOS will disconnect from LinkPOS.Steps to follow: 1)Check EFTPOS network, 2)Check LinkPOS network.
- If find any device or machine is disconnected, confirm the network and connect.
- EFTPOS Device connects WIFI: https://linkpos.com.au/guide_eftpos.html#wifiConfig
- If EFTPOS Device and LinkPOS are connected to the network and be within the same network, but still cannot connect. Please cancel pairing, and try to pair them again.
- EFTPOS and LinkPOS pairing method: https://www.linkpos.com.au/guide.html#posConfig
Turn On/Off EFTPOS Device
(Please disconnect the device from the charging station, then turn it on/off.) #
1)Turn On: #
Press the “Enter” button for 10 Sec to turn on the device. #
2.)Turn Off: #
Press the “X” button for 10 sec to turn off the device. #
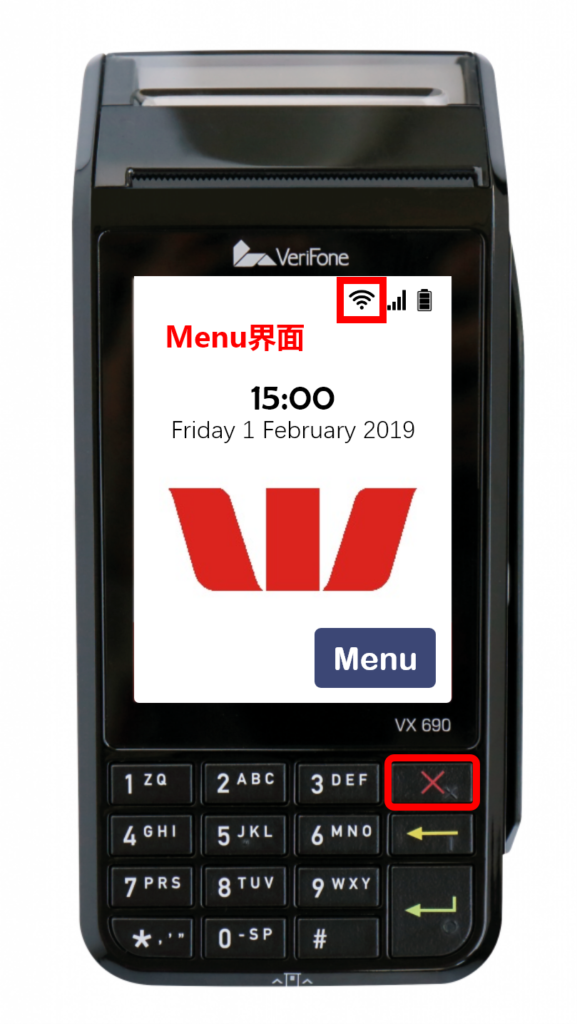
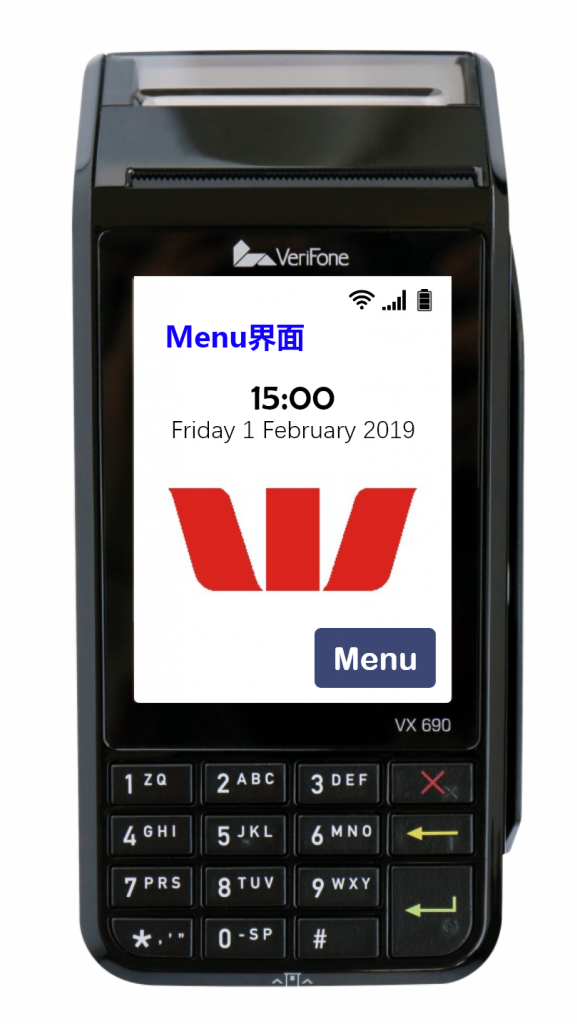
Two interfaces and how to switch #
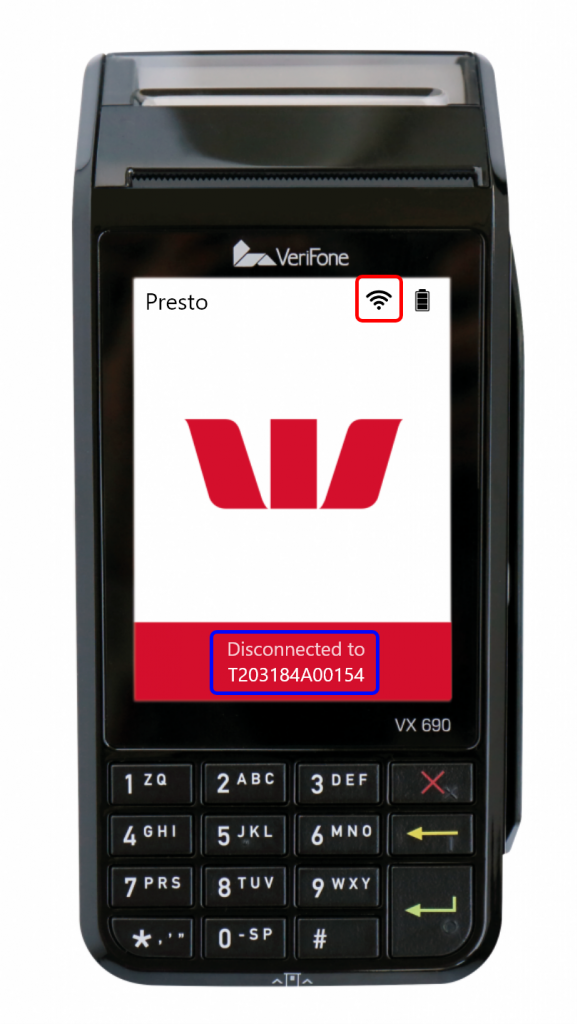
1)As shown, EFTPOS Device Pairing status, disconnected and waiting to pair: #

2)Menu interface as below: #
3)Press “1” and “Enter” at the same time in the paring interface to enter the Manage interface. #
4) Quick-click the “3” or ”←” key in the management interface to enter the status interface. #
1)Manually enter the payment amount in EFTPOS Device: #
Enter the amount directly in the Menu interface. #
The amount shows in the manual payment interface, confirm the amount then press “Enter” #
(etc: $25, input 2 — 5 — 0 — 0 keys confirm then press “Enter”) #
Place Bank Card close to EFTPOS Device, then the payment is completed. #
Payment success is shown below. #
Ask the customers whether print the extra Card Payment receipt or not. #
Press the “Cancel” to cancel the card payment. #
2)Manually input the refund amount in EFTPOS Device: #
Press “Menu” on the screen to choose the first function “Refund”. #
Input EFTPOS Device six numbers passwords to activate the refund function. #
(The Device passwords are provided by Westpac Bank; the user will receive passwords through email from Westpac. Please confirm with Westpac if the user does not receive the passwords.) #
Input the passwords to enter the “Refund” interface. #
When turning to the refund interface, manually input the refund amount and press” Enter” to confirm. #
Etc: $25, input 2 — 5 — 0 — 0 keys, then press “Enter” to confirm. #
Meanwhile, put the bank card close to EFTPOS Device for a refund. #
When EFTPOS Device receives the bank message, the cardholder needs to input the passwords or signature. #
After Passwords are inputted or signed, the screen shows refund success. #
Choose to print the customer receipt or not, the refund is complete. #
3)Use the EFTPOS Device to calculate daily total payments: #
Choose the “settlement” in Menu to enter the settlement interface. #
Choose the first option to start a settlement. #
Choose the date for settlement. #
Confirm the date, the device will auto-print the daily settlement ticket, the total amount will be count and transferred to the business account. #
Notice:(Settlement function is only available once daily, it will calculate the total amount from the last settlement; when the user chooses the settlement function, the bank will transfer the settlement amount to the business account.)。 #
4) Print the EFTPOS Device receipt again: #
Choose the “Print” in Menu to enter the printing interface. #
The user can choose to print the last receipt or another receipt. #
There are three methods to search the receipt needed to print: Search RRN, search time, and search all receipts. #
Search RRN #
Search the receipt time,input date/month/year/hour/minute #
Confirm the receipt to print, EFTPOS Device will auto-print the receipt. #
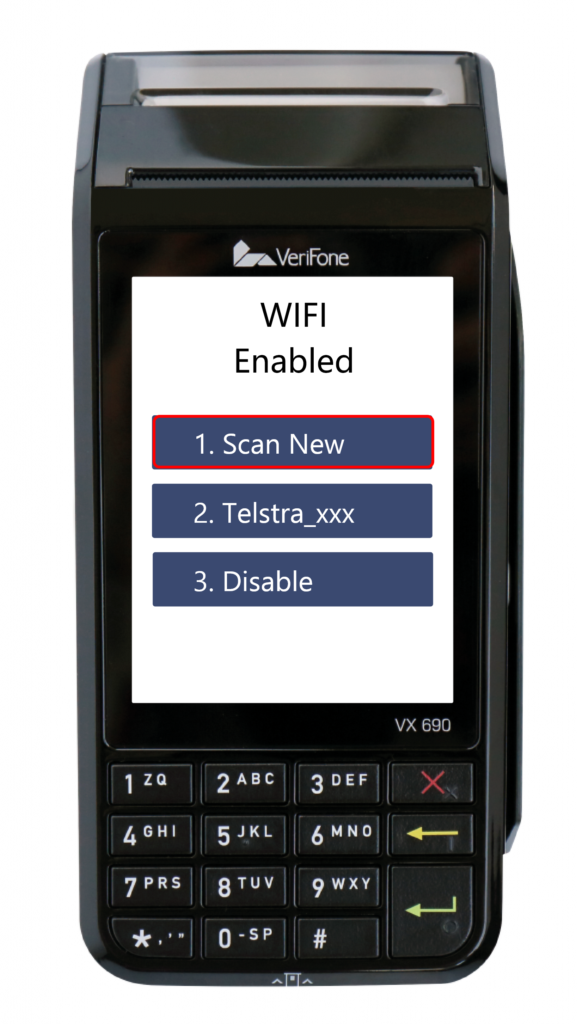
WIFI Network Setting: #
1)EFTPOS Device network setting
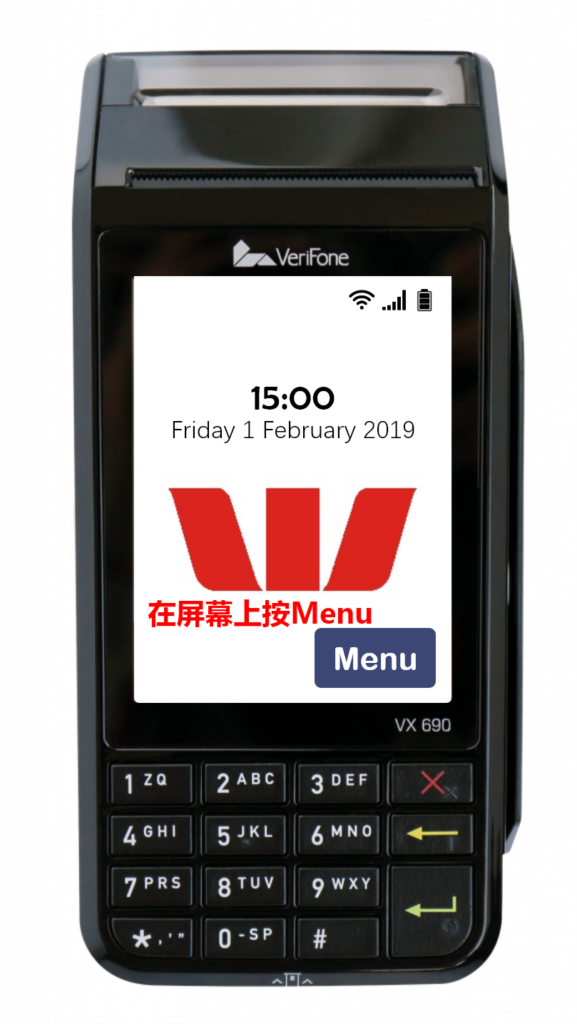
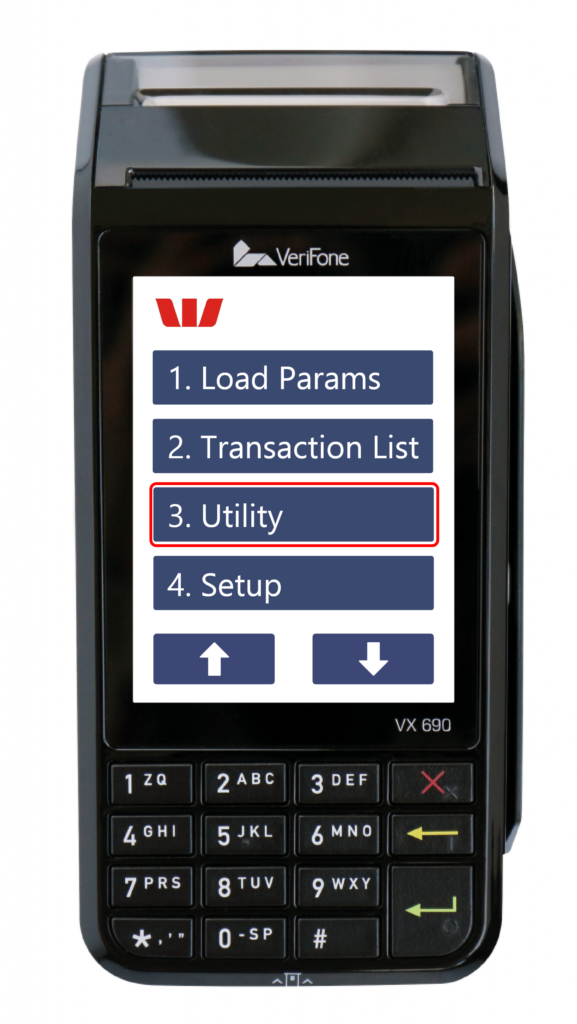
Press “Menu”
Press “↓” to the Next page
Find “Utility” and Press
Enter Utility interface, press “↓” to next page.
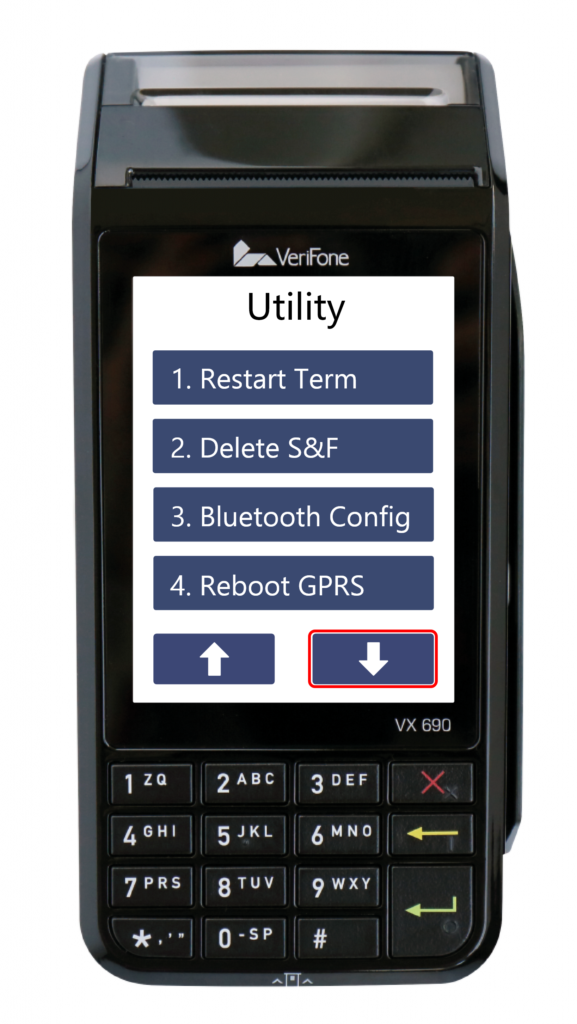
Find the “Network” option.
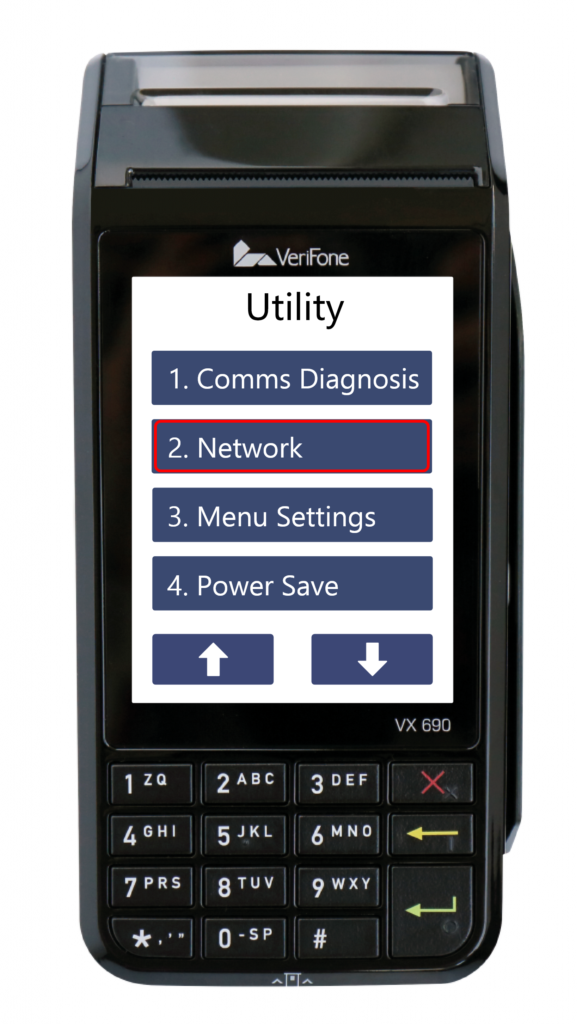
Find the “WIFI” option in the Network setting.
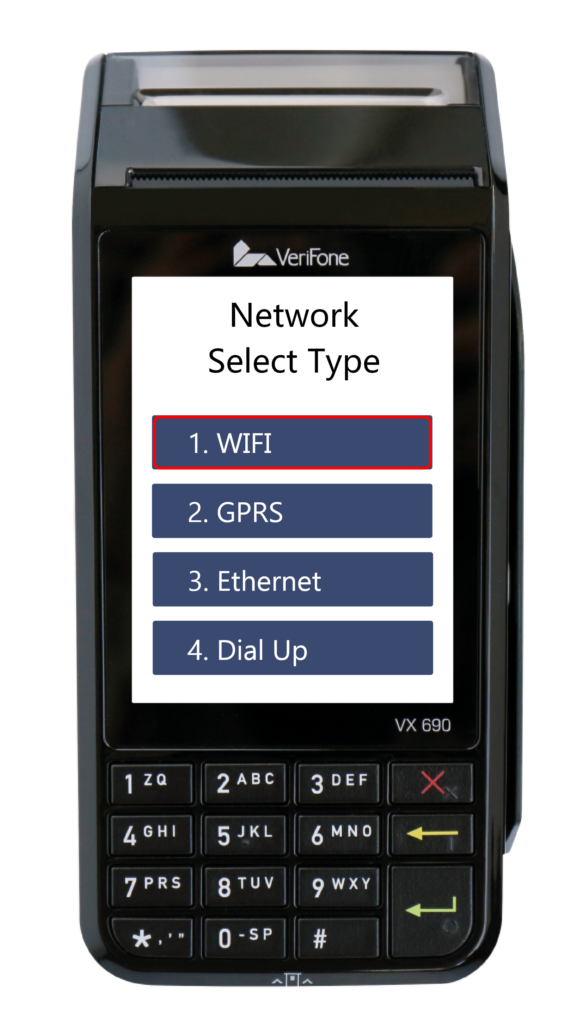
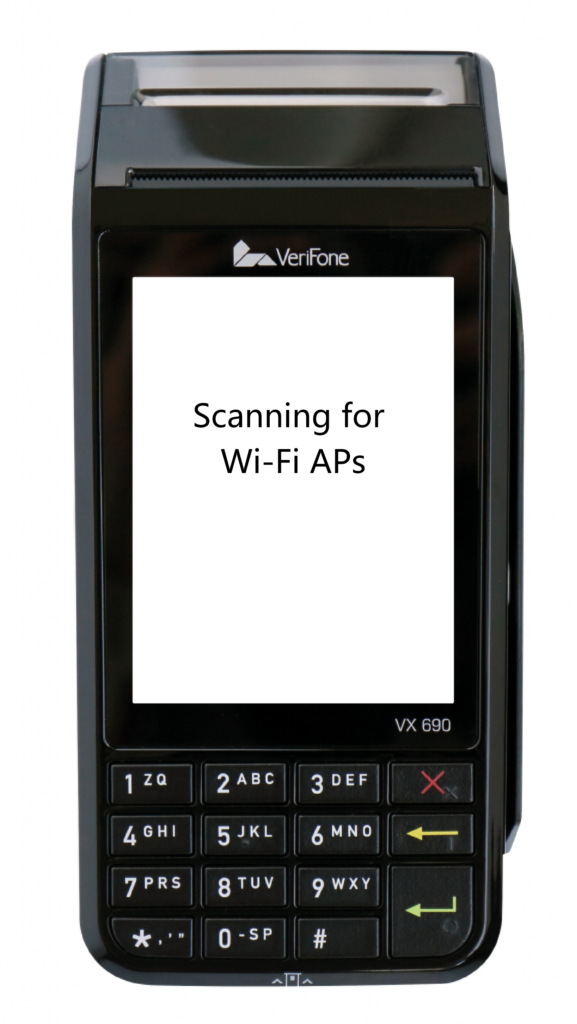
Choose the first option “Scan New”
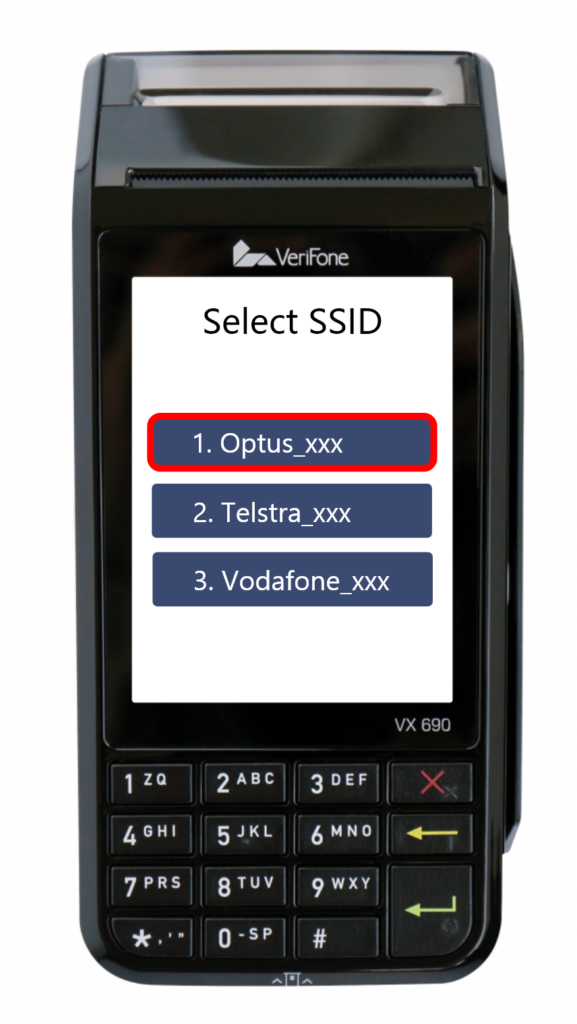
EFTPOS Device starts to scan the network.
Select the network need to connect.
Enter the passwords to connect to the network.
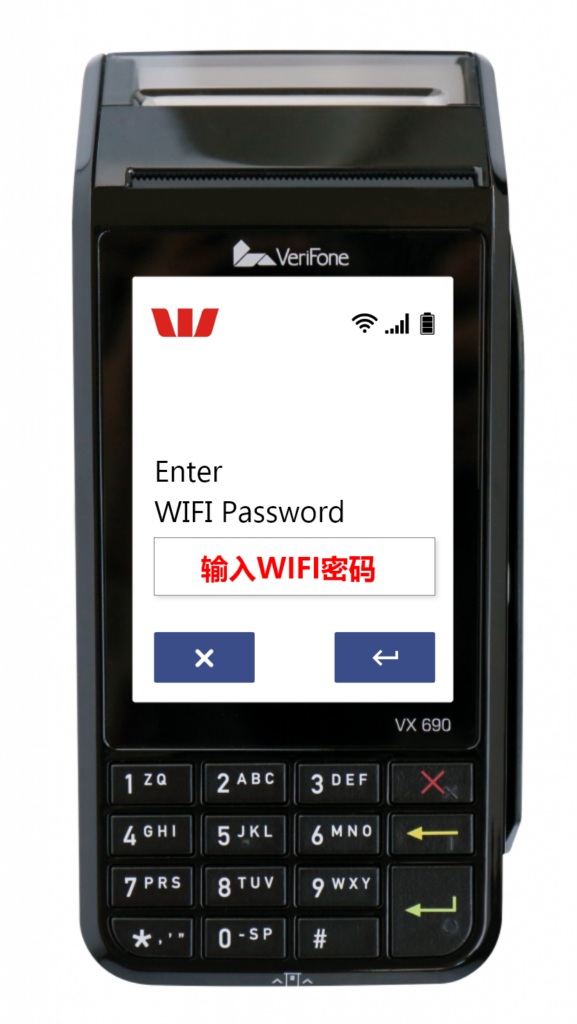
Press ↵the device will start to connect to the network.
Once the network is connected, the interface will turn back to the menu, and check the WIFI connection on the top right.
Press “X” three times, and will turn back to the main menu.
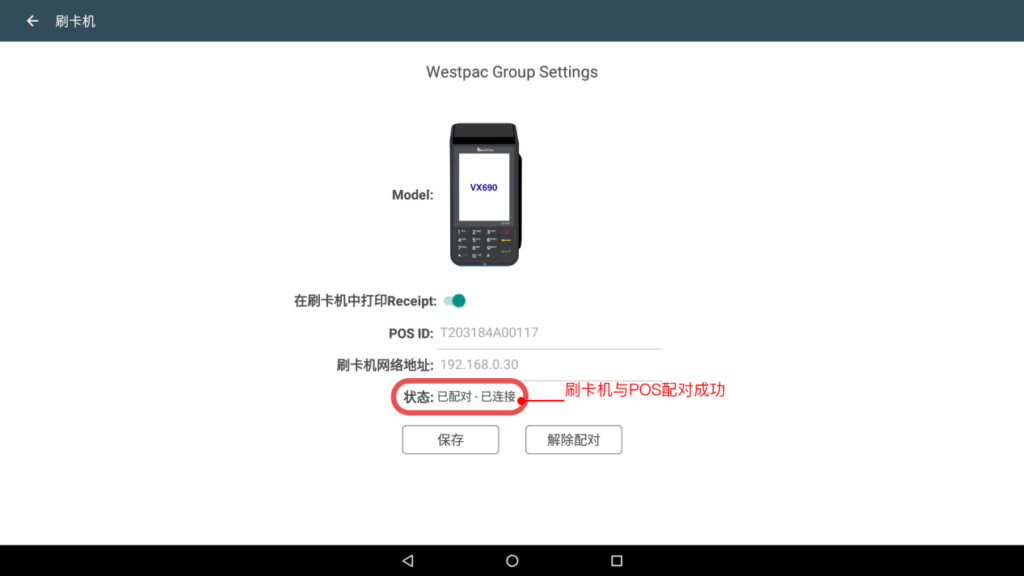
Pair EFTPOS Device to LinkPOS machine.
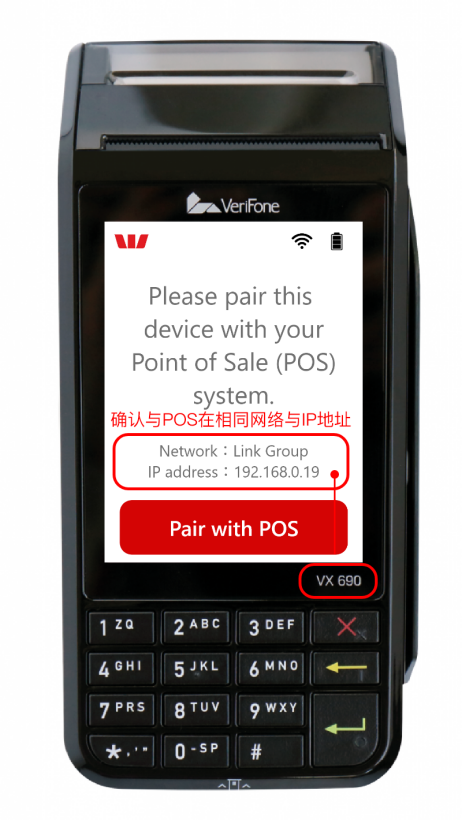
While the IP address is shown on Screen, EFTPOS Device is ready to pair to LinkPOS.
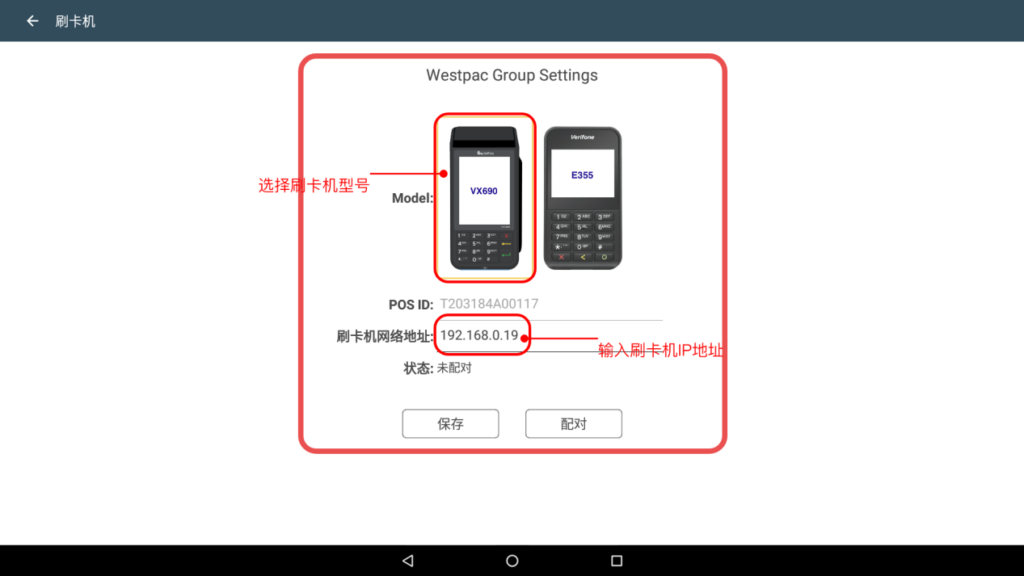
2)How to pair EFTPOS Device with Link POS
Back to LinkPOS, choose the card device option, and click “setting” to pair.
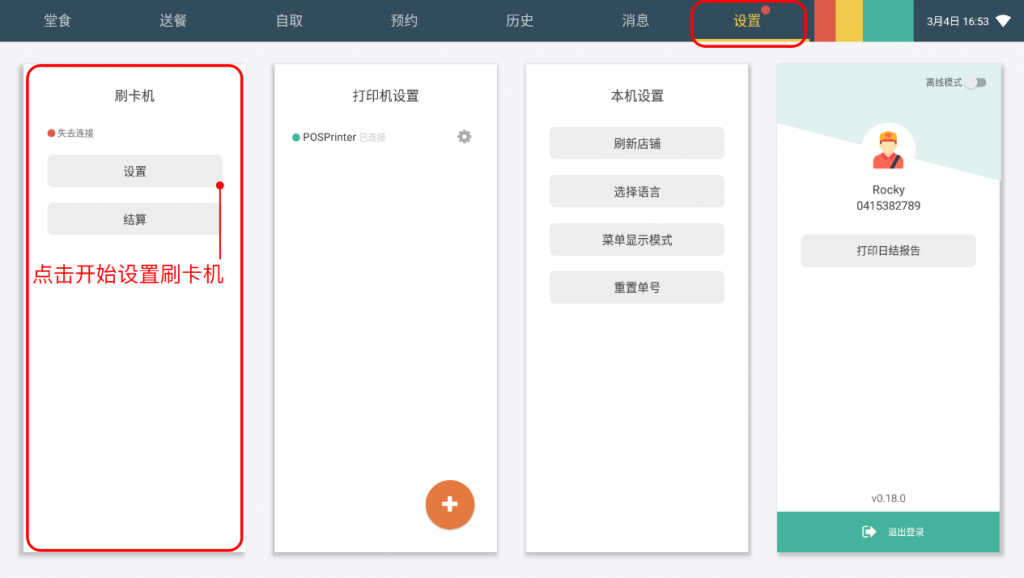
Choose the selected card device, and input the device IP address, click “Save”, then click “Pair”
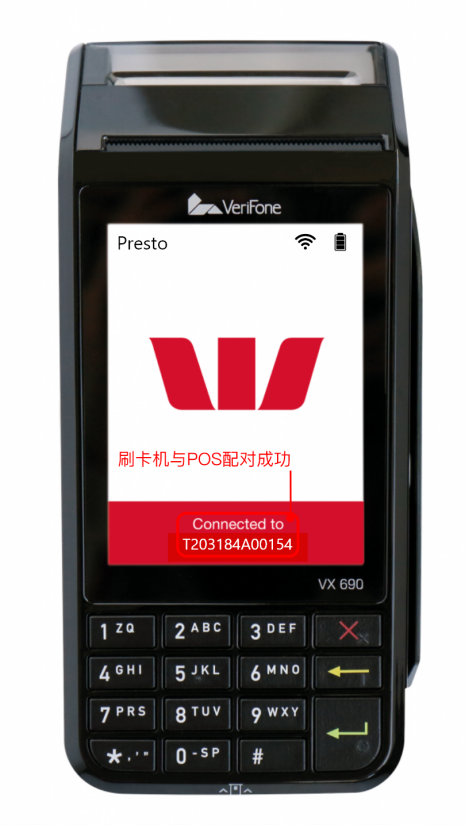
Click “Pair with POS”。
Confirm the pairing codes on both EFTPOS Device and Link POS to be the same.
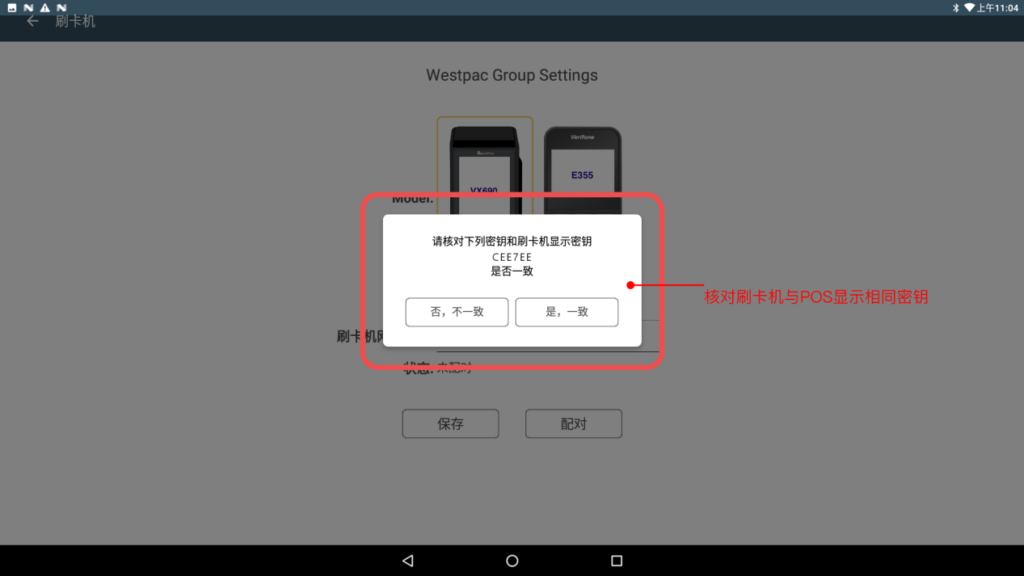
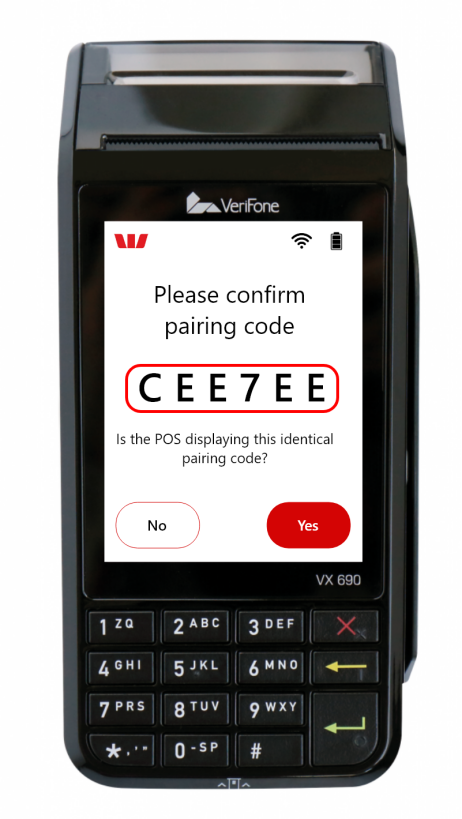
Click “Yes”, Card Device will successfully pair to the Link POS.
LinkPOS and EFTPOS Device will show “Pairing Succeed” at the same time.
For more functions instruction, please check the official website below:
http://merchantsupport.com.au/Westpac/Devices/EFTPOS1/Essential-Training
Payment Declined? #
No Worries, address the issue initially! #
First Step: Check EFTPOS Device network status. Normally it should be a red “Connected” interface.: #
Payment Declined, issues and solutions are listed below: #
1. EFTPOS Device and LinkPOS fail to pair. #
When EFTPOS Device and LinkPOS fail to pay, EFTPOS Device will show the red sign “Pair with POS”. #
#
While EFTPOS Device is not paired with LinkPOS, the user cannot choose the EFTPOS payment on LinkPOS Check-in interface. Then need to exit the payment interface, and back to the main menu to pair the EFTPOS Device with LinPOS. #
If EFTPOS Device and LinkPOS are connected to the network, both are not paired. Please check the paring method with this link below: #
https://www.linkpos.com.au/guide.html#posConfig #
2. EFTPOS Device Menu Interface #
EFTPOS Device, if the menu does not show the “Connected” interface. The LinkPOS will fail to call the EFTPOS Device. #
If an issue is caused by the menu interface, solutions are as below: #
1)Press “X”3-5 times in the Menu interface. If the network of the EFTPOS Device is connected, should go back to the red “Connected” interface, and then both LinkPOS and EFTPOS Device will work. #
2)If EFTPOS Device remains on the Menu interface after the first step, that means EFTPOS Device has lost connection, need to reconnect the network and pair it to LinkPOS. #
Click to check how to connect to the network:
https://linkpos.com.au/ch/guide_eftpos.html#wifiConfig
3)When the device connects network successfully, will back to the red “Pair with POS” interface, follow the steps to pair the device with LinkPOS #
3. EFTPOS Device shows “Disconnected” #
Confirm the network is connected, then cancel the pairing status, and try to pair EFTPOS Device to LinkPOS again, the device should work.
1)Press both numbers “3” and “↵” to stop pairing.
2)Enter the Menu interface, click option 1, and choose “Yes” to confirm to cancel pairing.
3)While successful to cancel the pairing, EFTPOS Device will be back to this interface.
4) Back to red “Pair with POS“ follow the steps of solution 1, to reconnect.
4. EFTPOS and LinkPOS Disconnect #
In some special situations, EFTPOS will disconnect from LinkPOS.
Steps to follow: 1)Check EFTPOS network, 2)Check LinkPOS network. #
#
#