In the Delivery screen, you can make an order that will be sent to the customer’s address directly from your store.
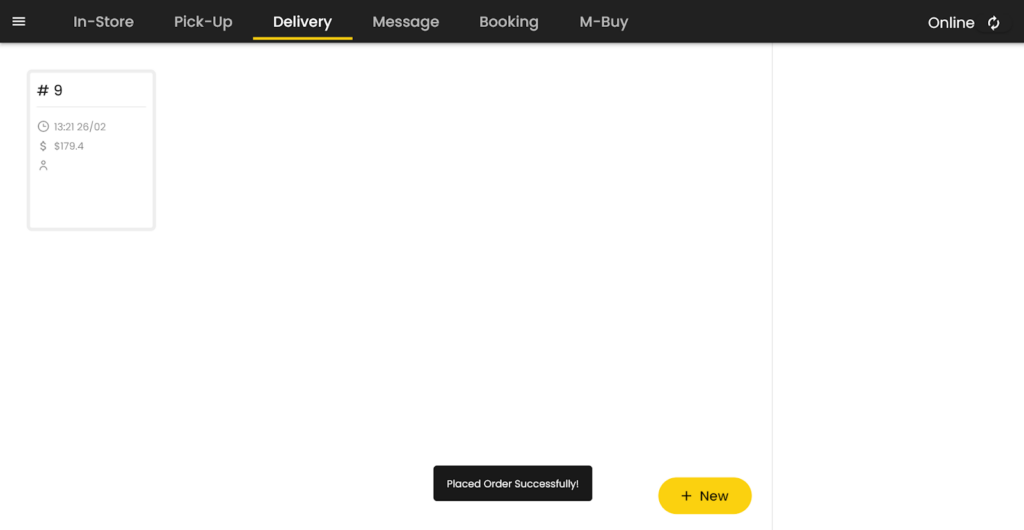
- Press the ‘+ New’ button to create a new delivery order.
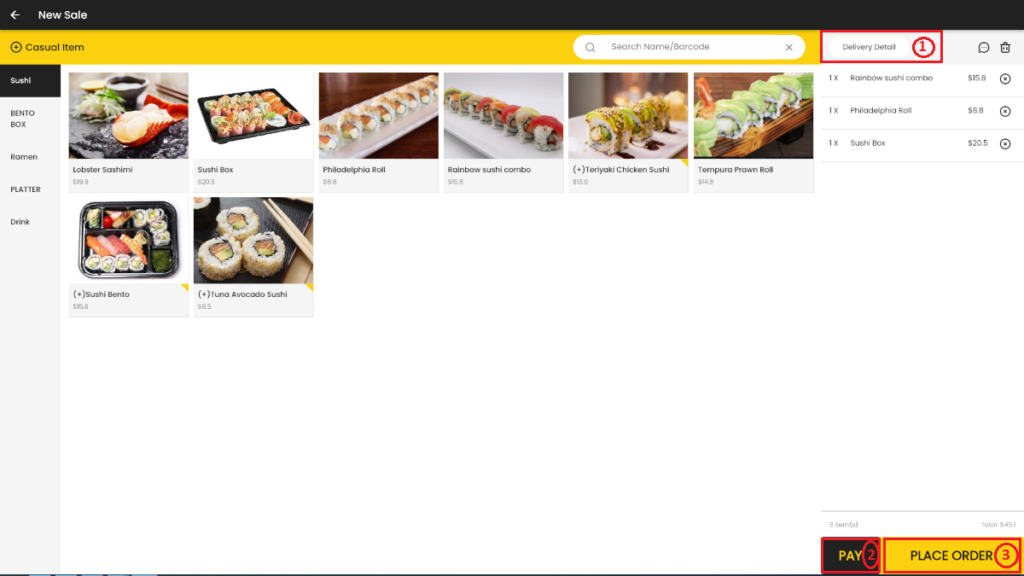
In the New Sale screen,
- Add items to the order.
- Click “comment” icon to add comments.
- Click “bin” icon to delete the whole order.
- Click “ⓧ” button next to the ordered items to delete the items from the order.
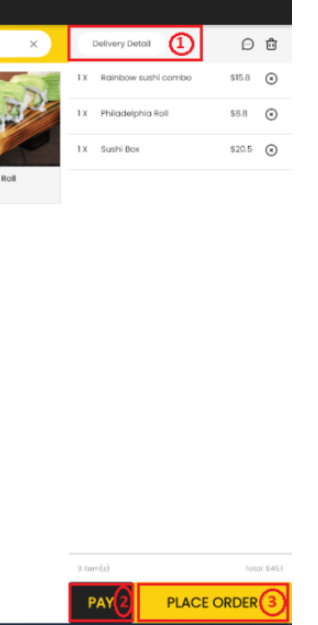
- Click “Delivery Detail” button to enter delivery details.
When creating a new Delivery order in the New Sale screen, the ‘Delivery Detail’ button is found to the left of the Order Note (1) and Empty Cart (2) icons, replacing the Table button in the In-Store tab and the Pick-Up Detail button in the Pick-Up tab.
The Delivery Detail screen allows you to enter the address and details of the customer that the order will be sent to.
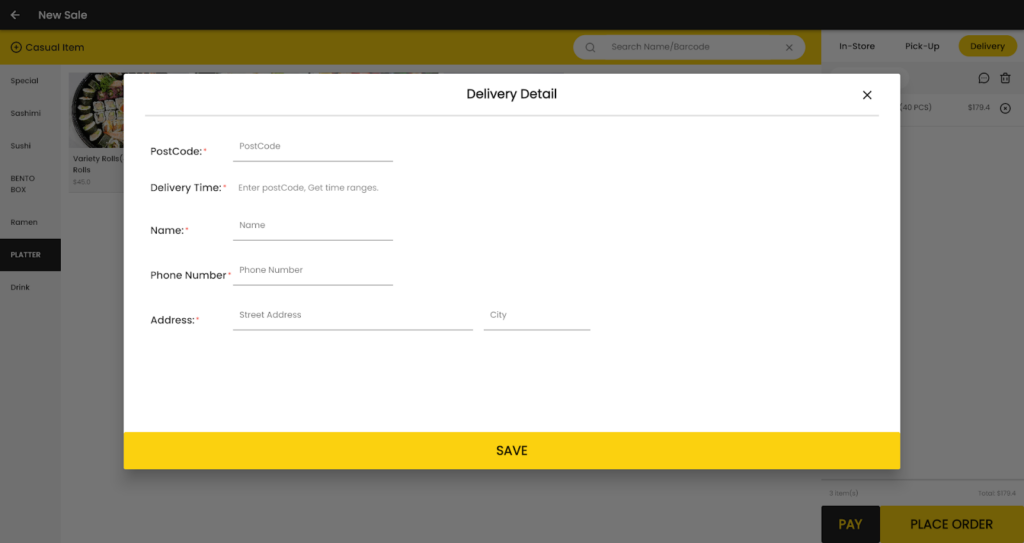
- PostCode (required): Enter the four digit Australian postcode of the customer’s delivery address.
- Delivery Time (required): Once a postcode is entered, select a half hour time slot that the order will reach the customer within.
- Name (required): Enter the customer’s name.
- Phone Number (required): Enter the customer’s contact mobile or landline phone number.
- Address: Enter the customer’s Australian address in the form of street number and name, then city/suburb/town.
Click “Save” button to save changes and return to the New Sale screen. After returning to the New Sale Screen, you can then click “Pay” button proceed with payment or click “Place Order” to save the order to the Delivery screen.
Scenario 1: If you click “Place Order” (3) button.
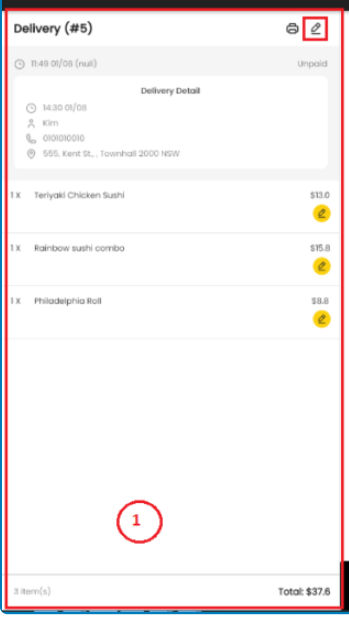
Your order will be listed in “Delivery” screen.
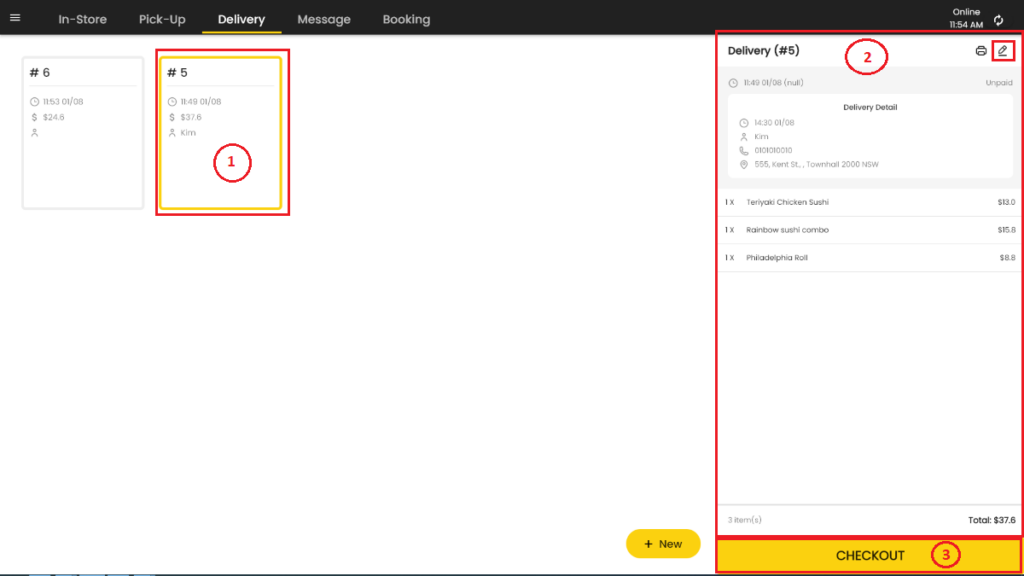
In the delivery screen,
- Tap your order (1) and a yellow border line will appear in your order.
- Your order details will appear in the right hand side panel (2) of the screen
- Click the pencil icon to edit the order.
- Click “CHECKOUT” (3) button to make proceed to payment.
Scenario 2: Clicking the Pay (2) button.
When you click the pay button, you will be navigated to the Checkout Screen.
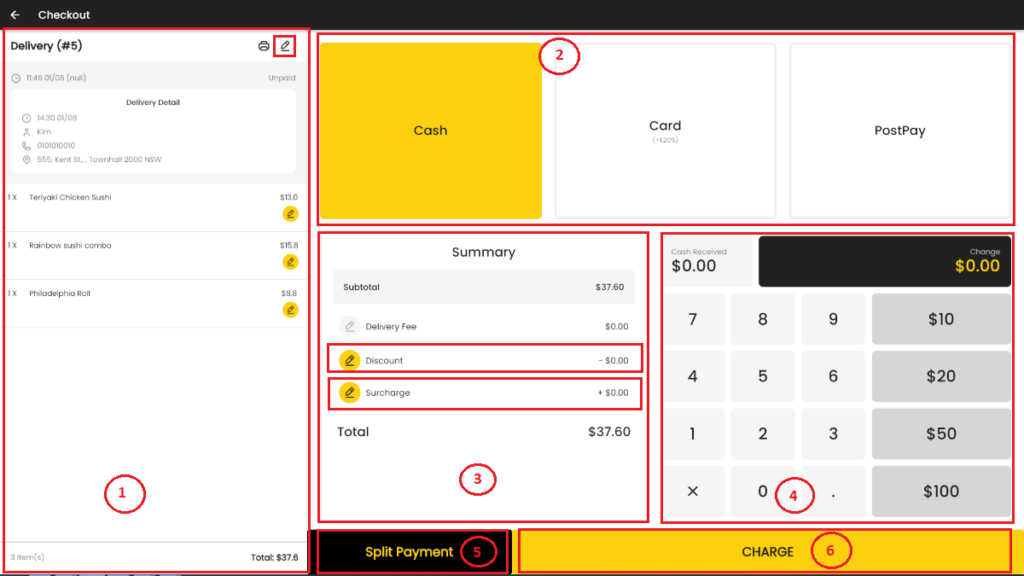
Checkout Screen Components: #
(1) Order Details #
(2) Payment Options #
(3) Summary #
(4) Number Pad #
(5) Split Payment Button #
(6) Charge Button #
(1) Order Details #
The order details consists of:
- Delivery details
- Name of customer
- Address
- Phone Number
- Delivery time
- Ordered items
Editing the order: #
- Tap on the pencil icon on the top right corner of the screen to edit the order.
- Tap on the pencil icon next to the items to edit the item.
(2) Payment Options #

In the payment options you get 3 options:
- Cash – If the customer wants to use cash for payment.
- Card- If customer wants to use debit or credit card for payment.
- PostPay- If the customer wants to pay via bank transfer.
(3) Summary #
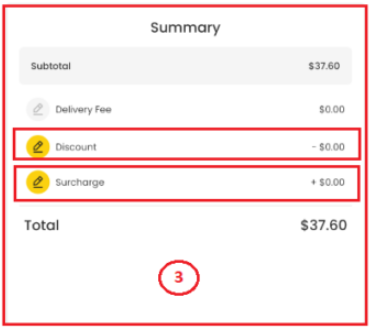
In the summary screen:
- Tap the “Discount” button to give discount.
- Tap the “Surcharge” button to add surcharge.
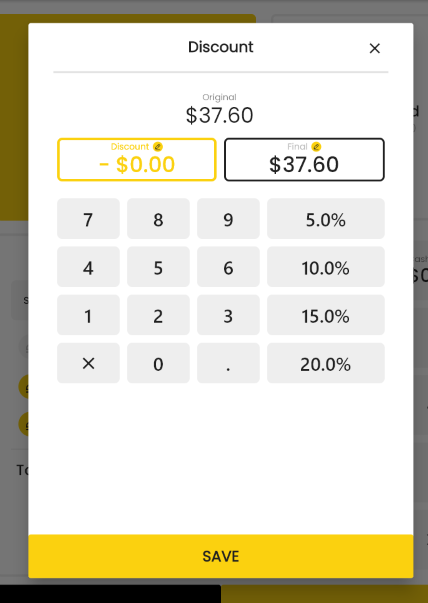
Scenario 1: Discount Screen. #
- Tap “Discount” button to go to Discount Screen.
- Enter discount amount or discount percentage.
- To add discount amount,
- Either select the box in the left hand side and enter the discount amount.
- Or select the box in the right hand side and enter the final amount you want to charge, the discount amount will be displayed in the left hand side box.
- Tap “Save” button to save the changes.
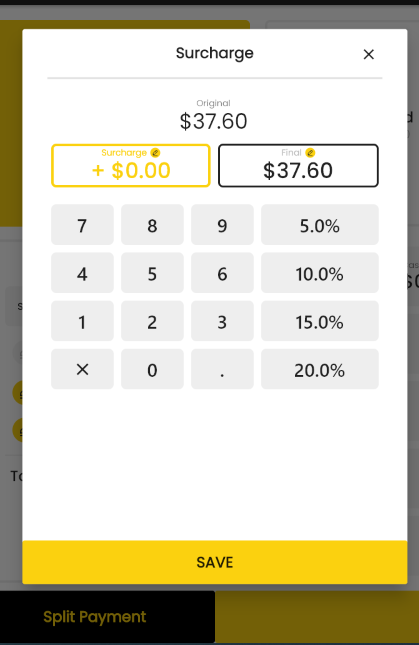
Scenario 2: Surcharge Screen. #
- Tap “Surcharge” button to go to Surcharge Screen.
- Enter surcharge amount or surcharge percentage.
- To add surcharge,
- Either select the box in the left hand side and enter the Surcharge amount.
- Or select the box in the right hand side and enter the final amount you want to charge, the surcharge amount will be displayed in the left hand side box.
- Tap “Save” button to save the changes.
(4) Number Pad #
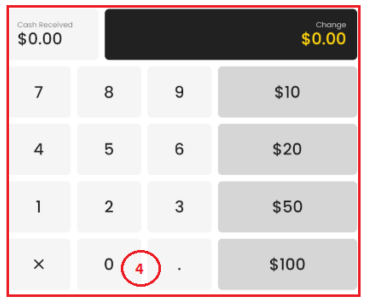
Number Pad (4) is useful for cash transactions,
- Tap “Cash” payment option.
- Enter the amount received in the number pad, it will calculate the amount and display the change to be given to the customer.
(5) Split Payment Button #
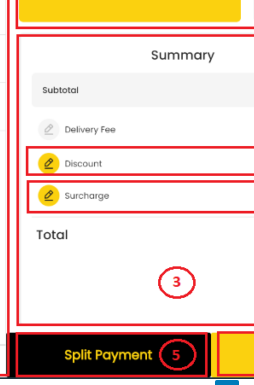
- Tap “Split Payment” (5) button if you want to perform a split payment.
- Tapping the split payment option will take you to the Split Payment screen.
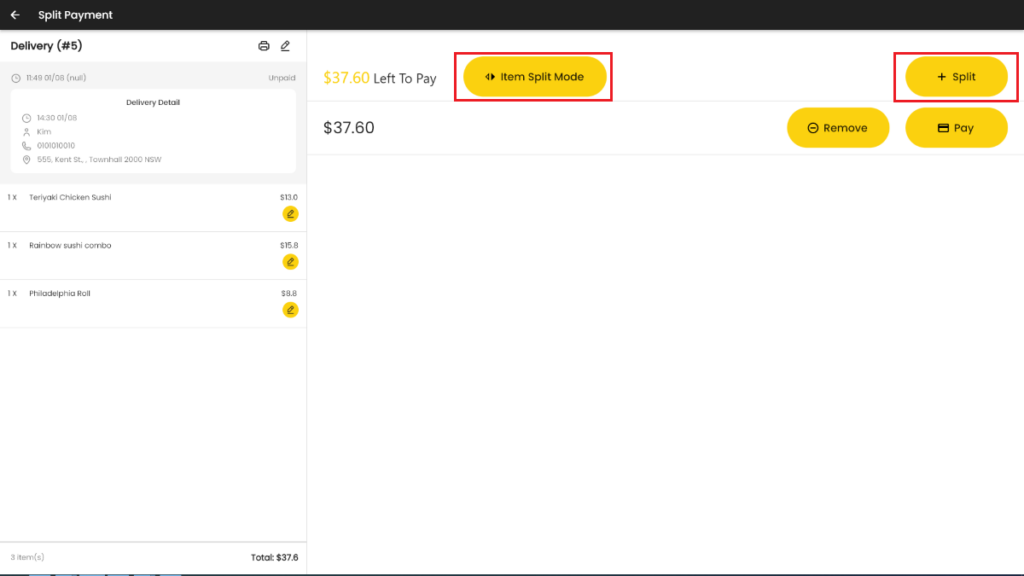
Split Payment Methods #
Item Split Mode – Tap “Item Split Mode” button to split the payment according to the individual items.
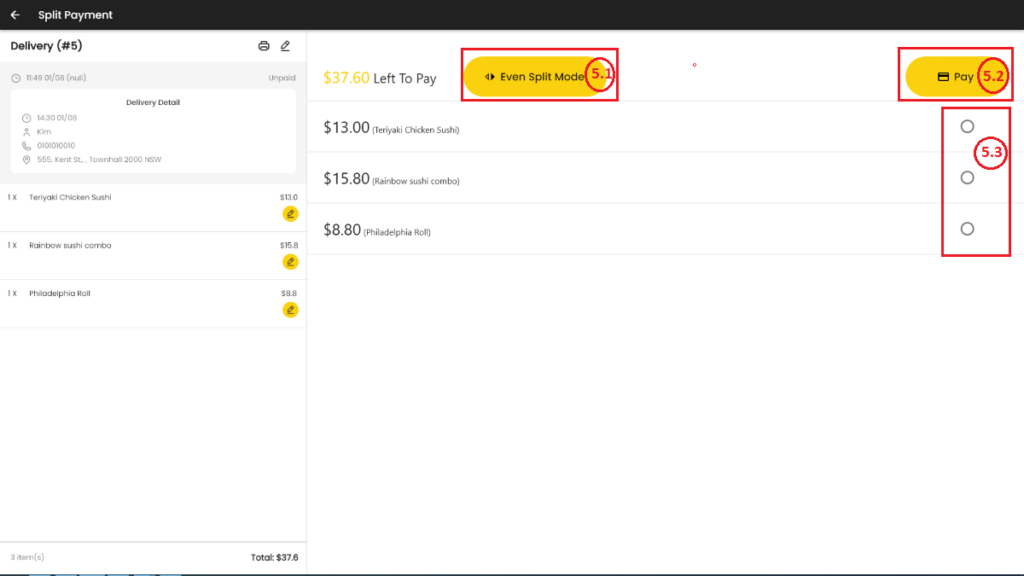
In this screen, the payment option is provided for each product.
- Tap on the radio button (5.3) to select the product(s).
- Tap the “Pay” (5.2) button to proceed with the payment.
- Tap “Even Split Mode” (5.1) button if you wish to go back to the previous screen (Screen (5)).
Equal Split – Tap “+ Split ” button on the Split Payment Screen (5), if you want to Split the amount equally.
You will get navigated to the screen below if you tap upon the “+Split” button.
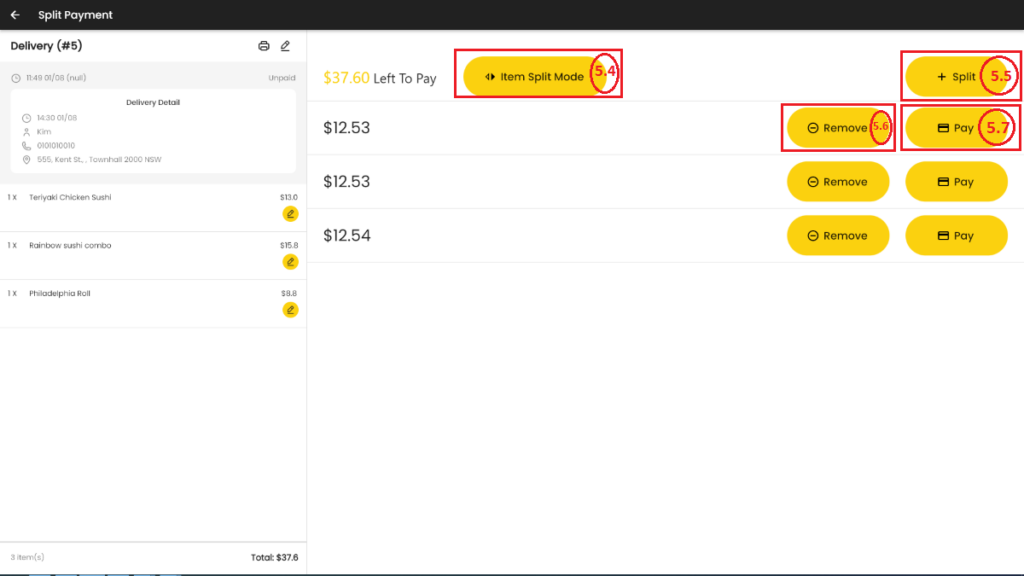
- In this Screen, tap on the “+Split” (5.5) button to increase the number of split payments.
- Tap the “Remove” (5.6) button to remove a split payment, or tap the “Pay” (5.7) button to proceed to payment screen.
- Tap “Item Split Mode” (5.4) button if you wish to go to item split mode screen.
(6) Charge Button #
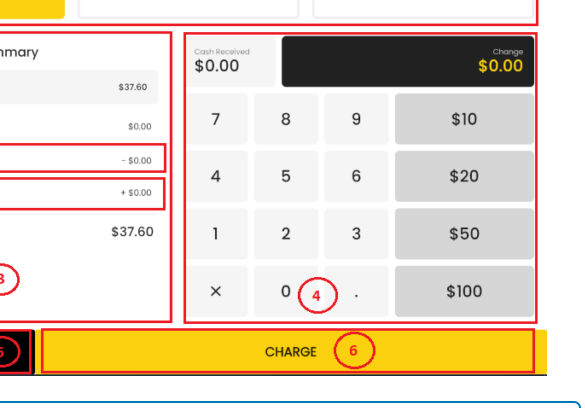
“Charge” button helps the operator to proceed with the payment process.
Scenario 1: If you choose “Cash” option, #
- Tap Cash option.
- Tap Charge button.
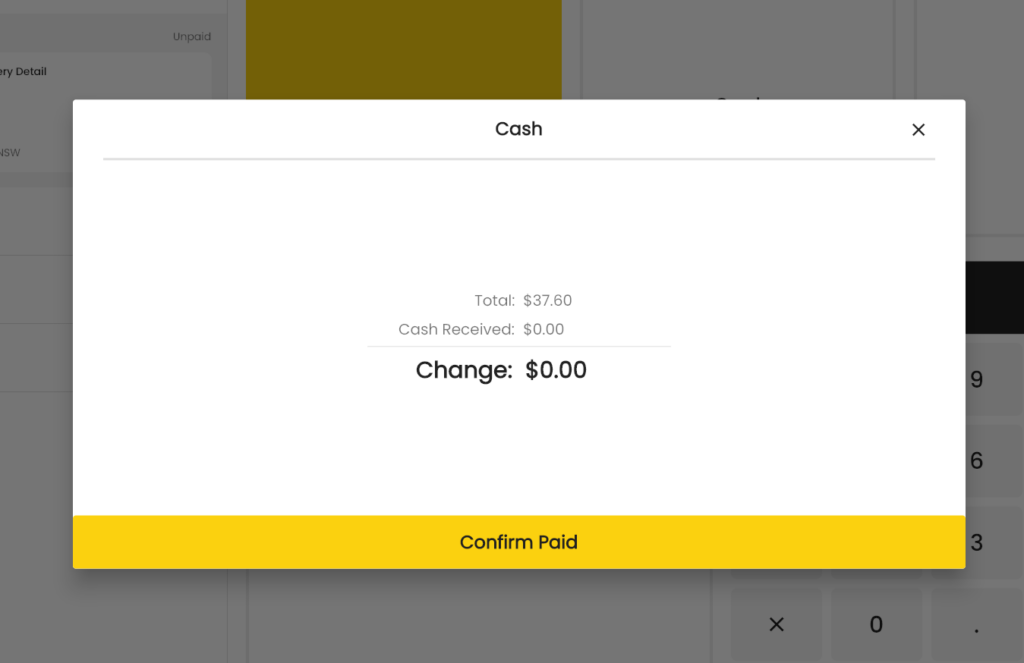
- You will be navigated to Cash payment Screen.
- Tap “Confirm Paid” button to complete the payment.
Scenario 2: If you choose ” Card” option #
- Tap “Card” option
- Payable amount will be displayed in the eftpos machine.
- Tap card to make the payment.
Scenario 3: If you choose “PostPay” option. #
- Tap “PostPay” option.
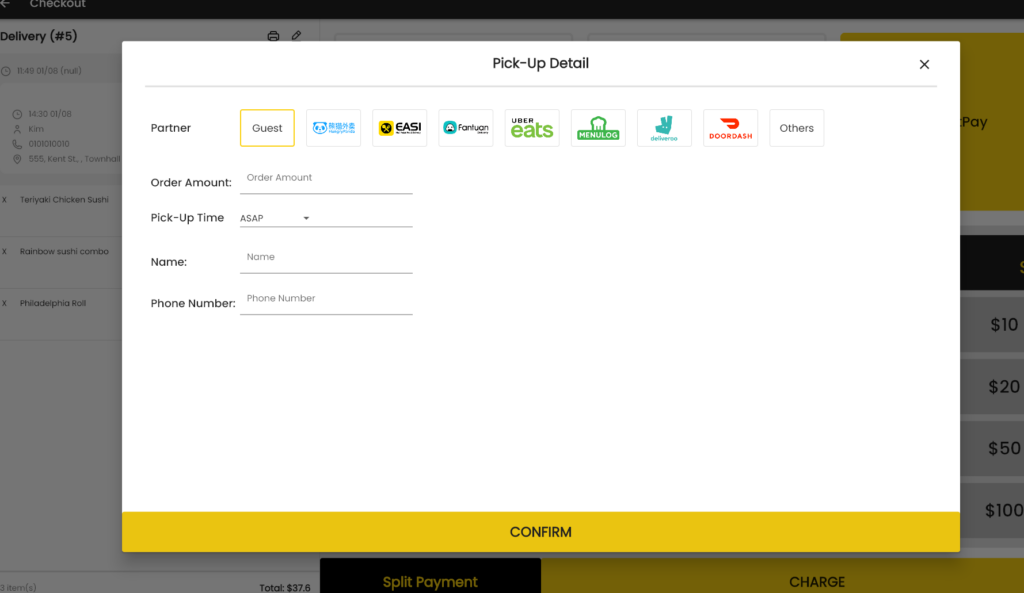
- You will be navigated to PostPay screen.
- Select partner, if the customer himself is going to deliver the order, select Guest, or else select the other options according to the requirement.
- Enter the final order amount after discount and surcharge from the previous screen in the Order Amount section.
- Check the pickup time name and number.
- Click “CONFIRM” button to confirm the payment.


