Initiate an order #
In the In-Store dashboard screen, you can view all tables that have been set up for your store, and any orders pending for each. From this screen, you can create an order for a specific table, or without selecting one.
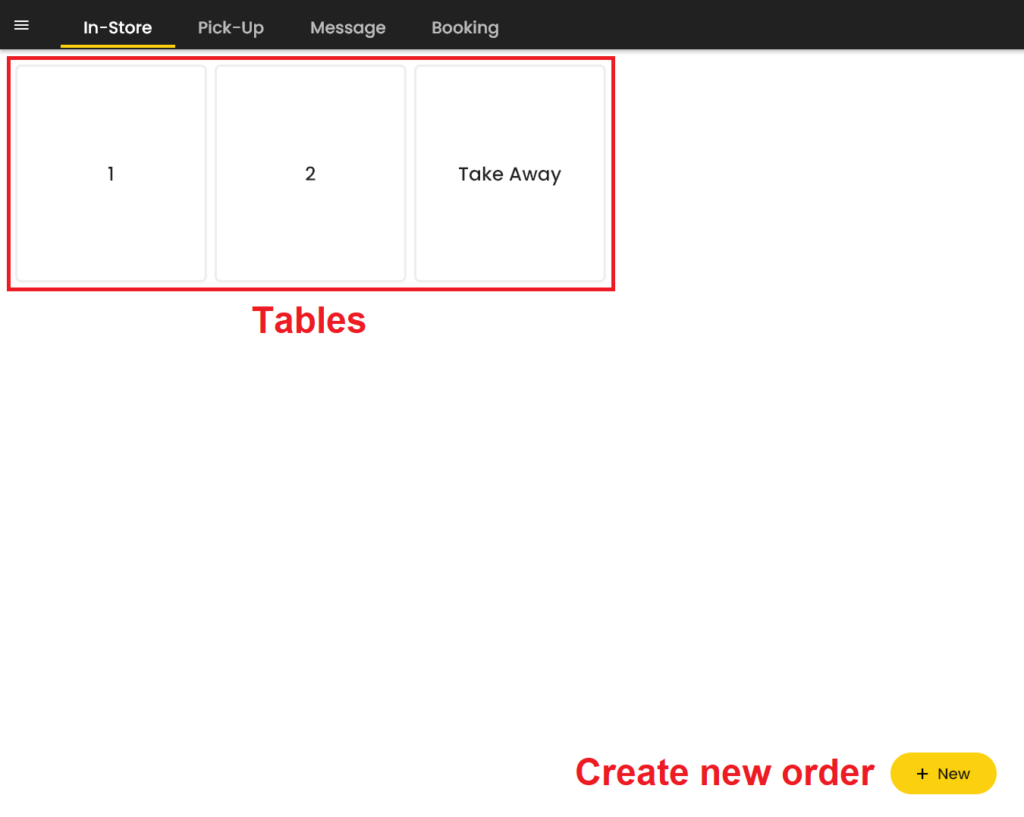
- Tables: Each card represents a table, room or other assigned area in the store. Blank tables have no pending orders, and if one has a pending order, it is grey and will list its order details.
- New: Creates an order that is not assigned to a table if one is not selected, or for the selected table. Making an order without a table is useful if your store does not assign customers to tables, or if the customer chooses not to order for a specific table.
Tap a table to select it. When a table is selected, a side panel listing the number of customers it can seat will appear on the right of the screen, and a separate ‘New Sale’ button will appear at the bottom of the panel.
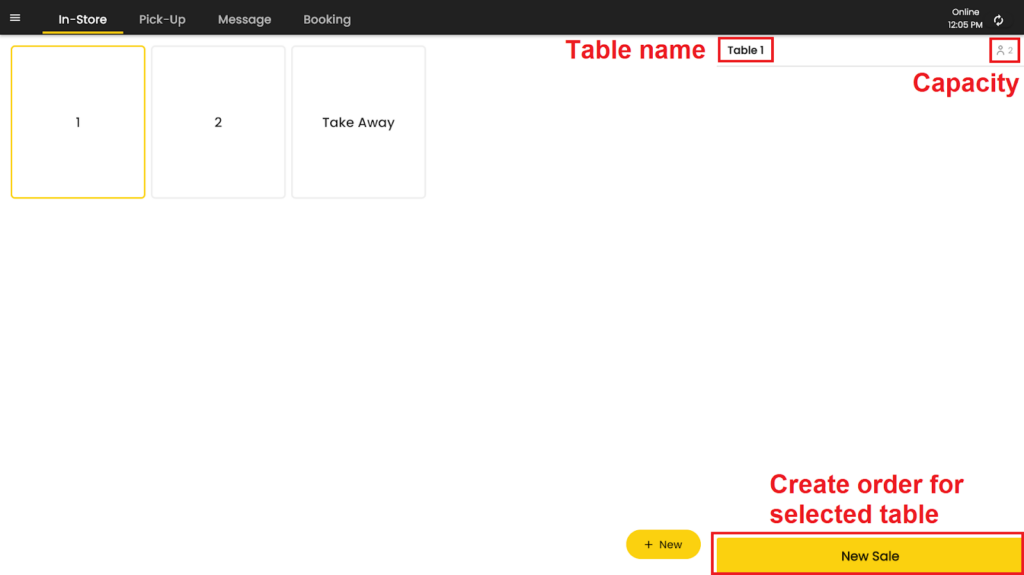
- Capacity: The maximum number of people per order the table can hold.
Tap ‘New Sale’ to make an order for the selected table.
In the New Sale screen, you can view store items, add, modify and delete items from the order, add a comment to the order, and change the order’s assigned table.
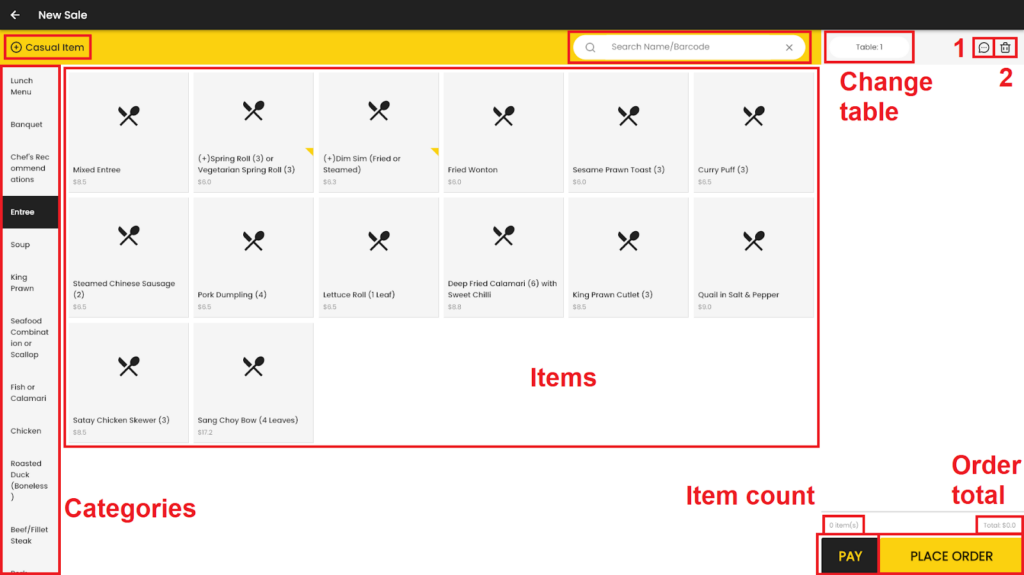
- Items and Categories: All items in the store are separated into categories, which are listed on the left of the screen. Some items with a plus ‘(+)’ beside their name have options that can be customised. Tap on an item to add it to the order.
- Search Name/Barcode: Search for an item by entering a partial or full name or barcode. Up to five results matching the search terms are shown.
- Order Note (1): Add a comment to the order describing any modifications the customer wants.
- Empty cart (2): Removes all items in the order. You will be asked for confirmation before doing so.
- Change table: Changes the table assigned to the order. If the order is not currently assigned to a table, once a table is selected, it cannot be removed from the order.
- Place Order: Saves the order and returns to the table screen, where the newly placed order will appear.
- Pay: Immediately accept payment for the order and directly go to the Checkout screen.
Some items may display a window asking you to customise their options when adding them to the order. By default, only items with required options will do so.
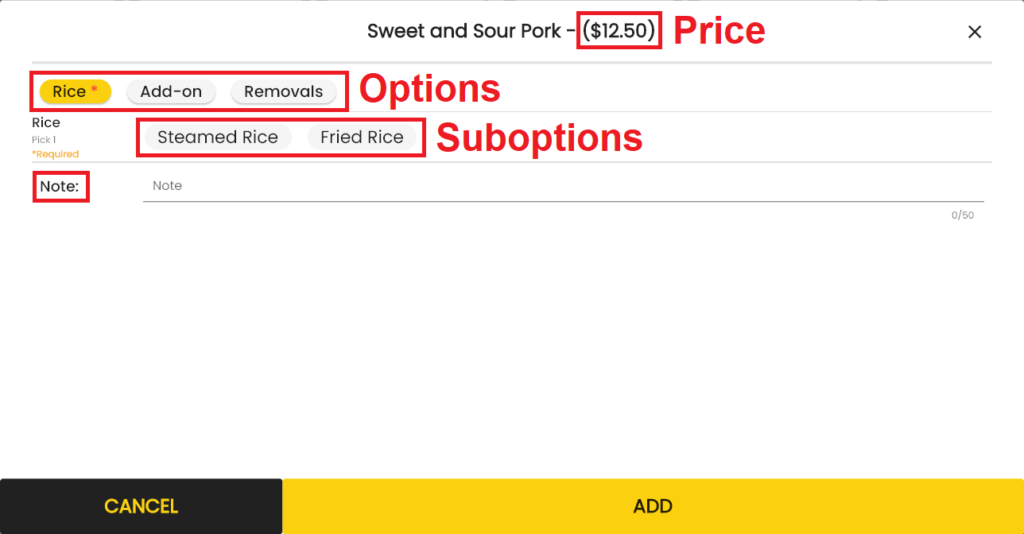
- Price: When first opened, this will show the item’s base price. Some suboptions will increase or decrease the price and will change the displayed price here as they are selected.
- Options: Tap one of the options to expand or hide their suboptions. By default, only required options (shown with an asterisk ‘*’) are expanded when the options window is first opened.
- Suboptions: Expanded options will display their suboptions in their own sections below the options section. Some options will allow you to select one, some, all or no suboptions, or more than one of a particular suboption. If an option is required, you must select at least one of its suboptions.
- Note: Enter a comment for further requirements or customisations the customer wants for the item.
Once an item is added to the order, it will appear in the right pane, or cart. You can modify the item’s customisations, add a note to it, or remove the item from the cart.
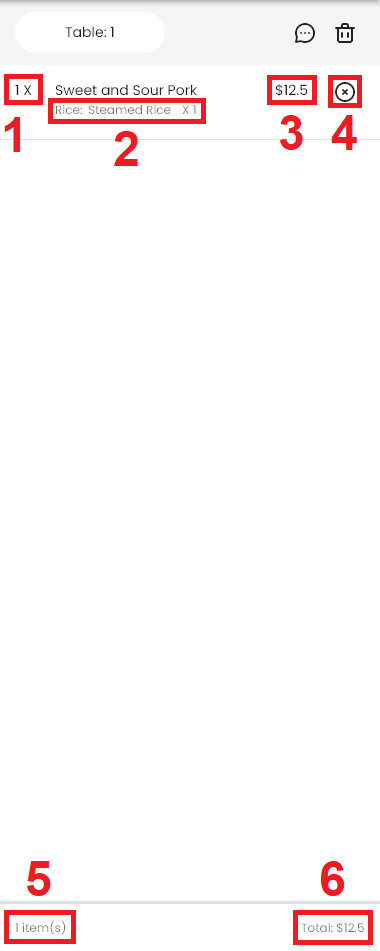
- Quantity (1): The quantity of a particular item with certain customisations. If more than one of the same item is in the cart but with different customisations, by default, they will be listed separately by customisation (for example, if there were 4 Sweet and Sour Pork items in the cart, 2 with the Rice option set to Steamed Rice and the other 2 set to Fried Rice, they would appear as “2 X Sweet and Sour Pork / Rice: Steamed Rice X 1” and “2 X Sweet and Sour Pork / Rice: Fried Rice X 1”).
- Customisations (2): Displays any customisations that have been made to the item. Only multiple copies of an item with exactly the same customisations will be combined in the cart by default.
- Price (3): The total price of all quantities of an item plus customisations.
- Remove item (4): Remove the item from the cart. You will not be asked for confirmation while doing so.
- Item count (5): The count of all items in the cart. Multiple quantities of an item are counted as individual items in the item count.
- Order price (6): The total price of all items in the cart.
Tap on an item to modify it, which will open the options window again. If the item has no options to customise, it will instead have Quantity and Notes fields. If a note is added to the item, any customisations displayed for the item are replaced by the note but not removed.
Once you have placed the order, you are returned to the table screen, and the table you made the order for will turn grey and display the order number and order price. Tapping on a table with a pending order will show its order details in a panel appearing on the right of the screen.
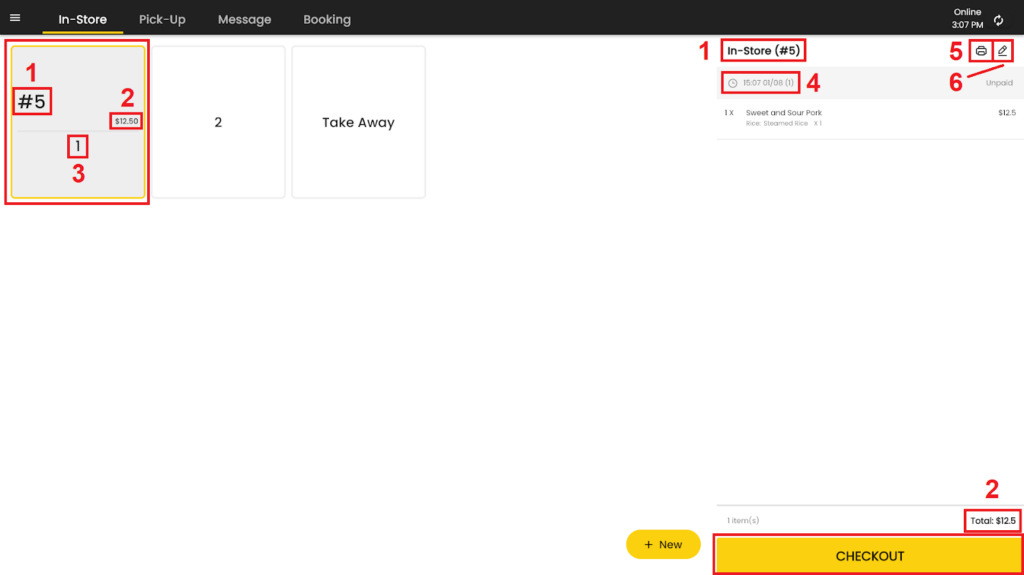
- Order number (1): When an order is placed, it is assigned an order number. By default, order numbers start from 0 at the start of the day (at 4:00 AM) and go up by one with each new order placed.
- Order price (2)
- Table name (3)
- Order time, date and table name (4): The time and date the order was placed. The table name is shown in brackets.
- Print order receipts (5): Print a receipt, invoice, order summary, label or EFTPOS receipt from either the machine’s internal printer or other connected printer.
- Edit order (6): Opens the Edit Order screen, which allows you to add, edit and remove items and notes from the order, and cancel the order.
- Checkout: Start accepting order payment from the customer.
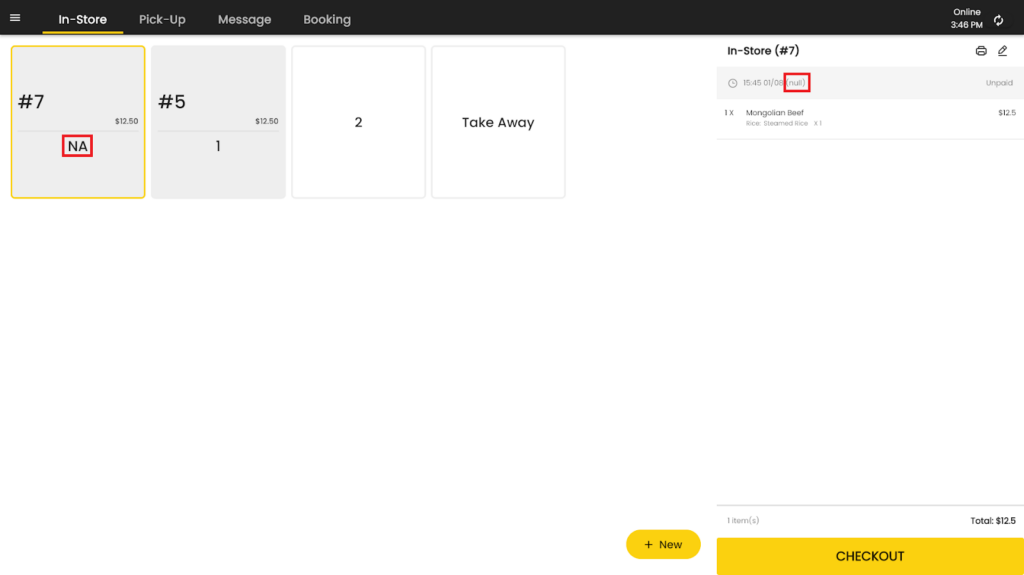
If no table was selected when placing the order, a new table card will appear to the left of the other table, with ‘NA’ as the table name. Selecting this card will show the table name as ‘null’ in the right pane next to the order time and date.
Tap on the pencil icon of an order to edit it, taking you to the Edit Order screen. It is similar to the New Order screen, but displays the order number and order time and date, with the Pay and Place Order buttons replaced by the Update button, and the Empty Cart icon replaced with the Cancel Order icon.
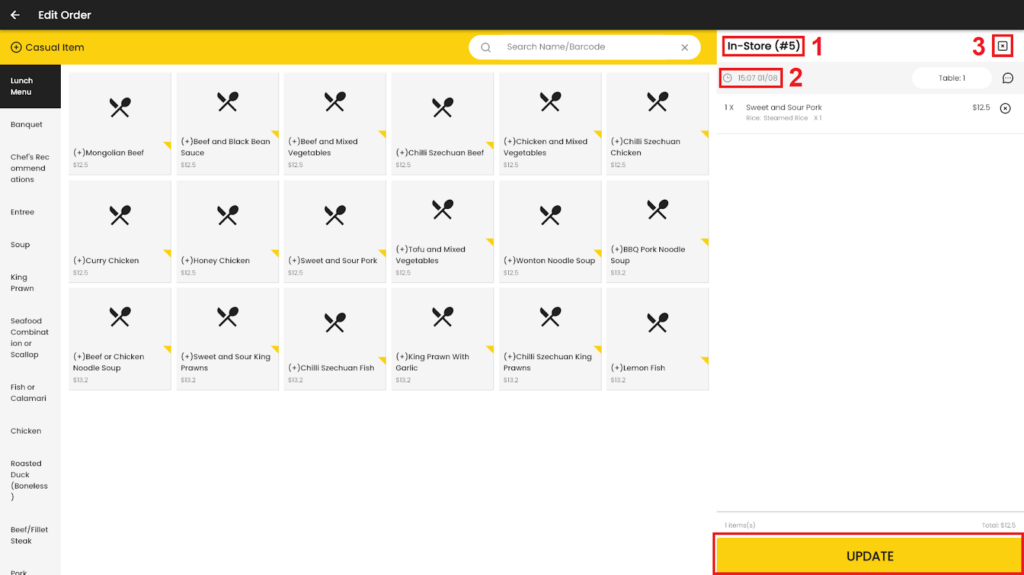
- Order method and number (1)
- Order time and date (2)
- Cancel order (3): Discards all items in the order, removes the order from the table and returns to the tables screen. The order will be moved to the History screen where its status will appear as Cancelled.
Tapping on the printer icon will open the Select Print Type window.
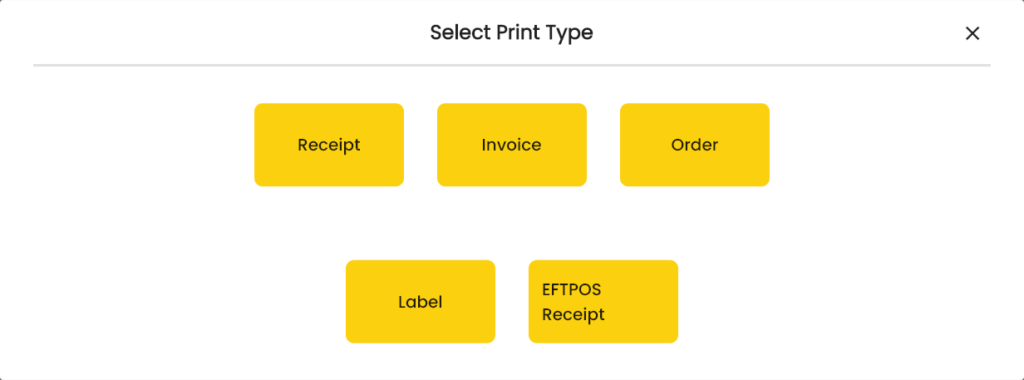
- Receipt: Prints the list of items in the order, their prices, the total cost of the order, payment method and amount received.
- Invoice: Prints a receipt with the total cost shown with and without GST, as well as the GST amount.
- Order: Prints a list of the items in the order without prices.
- Label: Prints label stickers for each item in the order, which can be attached to their packaging. A label printer is required.
- Qrcode:
- EFTPOS Receipt: Prints the EFTPOS receipt from the current POS machine that would normally be printed from the card payment terminal if the order was paid by credit or debit card.


