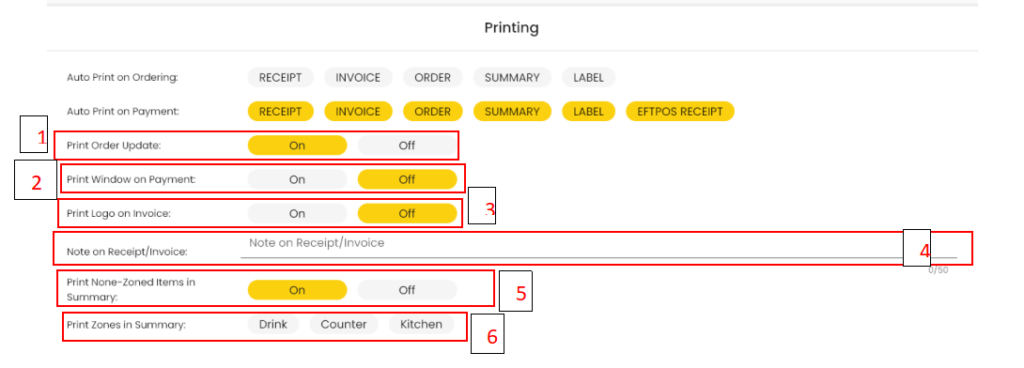
This section allows us to modify the printing settings for the system according to our needs.
Scenario-1: Connecting the printer.
From the side bar, we select the ‘printing’ option.

After that we need to add the printer into the system.

Then we search for the printer (1) and select the printer (2).

Scenario 2- Choosing printing settings to control the connected printer.
You can choose the different print types according to the requirement.

There are different print types in the printer section. We can choose the type of print according to the requirement.
Receipt: This option prints out the receipt.
Invoice: This option prints out the tax invoice of the order.
Summary: This option prints out the order summary.
EFTPOS receipt: If the Eftpos is paired with the POS machine, then this option prints from the POS printer
Daily Report: This prints out the daily report.
Order: This prints out the list of items in an order.
Also, you can select Print mode (Receipt/ Label) from the option.

Also, you can select the language option (Primary/Translation).

If we select the primary language, it will display the first name of the product.

If we select the translation option, it will print the show first translation of the product.

Print settings on when and which print type to choose:
After we set the printer settings, we choose when and which print will be printed.
Scenario 1: Auto print on ordering
Any of the selected print types will be printed automatically once the order has been placed.
Note: Make sure print type in assigned printer is selected too.

Scenario 2: Auto print on payment
Any of the selected print types will be printed automatically once the payment has been made.

The printouts are shown below:
Receipt

Invoice

Order

Summary

Label

Eftpos receipt

Different Print options in printing section:

- Print order update: when this is turned “on” , it provides the print out for “add” , “delete” and any other update of the order from the assigned print zone.
Add Item

Delete item

2.Print window on payment: When this option is turned “on” ,m the window will be displayed as:

From this window, we can choose to print any of the options displayed.
3.Print logo on invoice: This option prints company logo on printouts.

4.Note on Receipt/Invoice: **Note not printed**
5.Print None-zoned items in summary:


6.Print zones in summary:


