1-1. Credit card machine settings: Please refer to the card pairing instructions (Attach link).
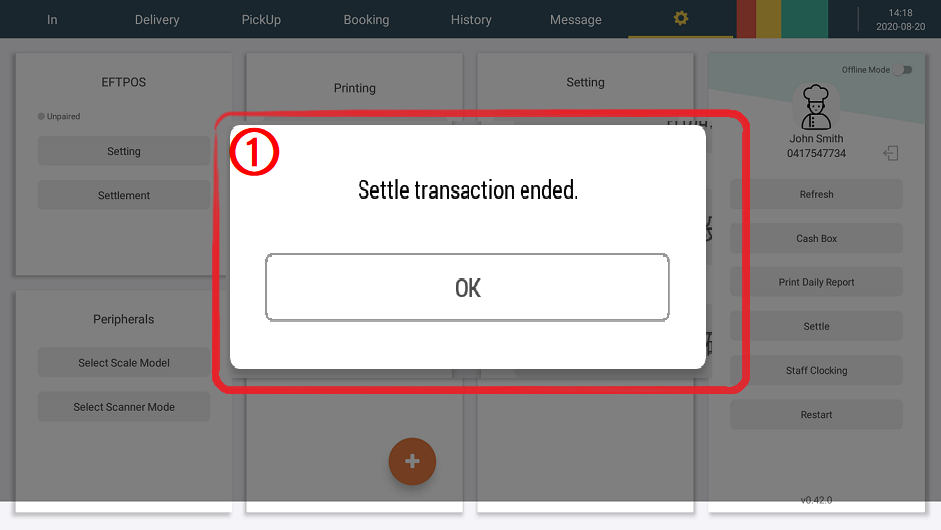
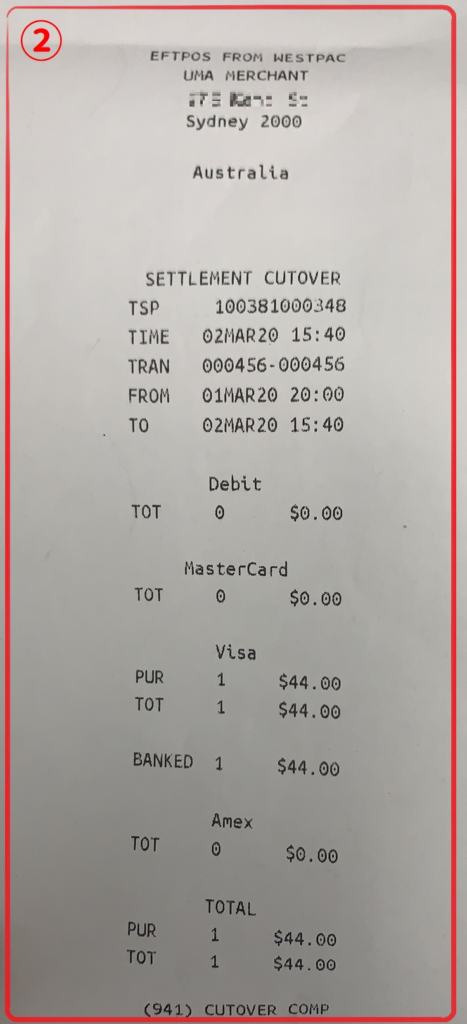
1-2. Credit card settlement: Print credit card machine settlement receipt.
Click to settle, The screen will pop up the notification window to display as ”Settle transaction ended” as ① The POS machine will automatically print the statement, Summarize the credit card turnover on the day (as ②).
2-1. Select electronic scale model: Used to match electronic scales for current-priced commodities or weigh the amount of commodities.
Click to select the model and select the corresponding type of electronic scale and click submit (As shown by the red arrow) To complete the pairing of the electronic scale.

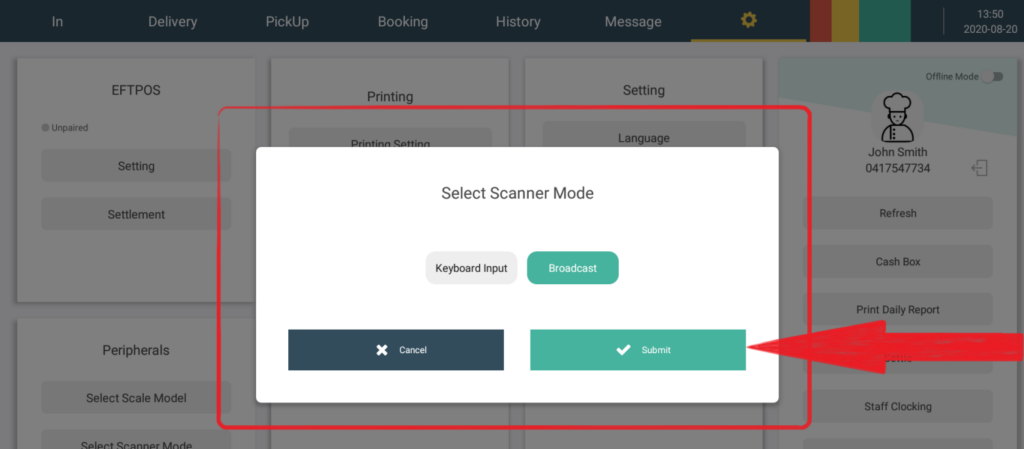
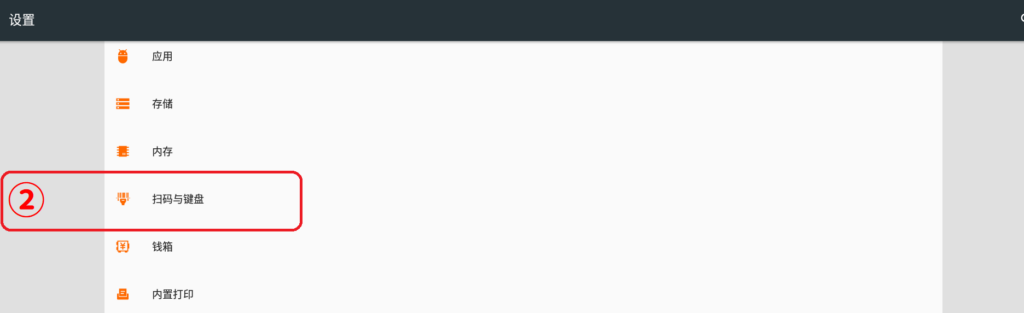
2-2. Select external scan code mode: Used to connect an external scan code or analog keyboard device.
(1) Analog keyboard input
If the pos system needs to be connected to an analog keyboard, System broadcast, And turn on analog keyboard input.
(2) System broadcast
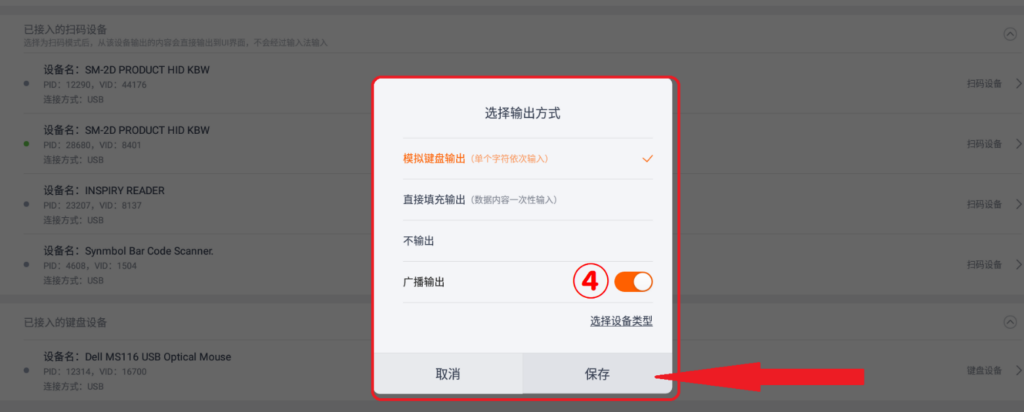
Click system broadcast, the background color will be green as ①,Click submit (As shown by the red arrow), On behalf of the system broadcast, represents that the pos system can currently receive scan code devices.
(3) Confirm whether the system broadcast of the scanning device is turned on
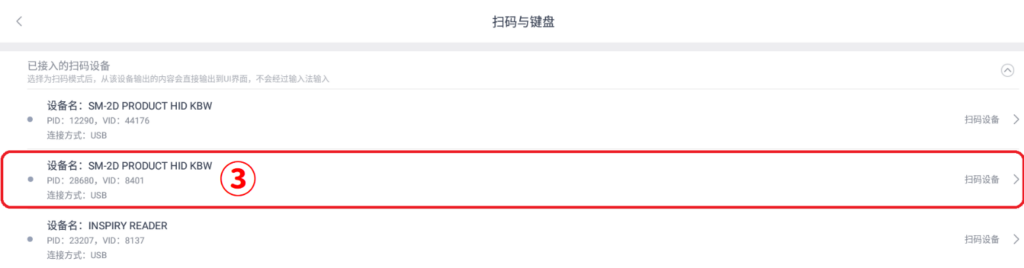
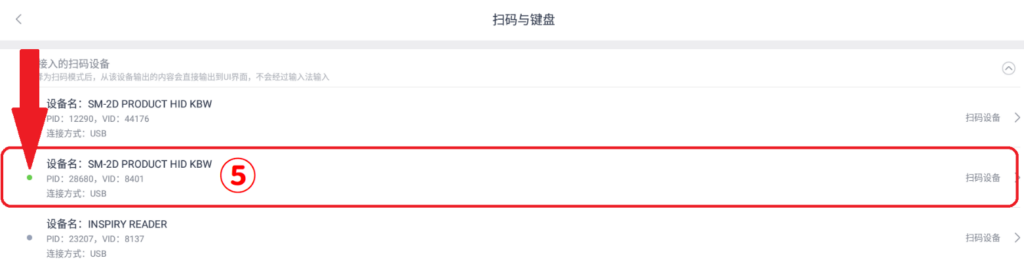
Exit the screen and go to the system settings interface, click Scan Code and Keyboard (as ②) Can view all previously connected code scanning devices and keyboard devices, If there is no connection at this stage, a gray light will appear (as ③), The linker will show a green light (as shown by the red arrow⑤), Select the device to be connected to open the broadcast output as (④) Click save (as shown by the red arrow ④), It can transmit messages with pos system.
3. Printer settings: Used to set the details of receipt printing
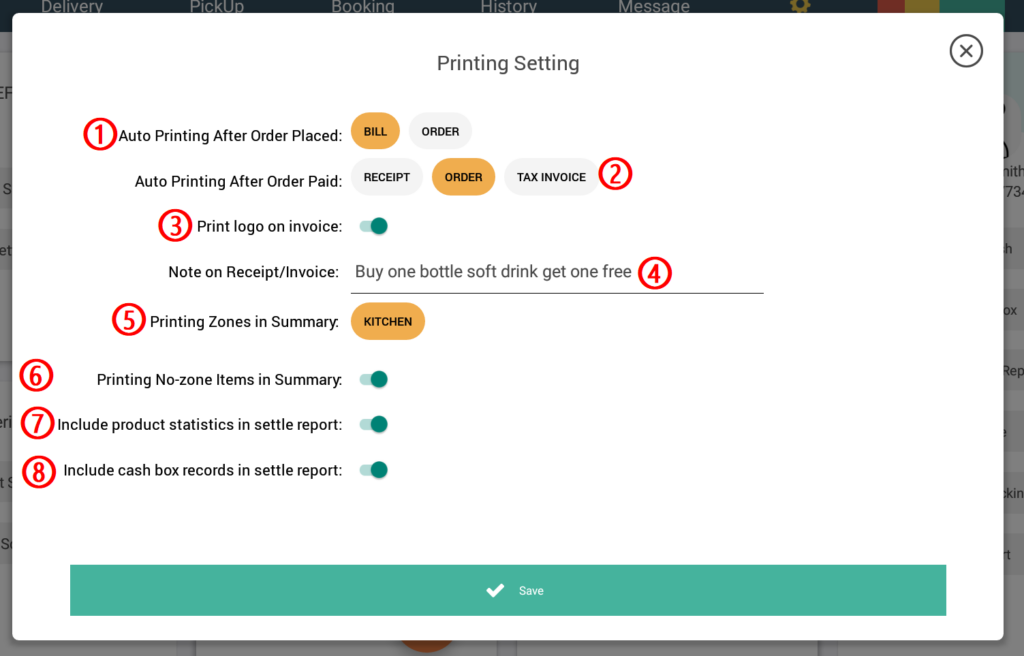
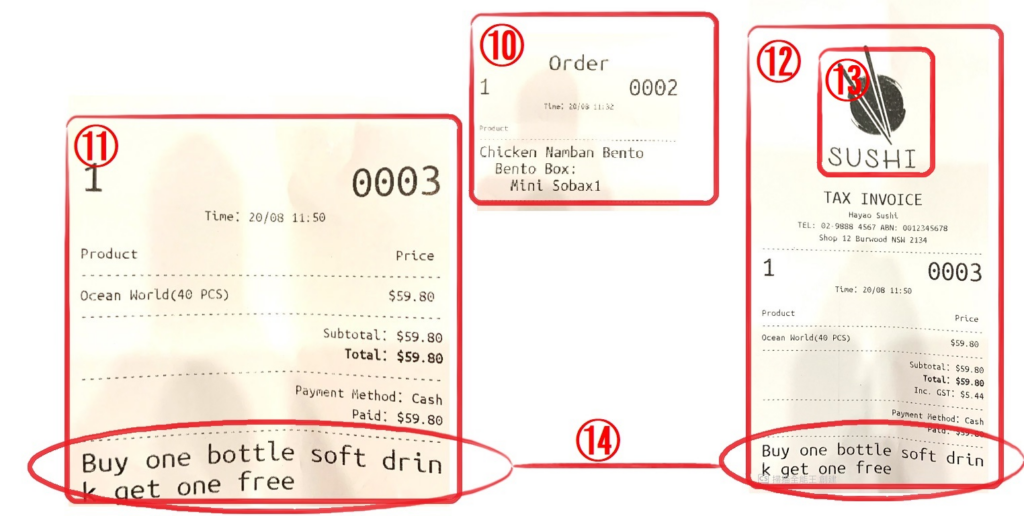
(1)Click on ① for the bills and order、the bills and order ticket will be printed when the order is placed.
(2) At ② section choose Receipt (⑪)、Order (⑩) and Tax Invoice (⑫) means it will printed out when the order is made.
(3) Turn on Logo (③), and the Logo will appeared on the Tax Invoice (⑬).
(4) Enter information at Note on Receipt/Invoice (④), the information will appeared both on Tax Invoice and Receipt (⑭).
(5) In ⑤, you can set the area included in the printed receipt when printing the kitchen summary sheet, If not selected, Dishes in this area will not be displayed when printing the summary sheet.
(6) Turn on ⑥, When printing the kitchen summary sheet, the dishes in the unallocated printing area will be printed together, Enabling this setting can prevent users from missing the setting of the dish printing area.
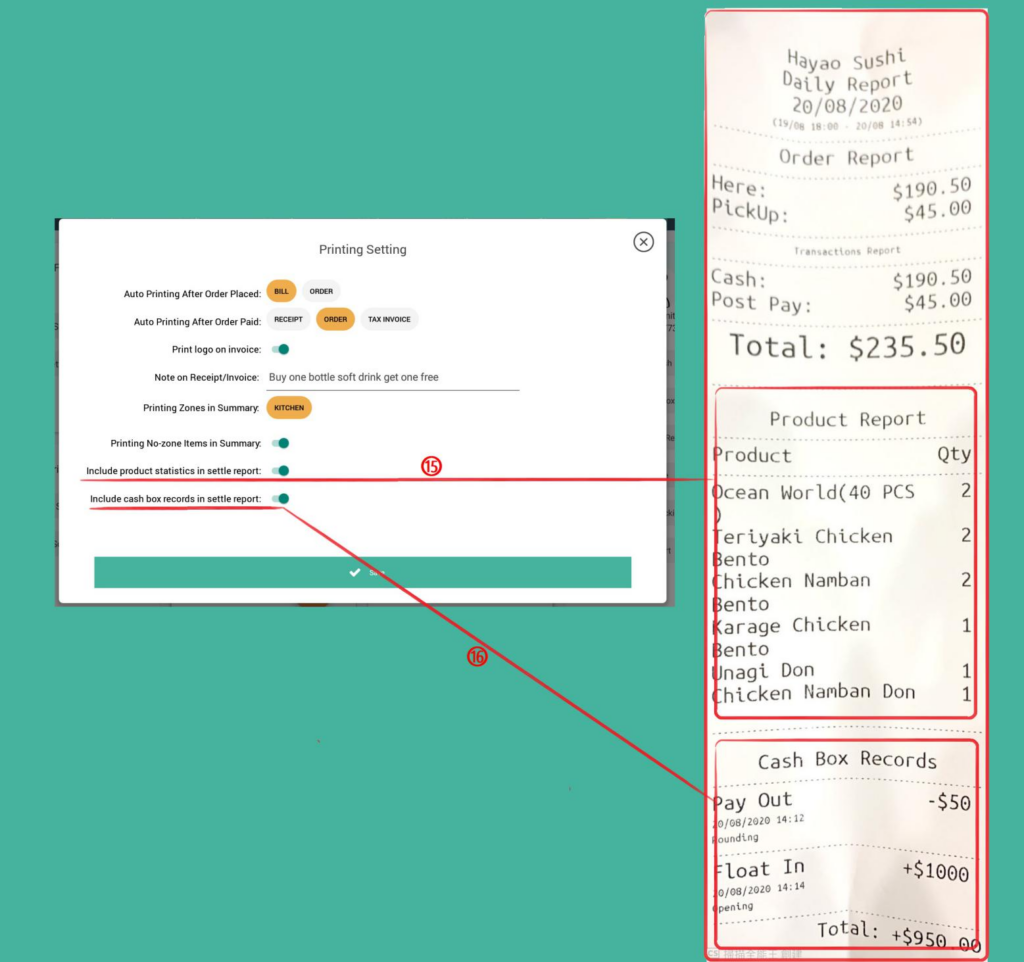
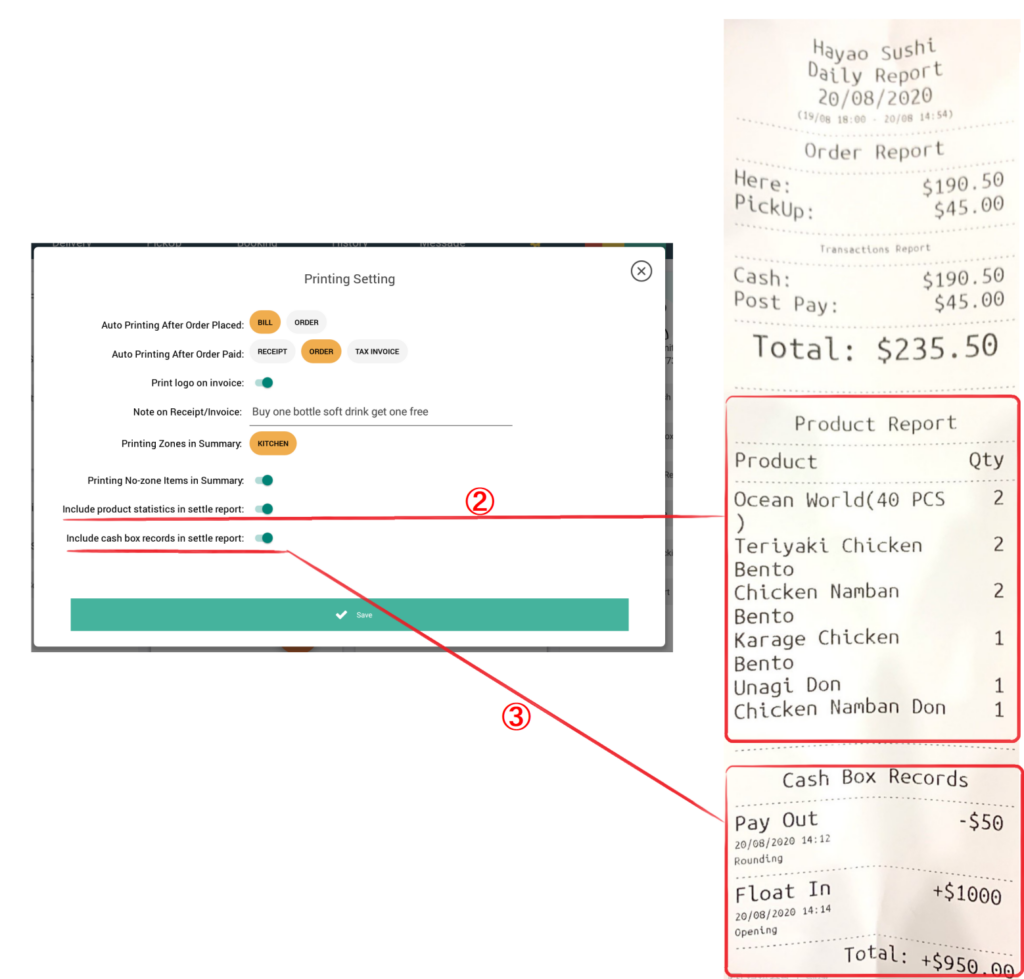
(7) Turn on ⑦ Commodity statistics will be displayed in the daily report (As in the comparison chart (⑮).
(8) Turn on ⑧ Cash box records will be included in the daily report (As in the comparison chart ⑯).
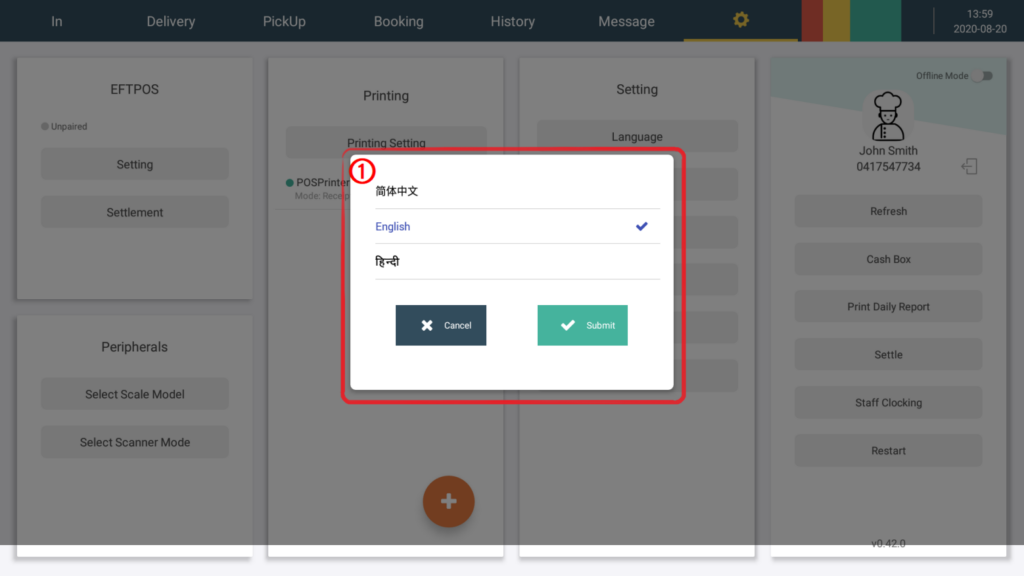
4-1. Language selection : To choose the language, currently the system supports simplified Chinese, English and Thai, Click the language you want to use(as①), then click Submit to complete the language setting.
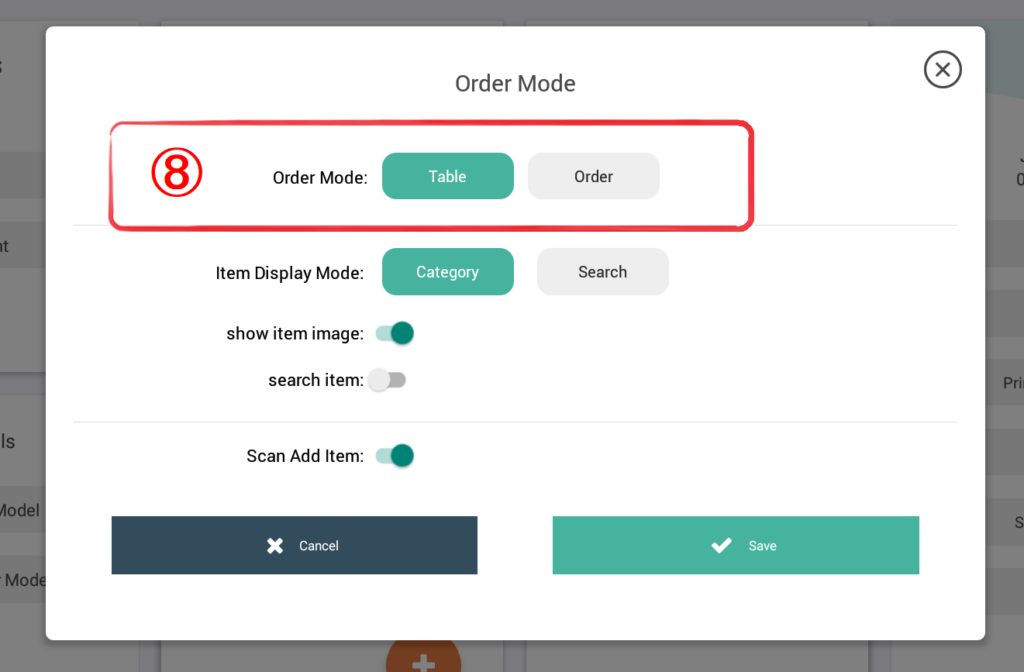
4-2. Order mode :Set order mode, product display and other details.
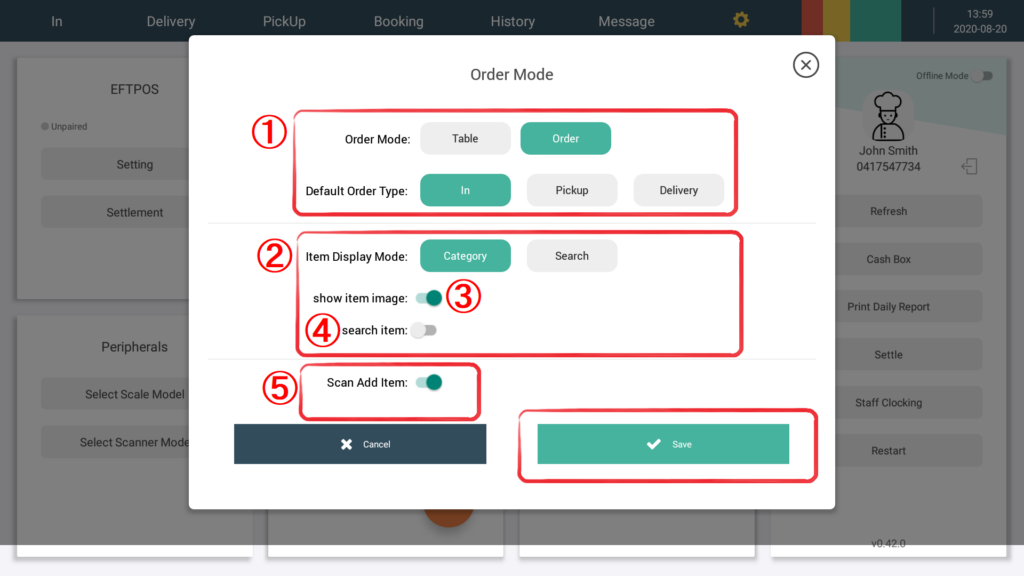
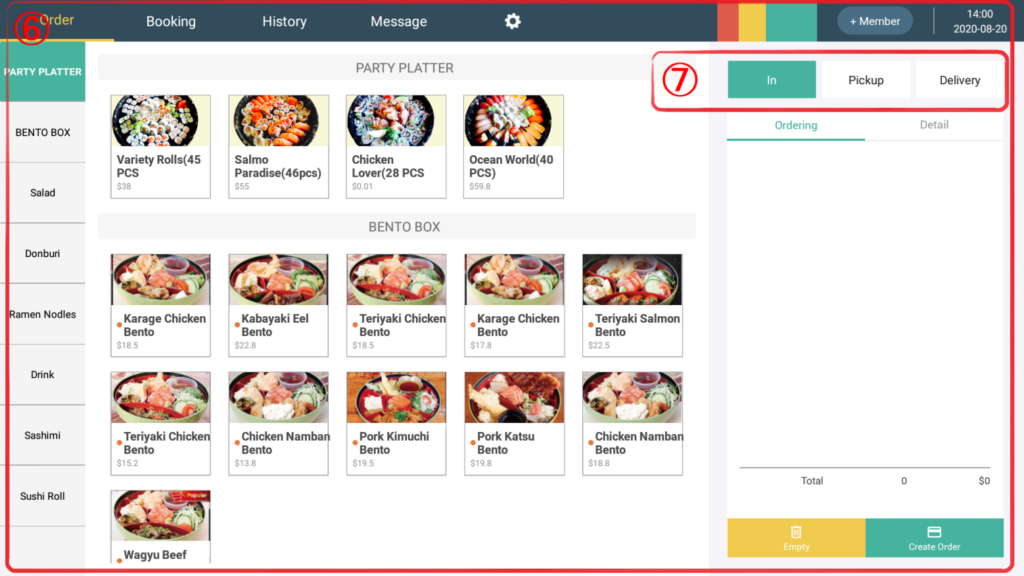
- In ① optional order mode, To choose the order mode, you need to choose to set the default order type to dine-in, Pick up or deliver, the order mode order interface displays as ⑥, the order type will be adjusted to the upper right (⑦).
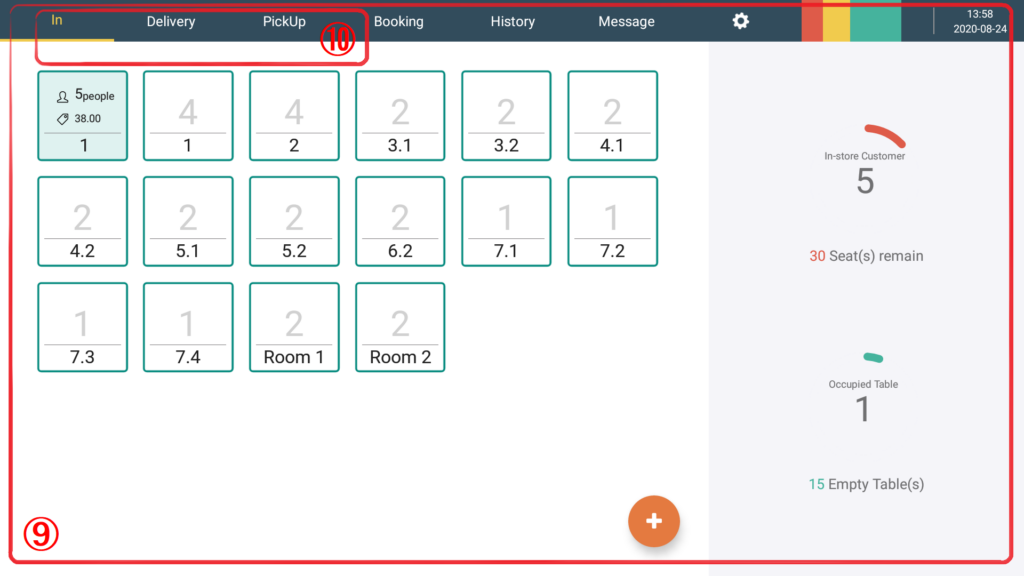
- Select table mode, The default order type will be automatically hidden (as ⑧), The ordering interface will be adjusted according to the table position (as ⑨), The order type will be adjusted independently to the upper left (as ⑩)
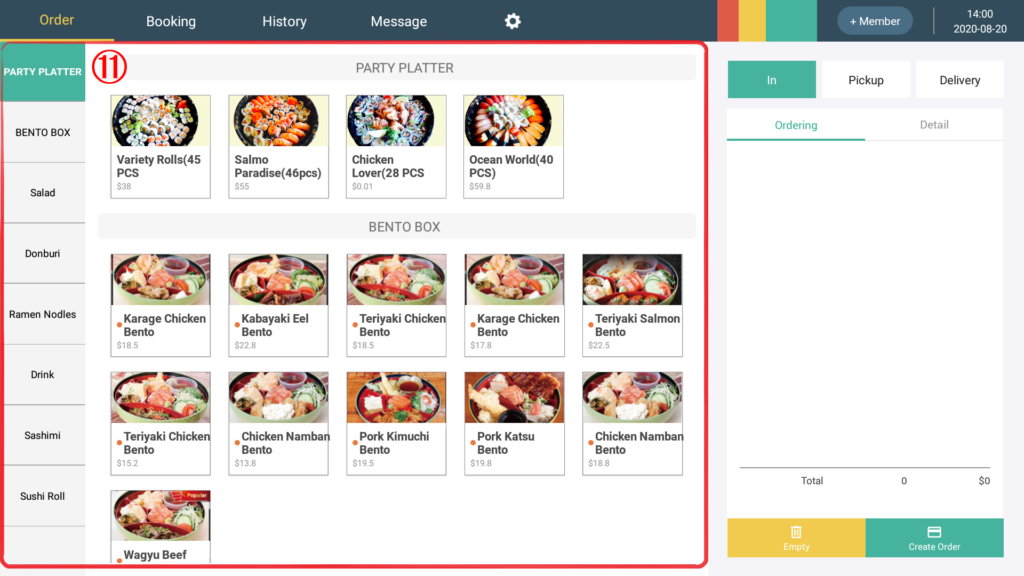
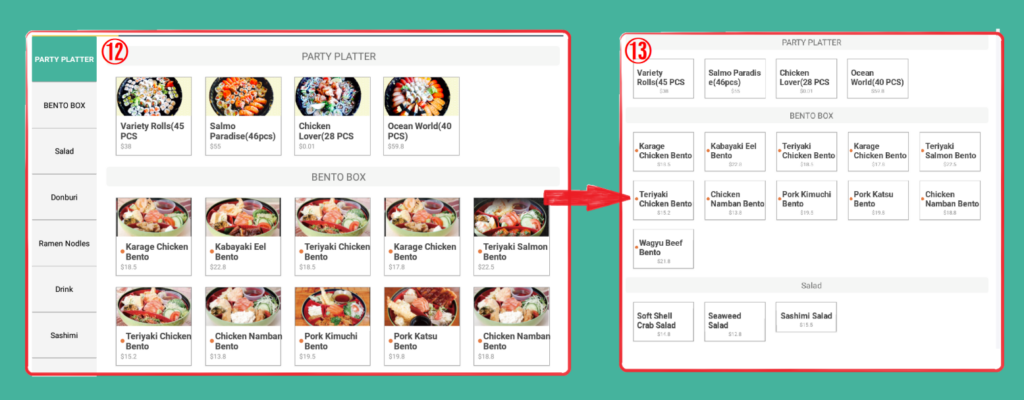
(3) In ②, choose to turn on the category display, which means that the products on the ordering interface will be displayed in order of category. The left is the product category name, and the right is the product name (as ⑪)
(4) Turn on display product images (③) the product will be displayed simultaneously with pictures and text (如 ⑫), If closed, only display text (as ⑬).
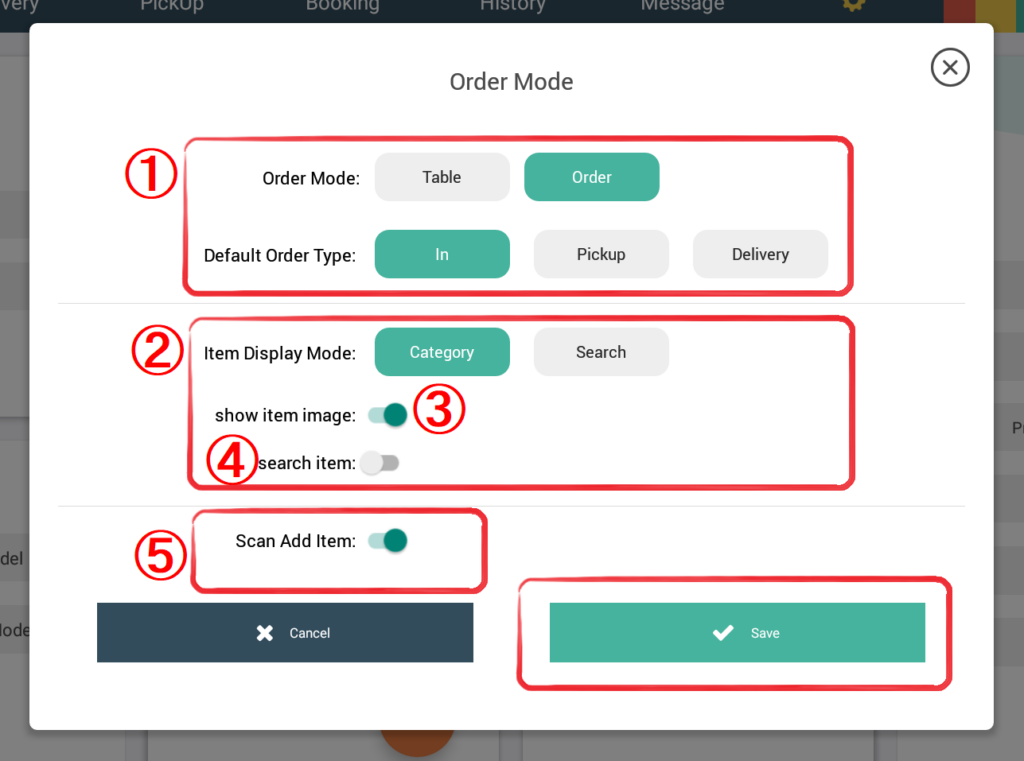
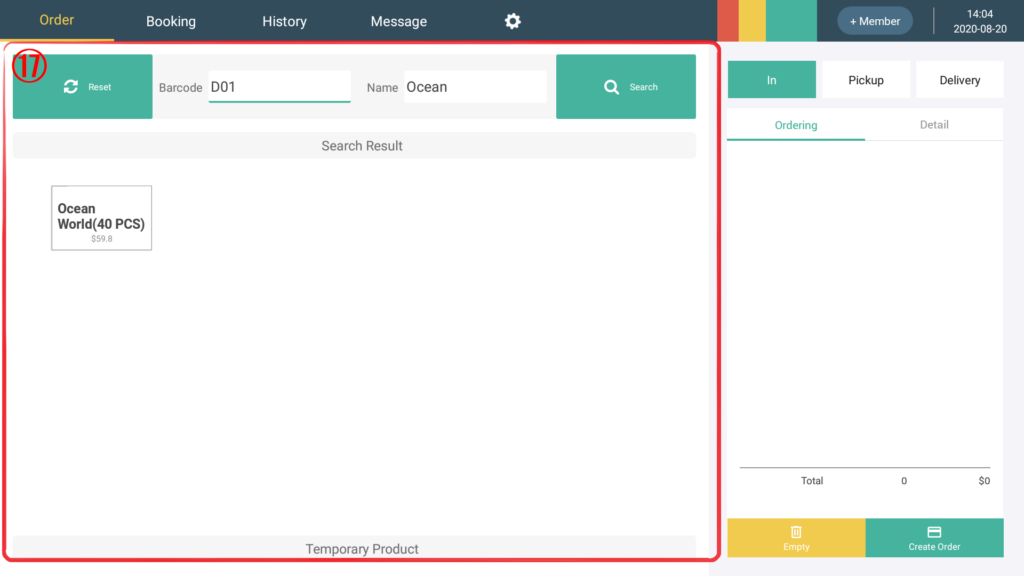
(5) Open search product (④), A new search box will be added to the order page (⑭), The waiter can search the product barcode (⑯)or product name (⑮)to having a order.
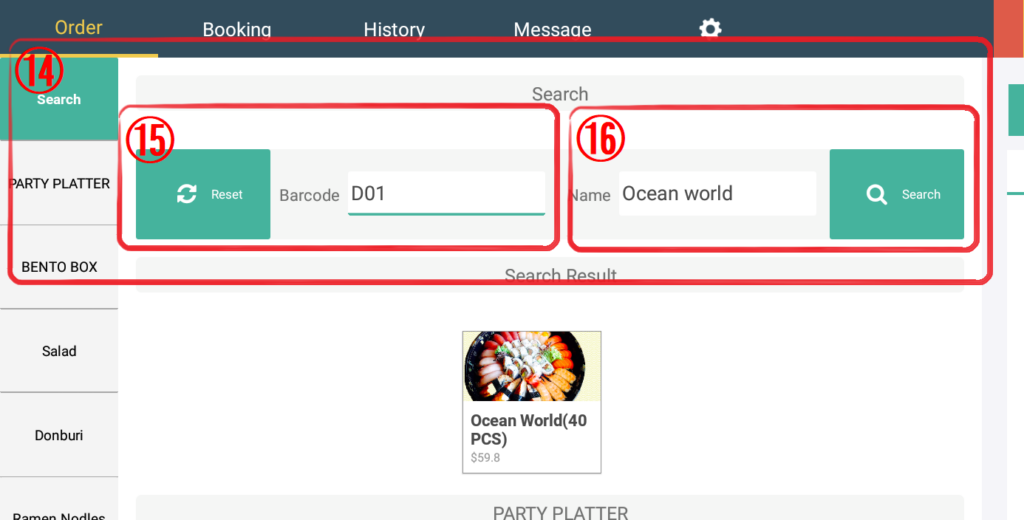
- Select to open the search display in ②, Display product pictures and search product functions will be hidden, products will not be displayed in search display mode(Except for current-priced items), Users can only enter products by searching for product names and barcodes (⑰).
(7) Scan code to add items (⑤), will allow barcode scanners to match product barcodes (⑱)to having a order (Mostly suitable for retail).

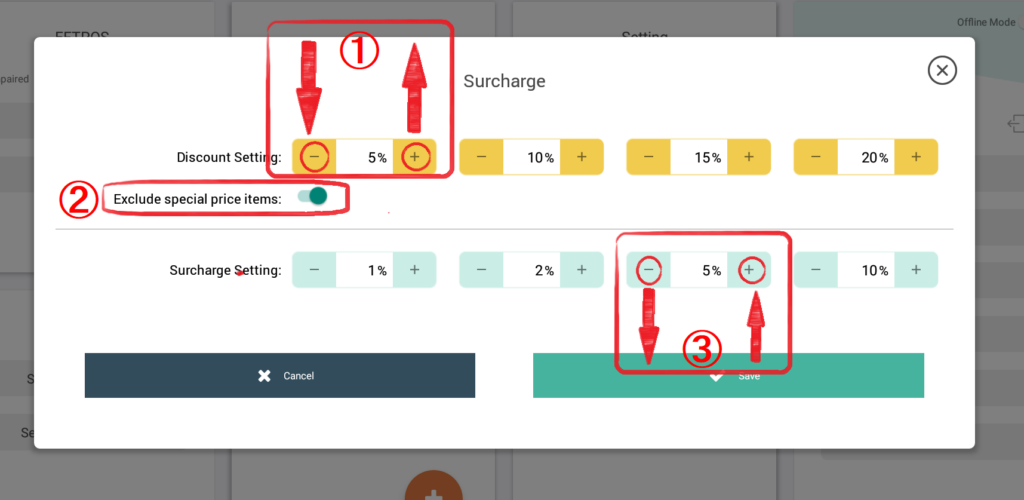
4-3. Additional fee :Set the ratio of discount to surcharge
(1) The discount rate can be adjusted by clicking the decreasing and increasing buttons next to the discount rate setting (as ①), open does not include specials (as ②), discount rate will not apply to special products
(2) The surcharge rate can be adjusted by clicking the decreasing and increasing buttons next to the surcharge rate setting (as ③).
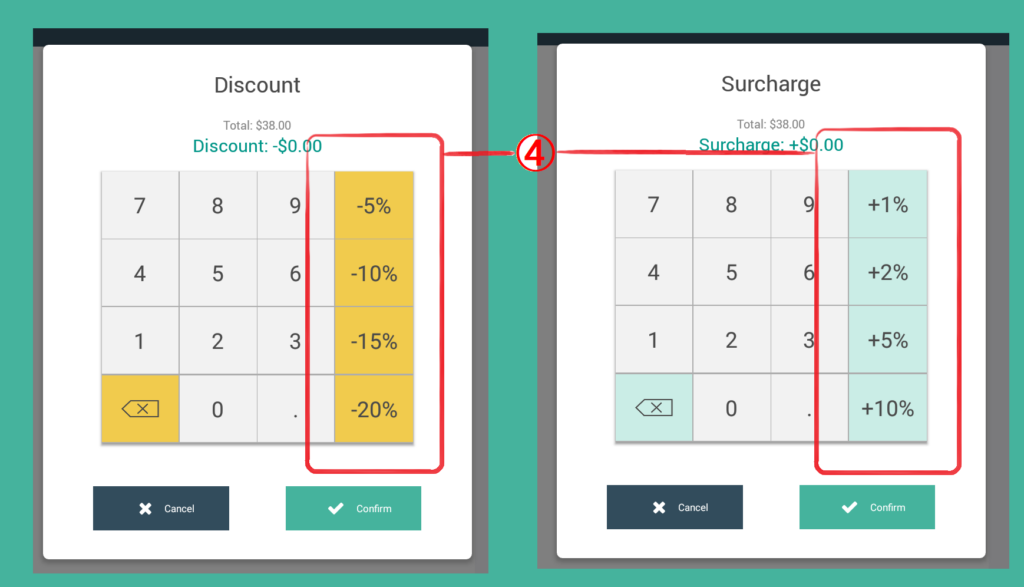
(3) The set discount and surcharge rate shortcut keys will be displayed on the computer at the checkout (as ④).
4-4. Advanced settings:Users can make advanced system settings
(1) Order mode: In ① select automatic order, Means that when consumers place a remote order, the system will automatically confirm the order. If you choose to confirm manually, When consumers order a meal remotely, they will be displayed in the message box (⑩). A pop-up message asks the operator whether to confirm the order (⑪),The order will not be placed until the operator clicks to confirm (⑫).
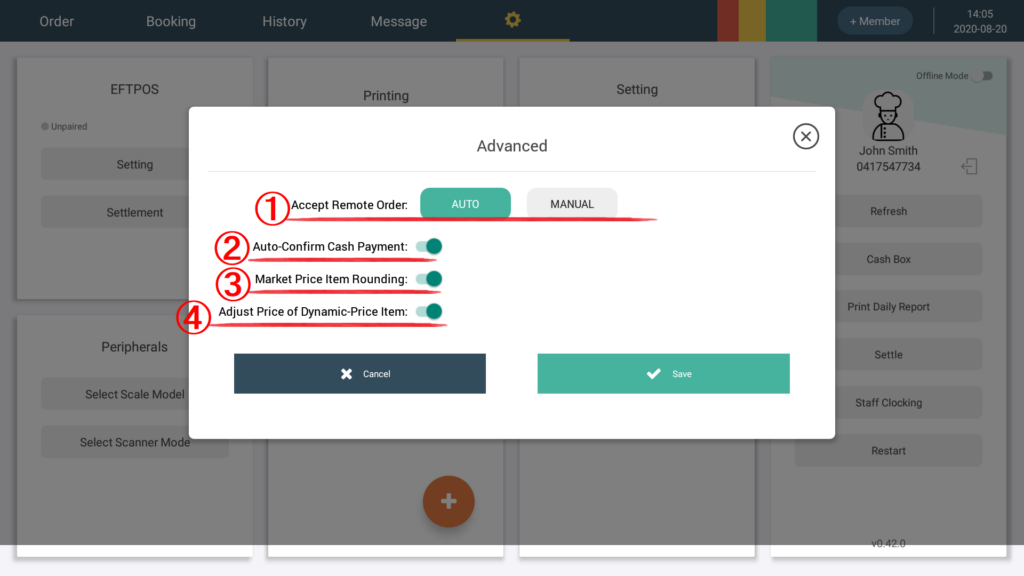

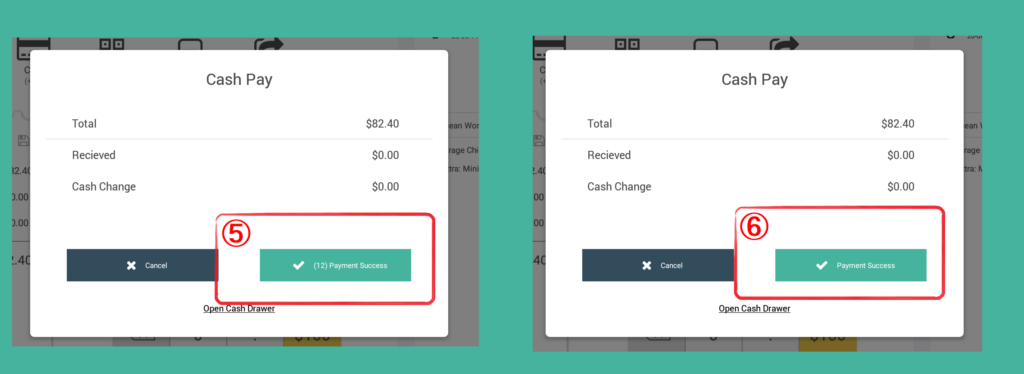
(2) Turn on automatic confirmation of cash payment in ②, The cash receipt dialog box pops up after the operator operates the immediate payment on the checkout page, The payment success dialog in the lower right corner will automatically default to payment success after 15 seconds (as ⑤), If you choose to close, you need to manually confirm to complete the payment successfully (as ⑥).
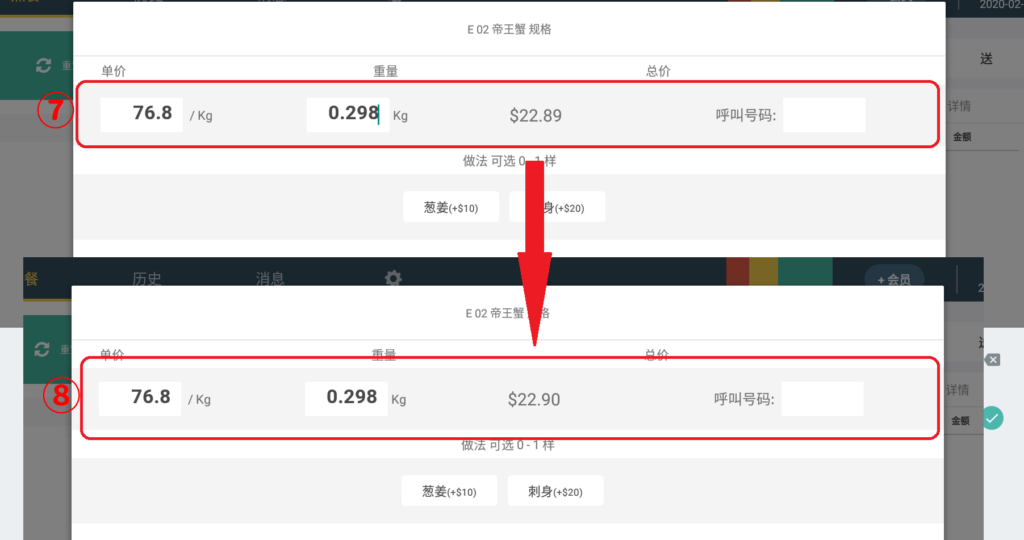
(3)Start dynamic price commodity consolidation in ③, Indicates that when you choose a product that is priced by weight or based on the number of units, the system will automatically round the amount, to avoid mistakes in amount, If the same, choose 76.8 yuan per kilogram of king crab weighing 298 grams, The actual calculated amount is 22.89 yuan (as ⑦) an error will occur during checkout, If this function is turned on, the amount will be automatically calculated to the whole number (as ⑧).
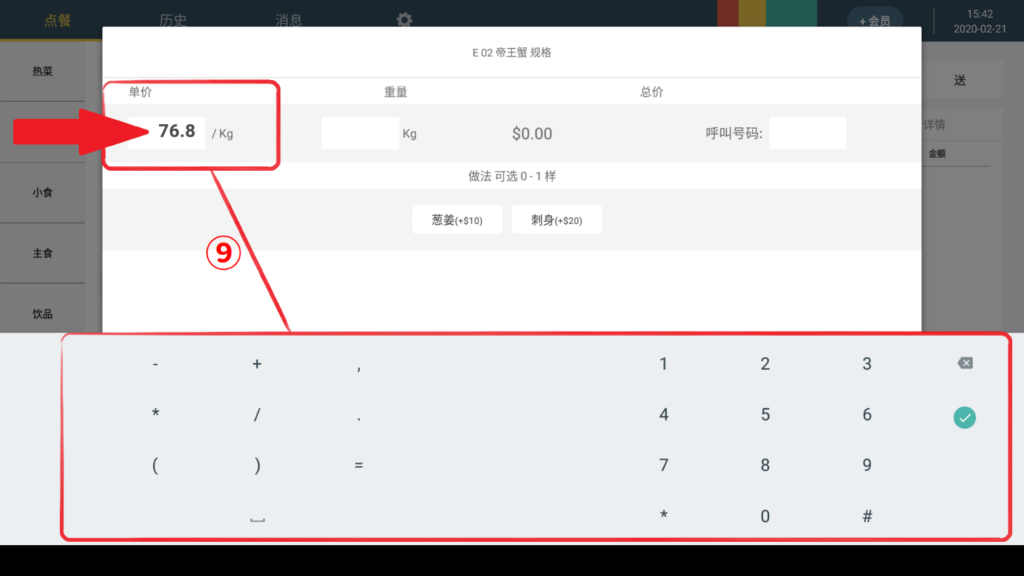
- Turning on changing the price of dynamic price commodities will authorize the waiter to make one-time price modification permissions for dynamic price commodities at ④, Click below the amount and the keyboard will pop up, The price can be modified once (as ⑨)
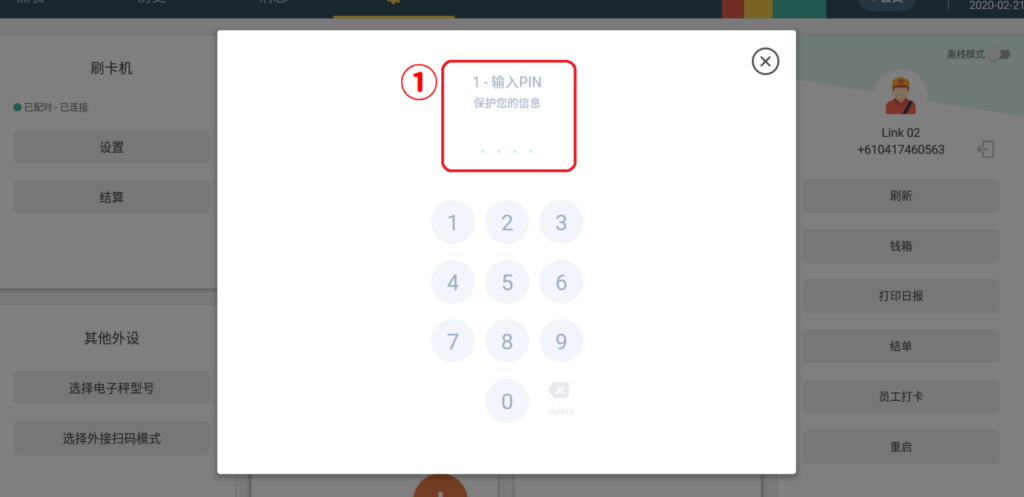
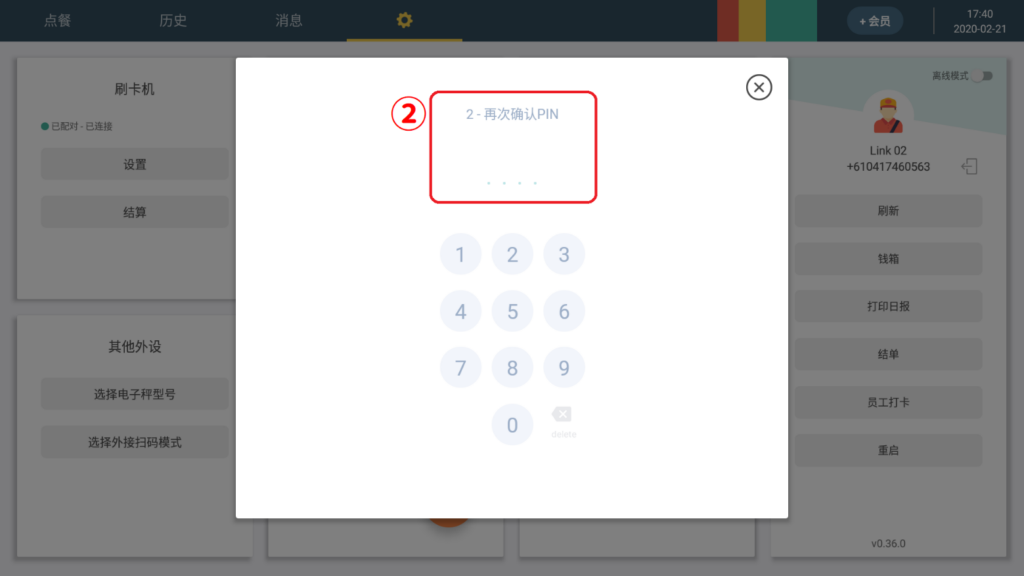
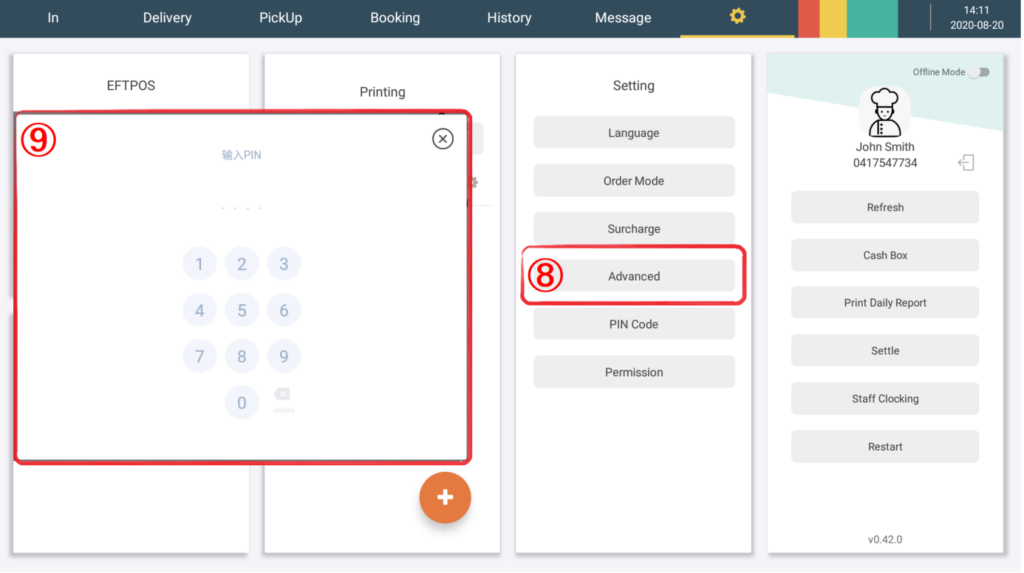
4-5. PIN code: Password can be set for sensitive functions such as advanced settings
The initial state of the system is that no password is set, to set a password, after entering the password on this page (as ①),the system will confirm the password again (as ②),If the password is correct twice. After input, the system will automatically jump back to the setting page, that means the password is set successfully.
4-6. Operation authority: you can turn on or off whether to enter a password when using daily print reports, initiating refunds and advanced settings.
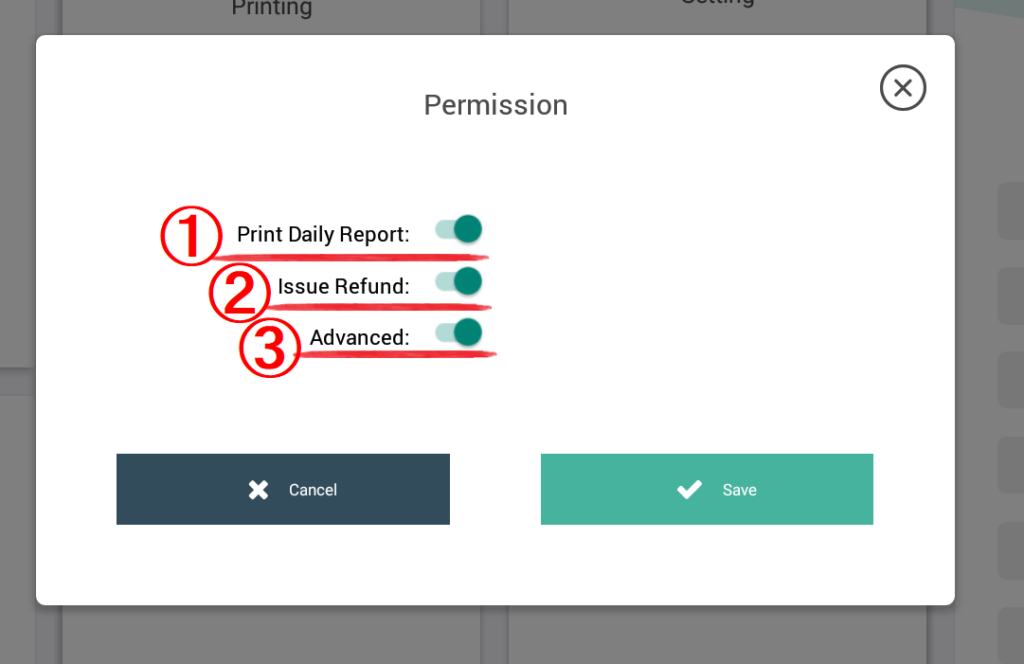
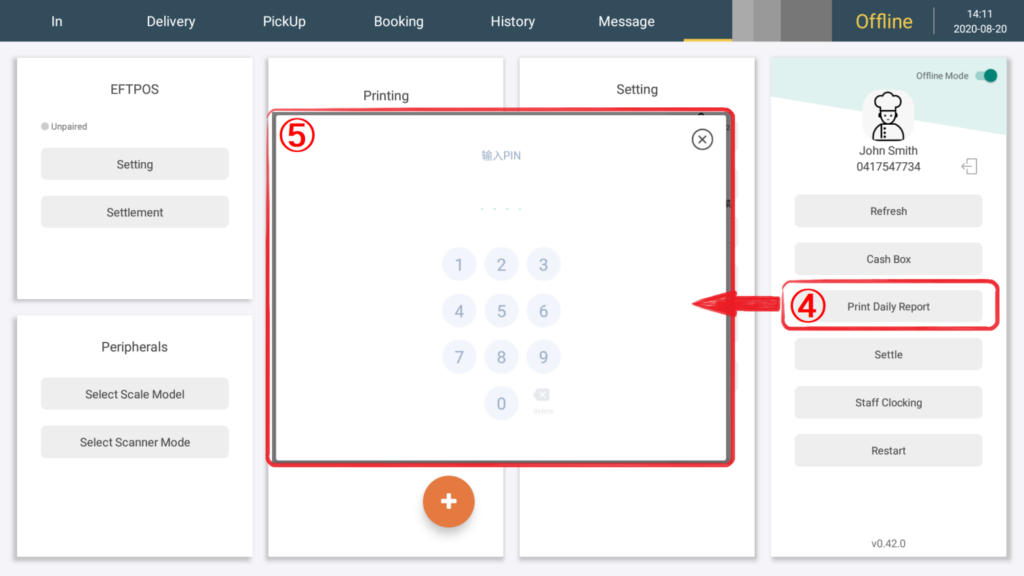
(1) If the option to print daily reports is selected (as ①), operator is using print daily report (as ④) You will need to enter the password set by the user before (as ⑤) printing daily report.
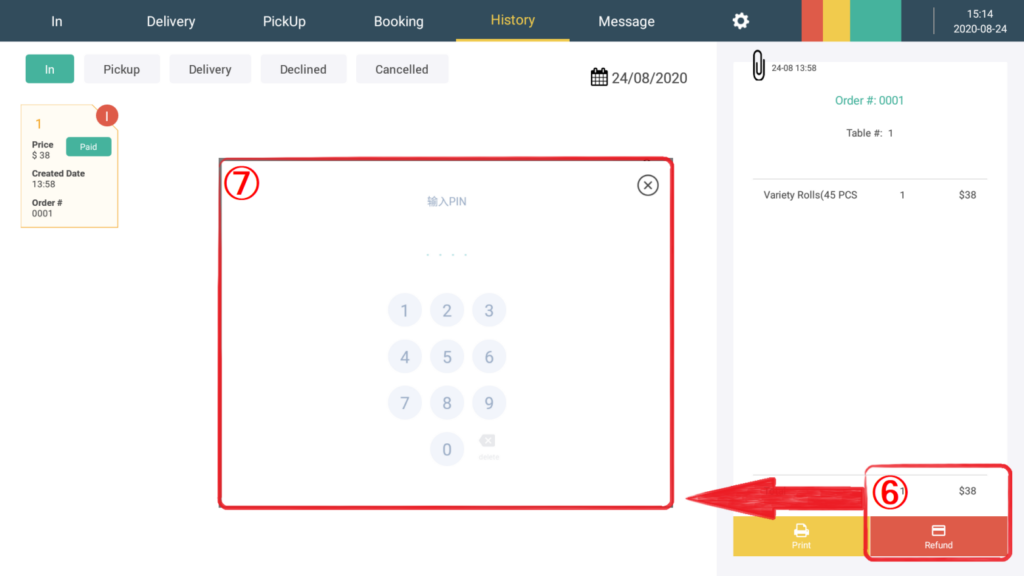
- If you initiate a refund operation option, select issue refund (as ②), operator will need to enter the password before using refund operation(as ⑥ and ⑦).
(3) By turn on the Advanced options (as ③), operator will need to enter the password (as ⑨) before using advance setting (as ⑧).
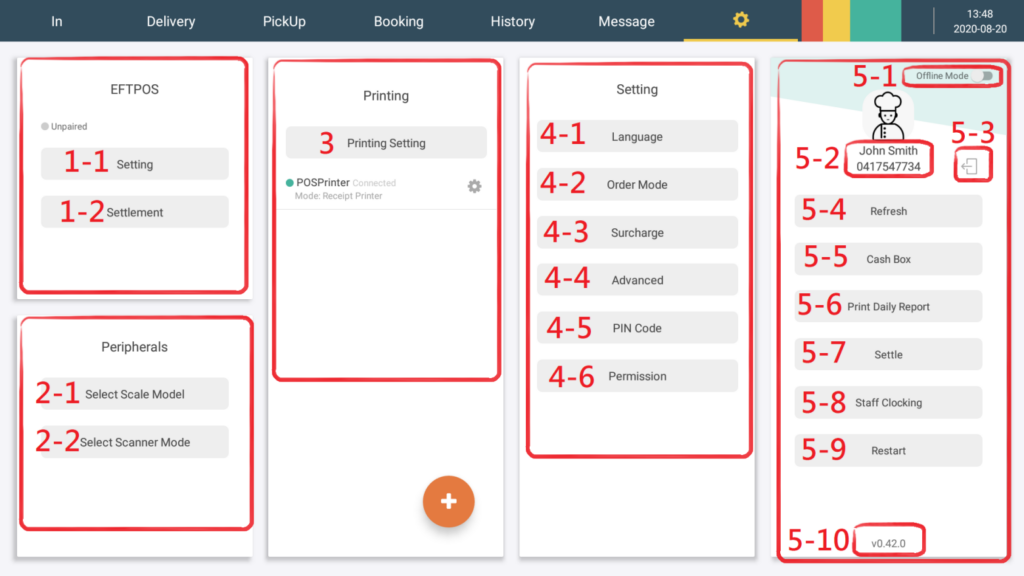
5-1. Offline mode: display the status when not connected to the network
(1) If the operator suddenly loses the network connection during operation, will show offline in the upper block (as ①), The operator can still use the system to order food, and the system will still record the data. When the network connection is restored, the system will automatically connect and upload the order information to the background
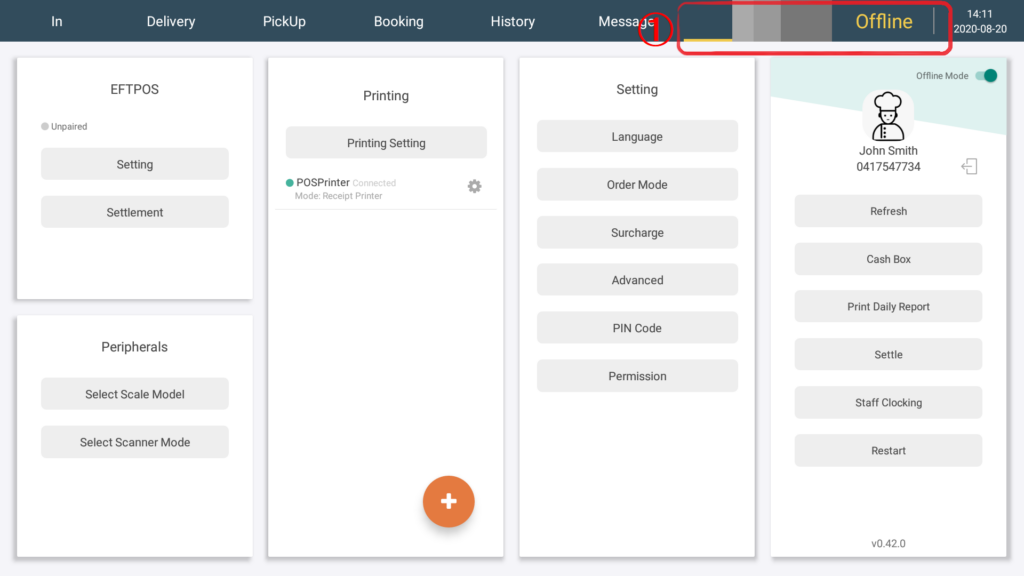
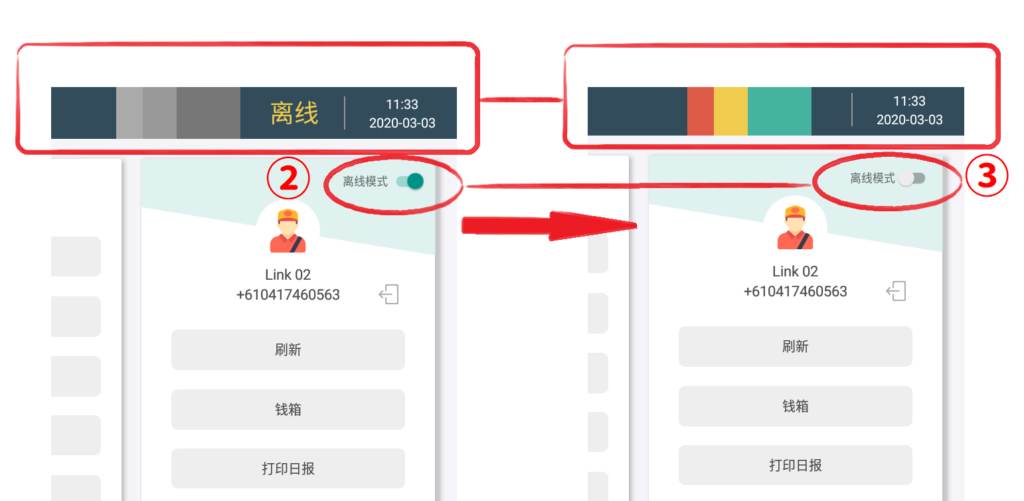
(2) If the network connection needs to be temporarily interrupted due to its factors during operation, the operator can manually click the offline mode (as ②), at this time, offline is displayed above the block, Operators can still order meals using the system, The system will still record the data, but if you want to restore the connection, you must manually turn off the offline mode to reconnect (as ③).
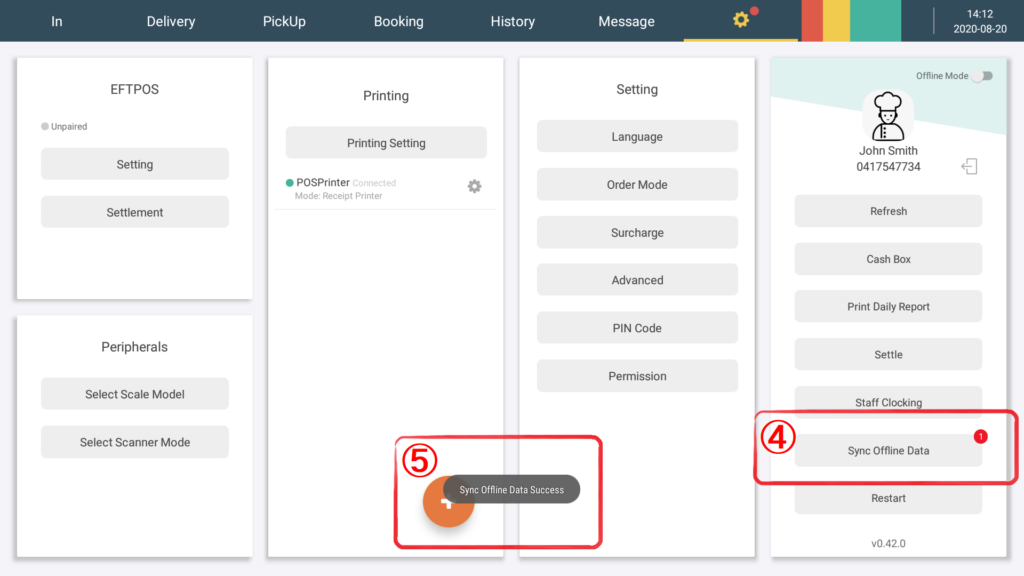
(3) The transaction performed in offline mode will be temporarily saved on the POS machine. After the connection reply, the synchronization offline data message will pop up in the setting interface (④), After clicking Sync offline data, it will appear at the bottom of the screen that the synchronization of offline data is completed (⑤), you can complete the data synchronization
5-2. Login information: The user name and login account information are displayed here
5-3. Logout: Click this icon, the user will log out of the account, and the page will jump back to the initial login page
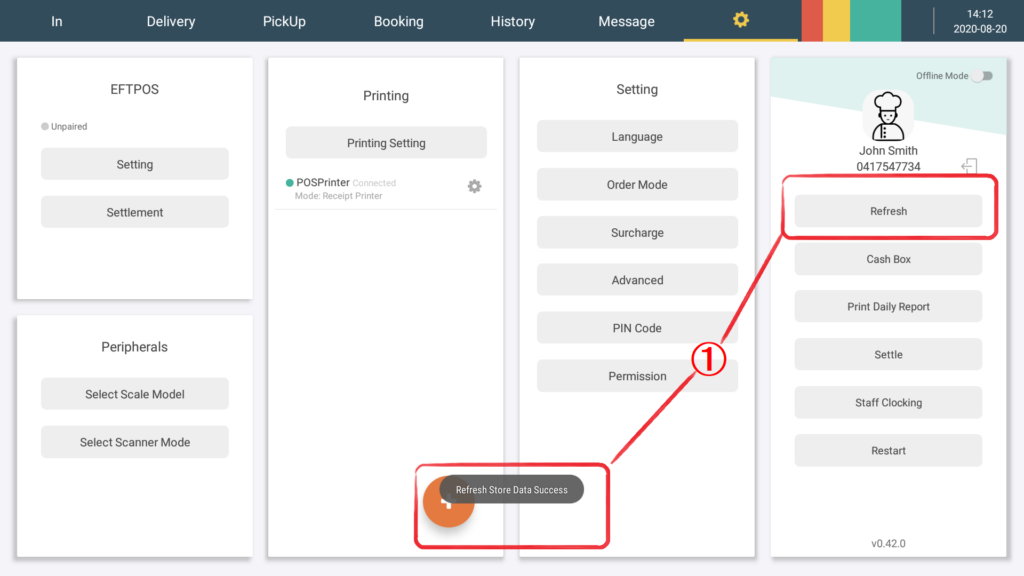
5-4. Refresh: After the background data is updated, you must click Refresh to update the information. After you click Refresh, the word “Refresh Store Successful” will appear at the bottom of the screen (as ①),It means that the settings of the POS background system on the POS machine have been updated
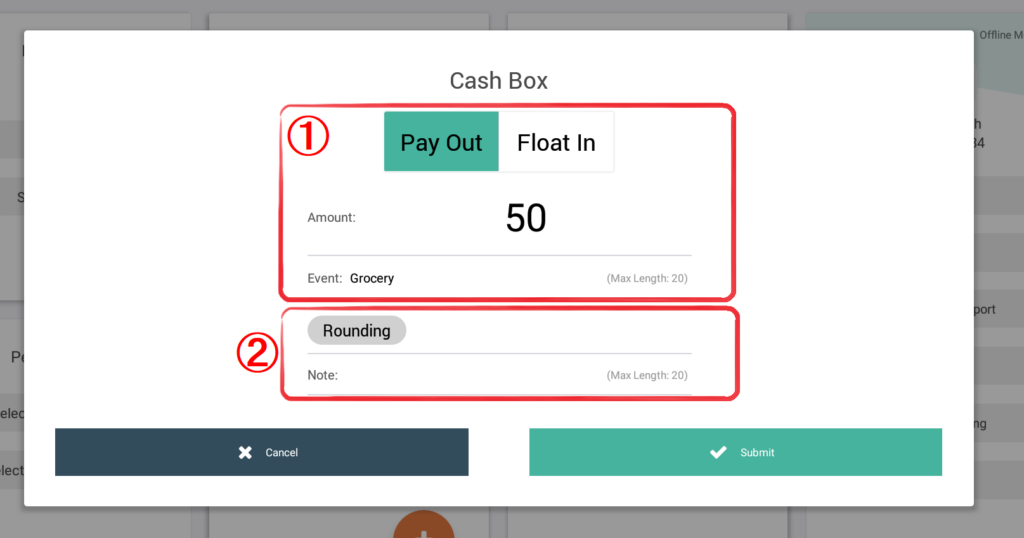
5-5. Cash box: Click the cash box to withdraw or deposit cash
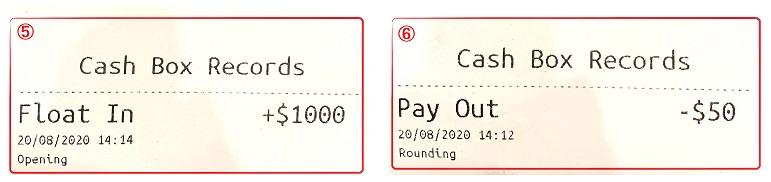
(1) When you need to receive cash from the cash box, such as temporarily paying for the restaurant’s purchase of items, you can use the Pay Out function and enter the amount of money and the name of the money (as ①), After submission, the cash box will automatically pop up, and the names of commonly used funds will be displayed below the payment input field (如 ②), The Pos machine will automatically print the Pay Out receipt (as ⑥)
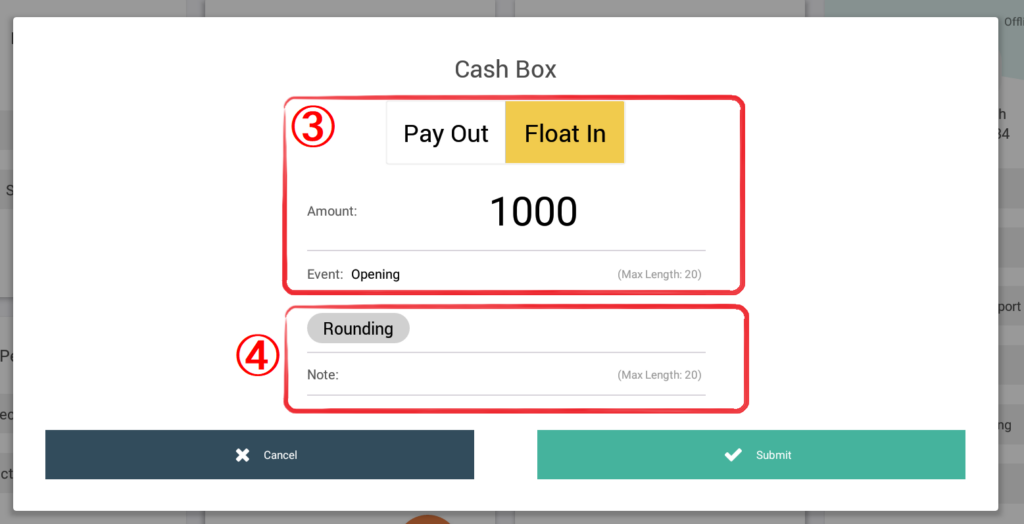
- When you need to deposit cash into the cash box, for example, you need to deposit cash in advance for turnover before starting work every day, enter the amount and the reason for the payment name (as ③), After submission, the cash box will automatically pop up, and the names of commonly used funds will be displayed below the payment input field (as ④), the Pos machine will automatically print the Float in receipt (as ⑤)
5-6. Print daily report: Print the daily report for any day
(1) Select the date and click OK (as ①), The basic report will be printed in the form of a small ticket, and the statistics of the number of orders and the payment amount will be available in the report.

- Set print to open, include commodity statistics in daily report (as ②) and include cash box records in the daily report (as ③), Commodity statistics and cash box records will be displayed separately in the daily report
5-7. Statement: used for daily settlement of cash box status
(1) The operator can directly enter the amount in the cash box at Cash In Drawer (as ①), You can also enter the number of banknotes of different denominations (as ②), The system will calculate by itself and display it in Cash In Drawer (as ①)
(2) At Cash Float Out, enter the cash withdrawn at the end of the business day or deposited in the safe (as ③), The system will record itself
(3) Click Submit after recording(as Red Arrow shown) the system will successfully settle the bill
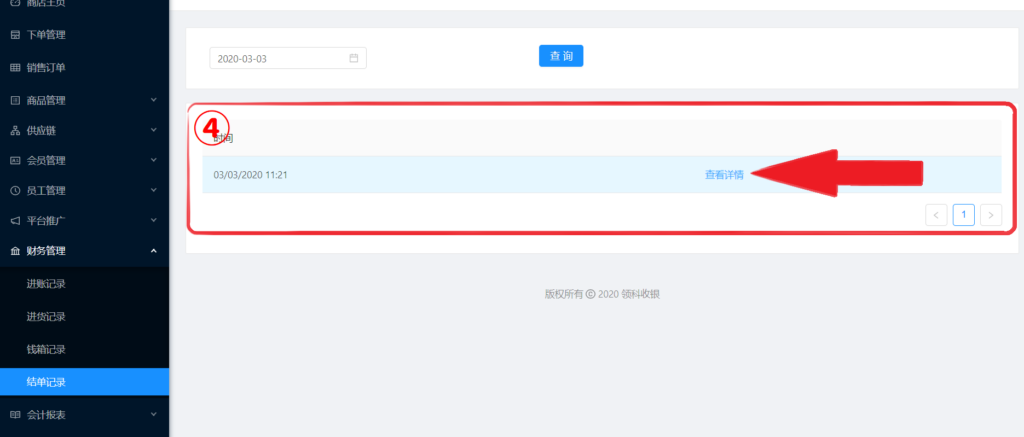
(4) The system will save the statement record in the background (as ④), Click View Details to view the statement record in detail(For details, please refer to the background interface description and attach the link)

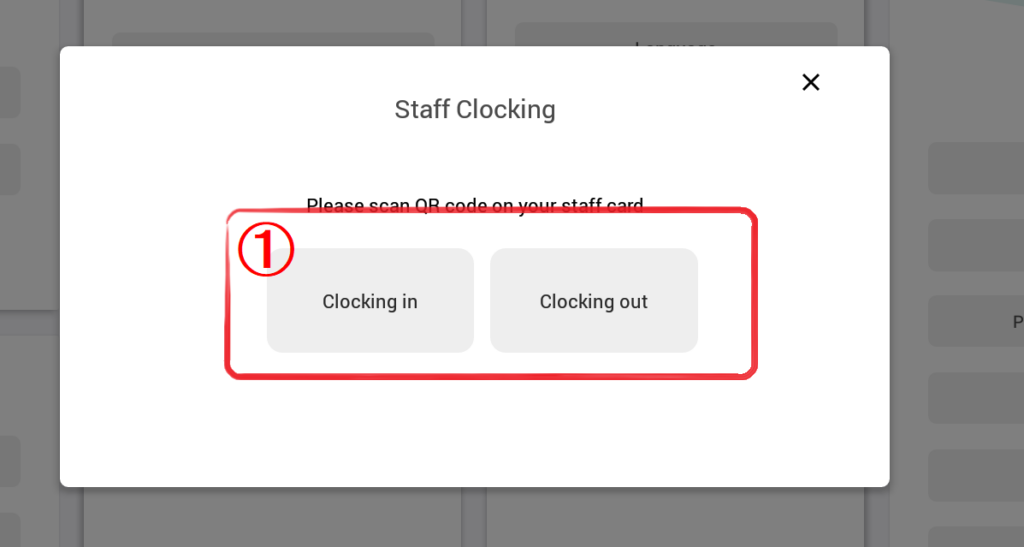
5-8. Employee check-in: used to record the employee’s commuting time, click on the employee check-in, scan the employee identification card on the corresponding device, and choose to go to work or leave work (as ①), system will automatically record the time
5-9. Restart: Click to restart the system to restart the system
5-10. System version: The latest version of the current POS system is displayed here


