History #
The history of all the transactions and books are displayed on this screen.
To check the history of all the orders, select orders tab on the top right corner.
To check the history of the specific date select calendar(1) and choose the required date. By default, the date is set to the present date during the operation of the machine.
To sort the type of orders like In-Order, Pick-up or delivery, press (2) and select as per required.
To sort the history according to the payment status like Paid, Unpaid, Refunded or Declined press (3).
To print the daily report press ‘Print Daily Report’ on the right.

The cards on the bottom indicate the general information of the individual orders.
The top most part of the card which is dedicated by the number (4) is the order number.
The time of the order is (5)
The amount of the order is (7)
The status of the order which is at the bottom of the card is (8)
Refund #
To apply for the refund, press on one of the orders. The border of the order will turn yellow once selected.

To initiate the refund process, press dollar sign (2) on the top right corner. Once selected, a form will pop up.
Add the refund amount (1) and reason of refund (2). Once added select ‘Confirm’.

Once the form is completed, the paid transaction will turn in into refunded option as shown in the image below
Printing #
In the Printing screen, you can add, remove and manage printers connected to the machine, select which receipts are printed from each printer, and modify details that are printed on receipts.
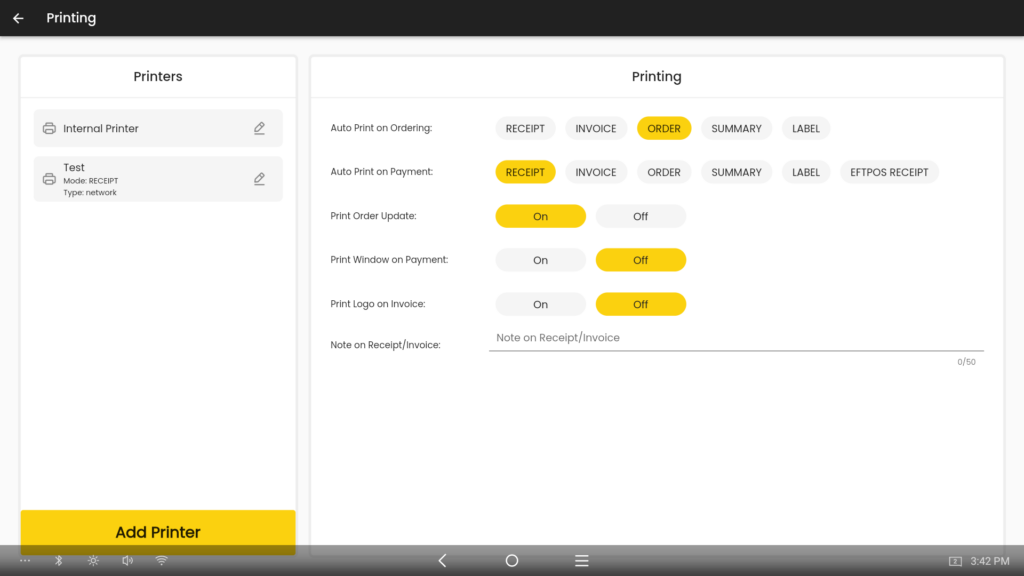
The left panel of the screen is the Printers list, which displays the printers connected to the machine, their names, print modes and connection types. Some devices, such as POS terminals, may have an inbuilt printer, which is shown here as ‘Internal Printer’.
The right hand panel of the screen is where the global printing settings are set for all connected printers.
- Auto Print on Ordering: Select the receipt types to be printed when a new order is placed.
- Auto Print on Payment: Select the receipt types to be printed when an order has been paid for.
- Print Order Update: Print an order update receipt when a pending order has been modified (e.g. item addition, modification or deletion, order note change)
- Print Window on Payment: Sets whether the printing dialog window asking the user to select a receipt type to print is displayed after the user completes order payment.
- Print Logo on Invoice: Enable or disable printing of the store’s logo, set in the Admin Portal, at the top of invoice receipts.
- Note on Receipt/Invoice: Enter a message to be printed at the bottom of all customer and invoice receipts, up to 50 characters long.
If for ‘Auto Print on Ordering’ or ‘Auto Print on Payment’, ‘Summary’ is selected, two new options will appear at the bottom of the screen.
- Print None-Zoned Items in Summary: When enabled, items that are not part of a print zone are printed on the order summary under the ‘No Zone’ heading. When disabled, these items will not be printed at all.
- Print Zones in Summary: Select the print zones that are printed on order summaries. When a print zone is enabled, items belonging to it are printed under the print zone’s name, and when disabled, its items are not printed at all.
Add Printer #
In the Add Printer screen, you can add a directly connected or network printer to print receipts from.
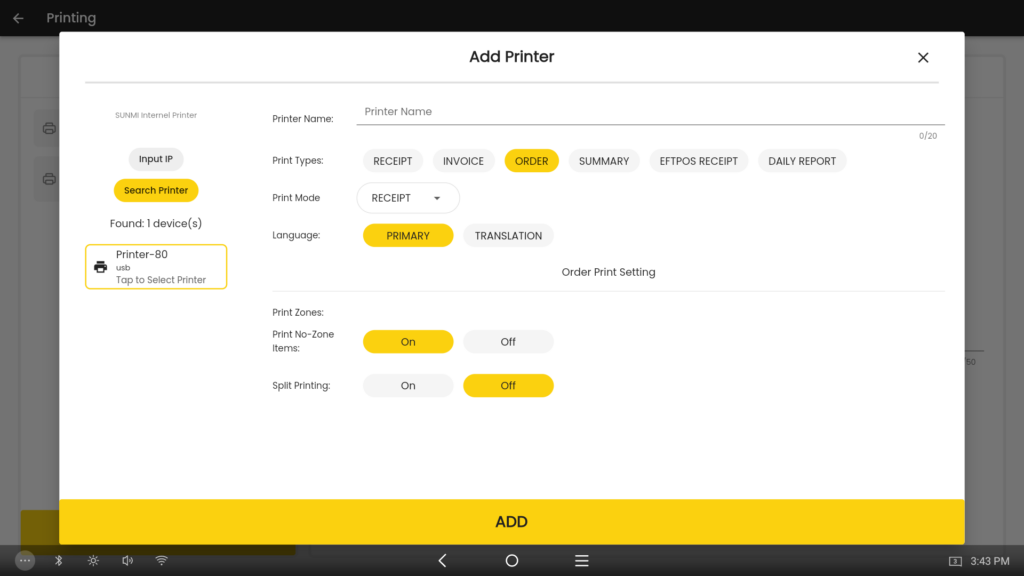
- Internal printer device: If the current machine has an inbuilt printer, its model name as reported by the printer driver is displayed here.
- Input IP: Enter the IP address of the network printer you want to add.
- Search Printer: Automatically return a list of all connected and network printers.
- Printer Name: Enter a custom name for the printer. This is useful if you have multiple printers of the same model and want to tell them apart, to set one to print only certain receipt types, or to have the printer in a particular area of your store.
- Print Types: Select which types of receipt you want the printer to print.
- Print Mode: Set the printer to print receipts or label stickers. ‘Receipt’ must be selected if the printer is a receipt printer, and ‘Label’ if it is a label printer.
- Language: Set the language printed on receipts. The primary language is the default language of the store and its items as specified in the Admin Portal, and the translation language, if one was set in the Admin Portal and the items have a translated name, is the other language.
If ‘Order’ in Print Types is selected, an Order Print Setting section with three options will appear.
- Print Zones: Select the print zones that the printer should print.
- Print No-Zone Items: When enabled, this printer will print items that are not part of a print zone.
- Split Printing: When enabled, all items are printed in a single order receipt, and order updates are separated only into Add Item and Delete Item updates, regardless of which print zones the items belong to. When disabled, items are grouped by print zone into separately printed order receipts, and Add Item and Delete Item order updates are also split in the same way.
To add a printer, tap Search Printer. A list of printers will appear below ‘Found:’, each showing their model name and connection type. Tap on any printer to add it. After doing so, a dialog window may appear asking if you want to allow LinkPOS to use the printer. Tap ‘Yes’ if it appears.
If you want to add a name to the printer or customise its options before you add it, you must enter the name or select options before selecting the printer you want to add, otherwise it will not actually link the printer to the current machine. Selecting the printer first will deselect it when the name or options are changed.
The printer will now appear in the Printers list, with its model or custom name, print mode and connection type.

Edit Printer #
Tap on a printer in the Printers list to edit its individual options. You can modify its name, print types and printing language.
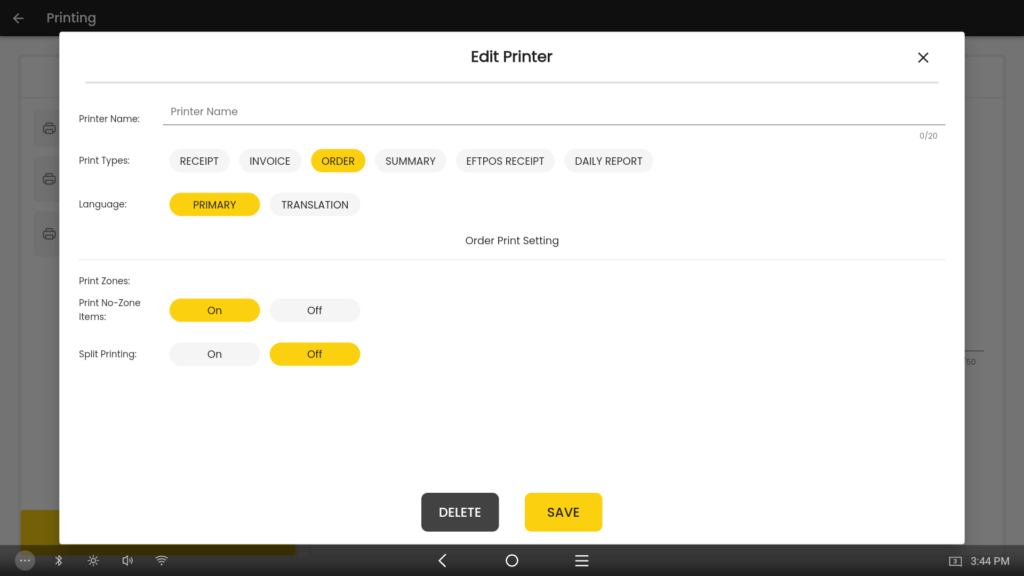
Tap Delete to remove the printer from the Printers list, or Save to confirm changes. Internal printers cannot be removed, and the printer’s print mode cannot be changed unless the printer is removed and readded.
EFTPOS #
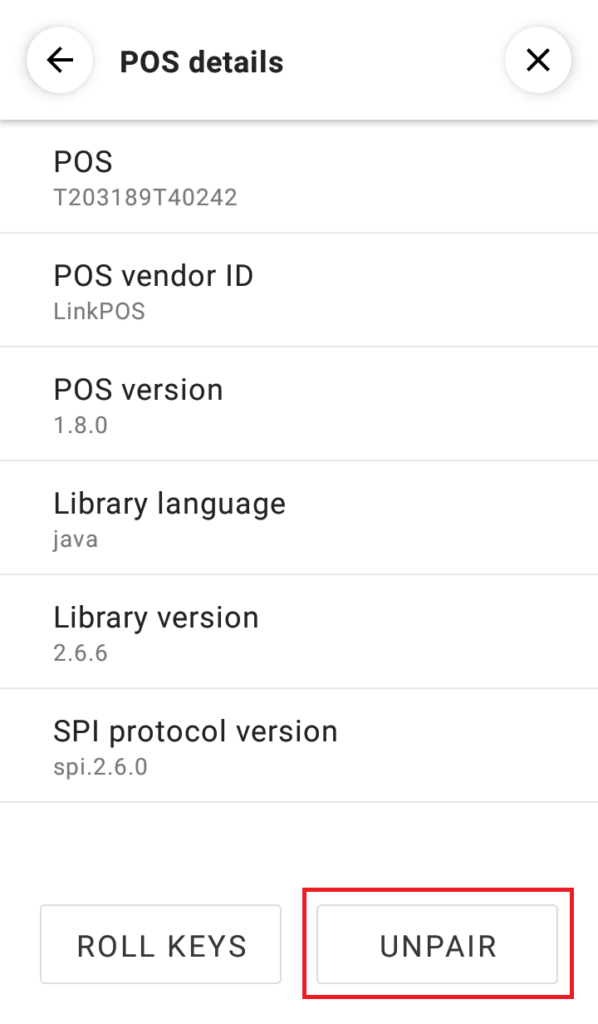
In the EFTPOS Setting screen, you can pair and unpair EFTPOS card payment terminals to the current machine so that it can accept card payments, and print settlements from the currently paired payment terminal. Only one payment terminal can be paired with a POS machine at a time.
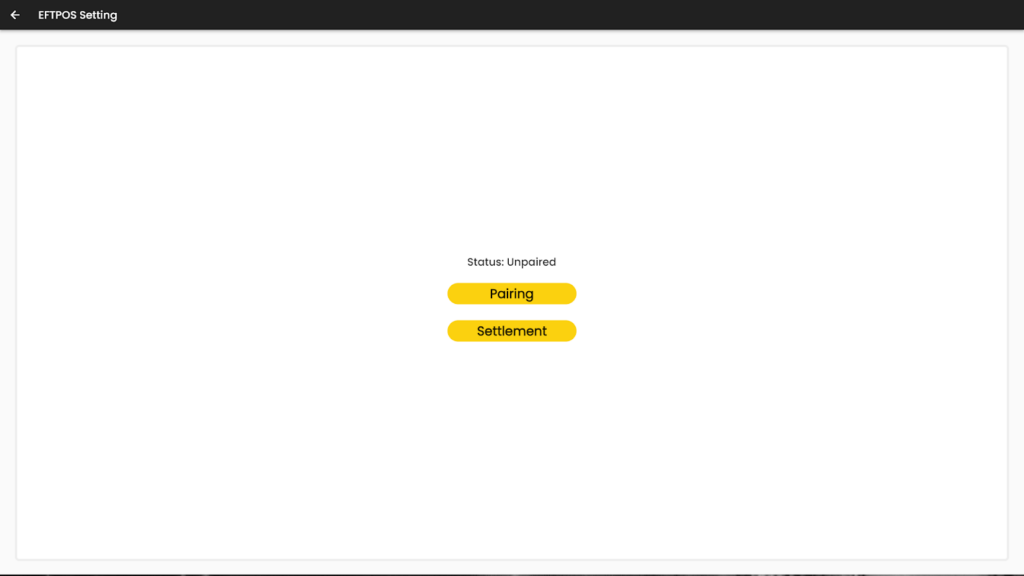
- Status: The current status of the connection between the POS machine and the payment terminal. If the POS machine has not undergone the pairing process or was most recently unpaired from a payment terminal, this will display ‘Unpaired’. If the machine is paired with the payment terminal and the connection between them is working, it will read ‘Paired and Connected’.
- Pairing: Opens the EFTPOS Pairing screen, which displays the details of the currently paired payment terminal, and allows you to pair and unpair from them.
- Settlement: Prints a statement of all card transactions for the current store and current day. A payment terminal must be paired and connected to use this function.
To view details of the currently paired EFTPOS terminal or pair with a payment terminal, tap the Pairing button to enter the EFTPOS Pairing screen.
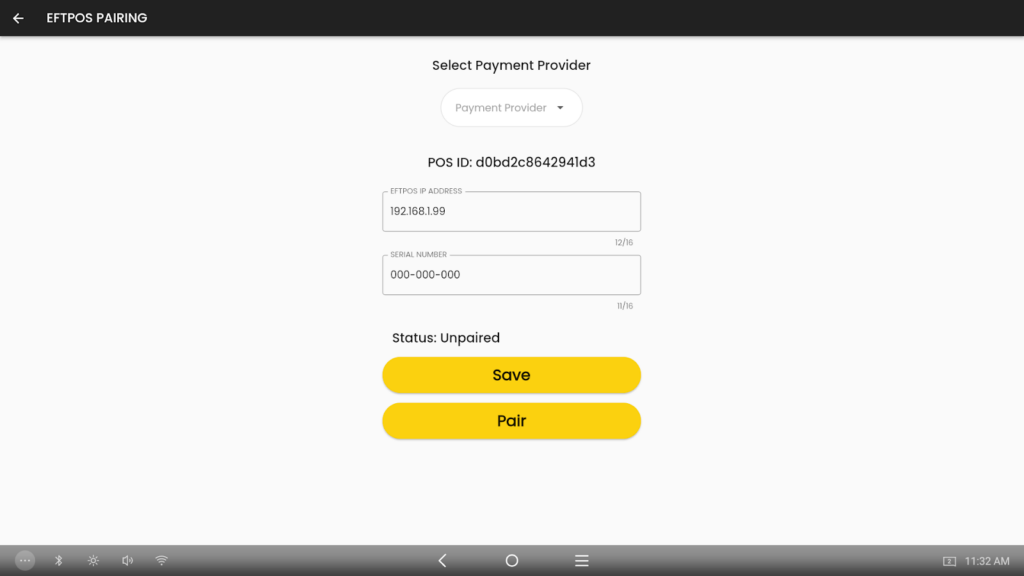
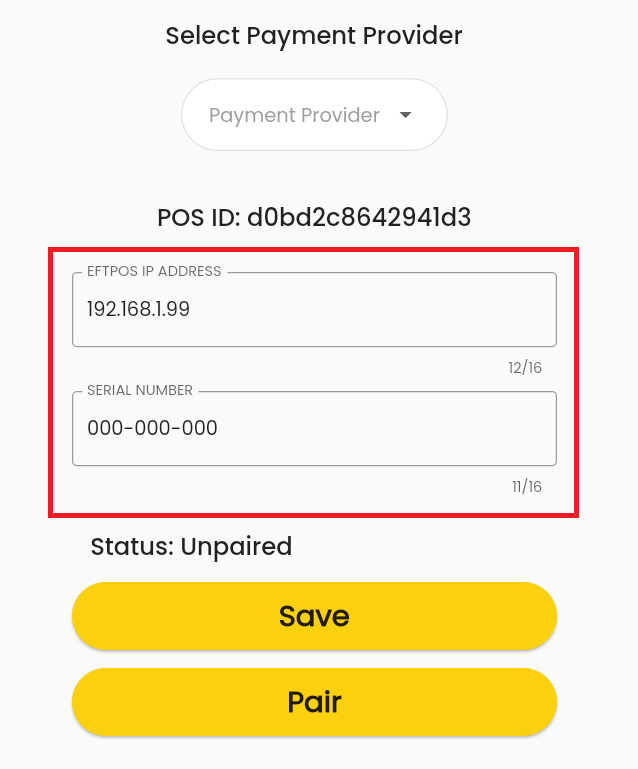
- Select Payment Provider: Select the name of your EFTPOS terminal’s payment provider, whose name or logo should be displayed on the terminal’s home screen. You can select from CommBank Smart, Gecko Demo Bank, Next Payments, Till Payments or Westpac Presto.
- POS ID: The unique ID of the current POS machine that LinkPOS is running on.
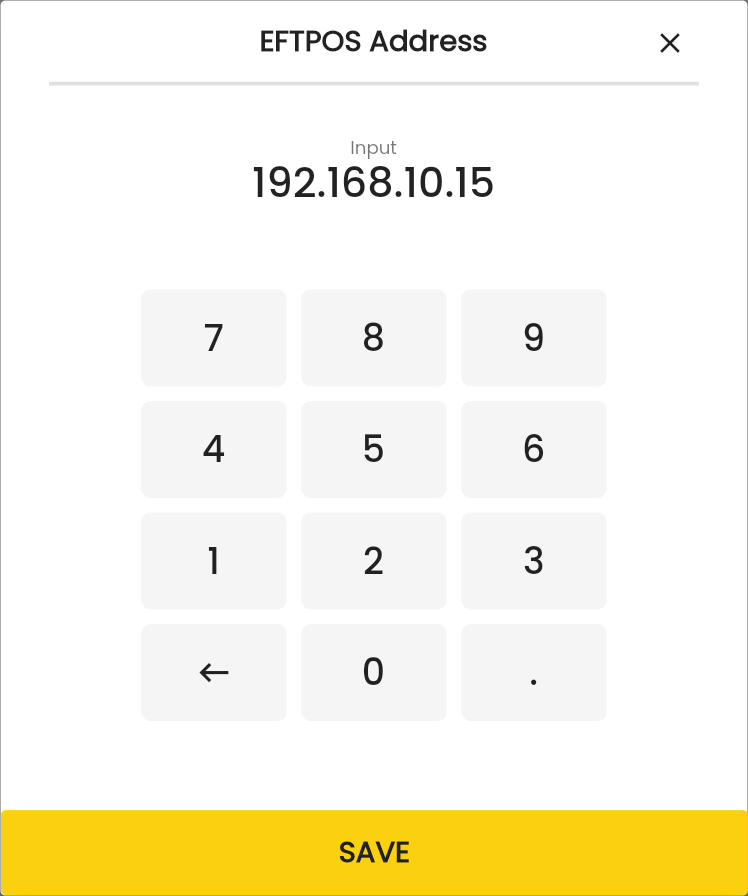
- EFTPOS IP Address: Enter the IP address of the payment terminal.
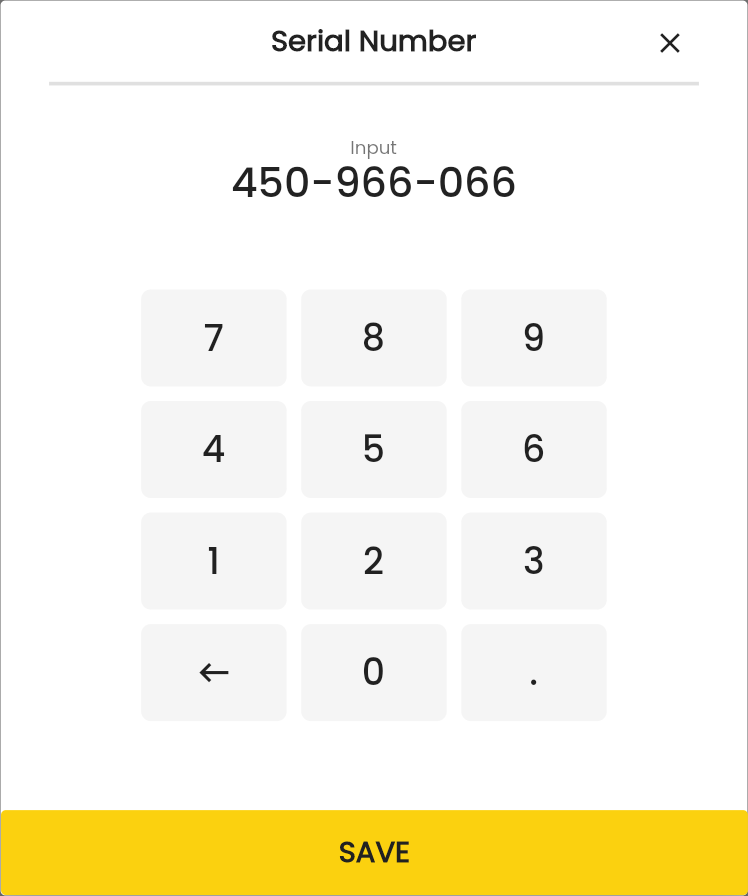
- Serial Number: Enter the serial number of the payment terminal.
- Status:
- Save: Saves the entered payment provider, IP address and serial number without pairing with the payment terminal.
- Pair: Begin pairing with the payment terminal using the entered details.
Pairing #
Before pairing with the payment terminal, make sure that it and the POS machine are connected to the same local network. For this example, a Verifone T650P Android EFTPOS terminal will be used for the pairing process.
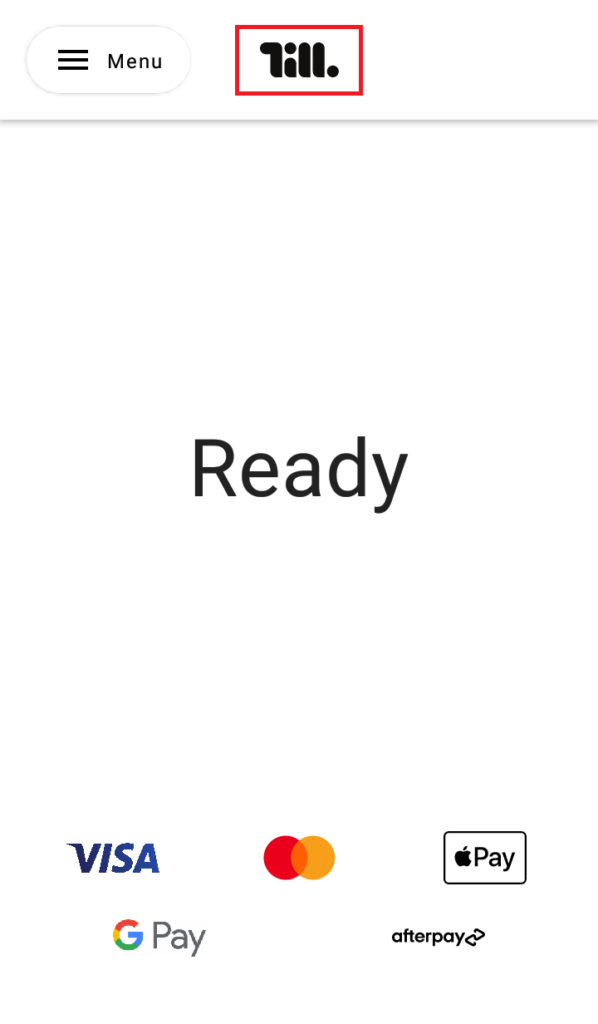
- On the EFTPOS terminal, go to the payment software’s home screen (on the Verifone T650P, press the home button). The payment provider’s name or logo should be displayed here. For this example, the logo for Till Payments is at the top of the screen.
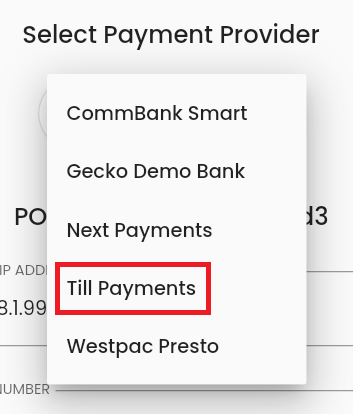
- On the POS machine, in the EFTPOS Pairing screen, select the payment provider that was displayed in the EFTPOS terminal’s home screen in the Select Payment Provider dropdown menu.
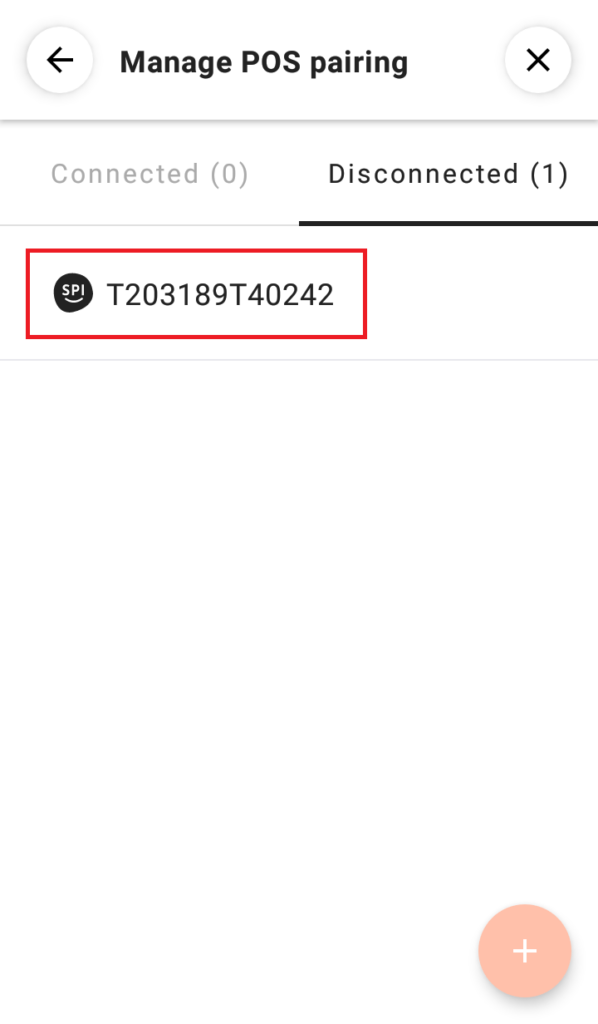
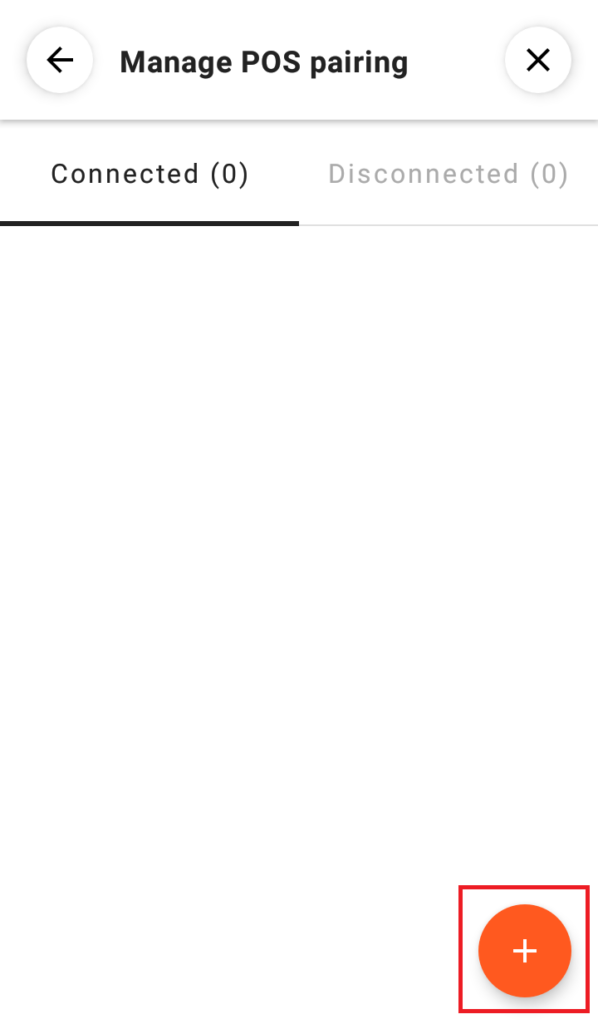
- On the EFTPOS terminal, enter the POS pairing screen. (On the Verifone T650P, from the home screen, go to Menu > Manage POS pairing.) If there are any devices listed here, unpair them. (On the Verifone T650P, if any devices appear in the Connected or Disconnected tabs, unpair them by tapping on them, then tapping Unpair in the next screen.)
- Begin the pairing process on the EFTPOS terminal, which should make it display its serial number and IP address. On the Verifone T650P, press the ‘+’ button in the bottom right corner of the Manage POS Pairing screen to add a new device, which will open the ‘Get ready to pair with POS’ screen where the serial number and IP address are displayed.
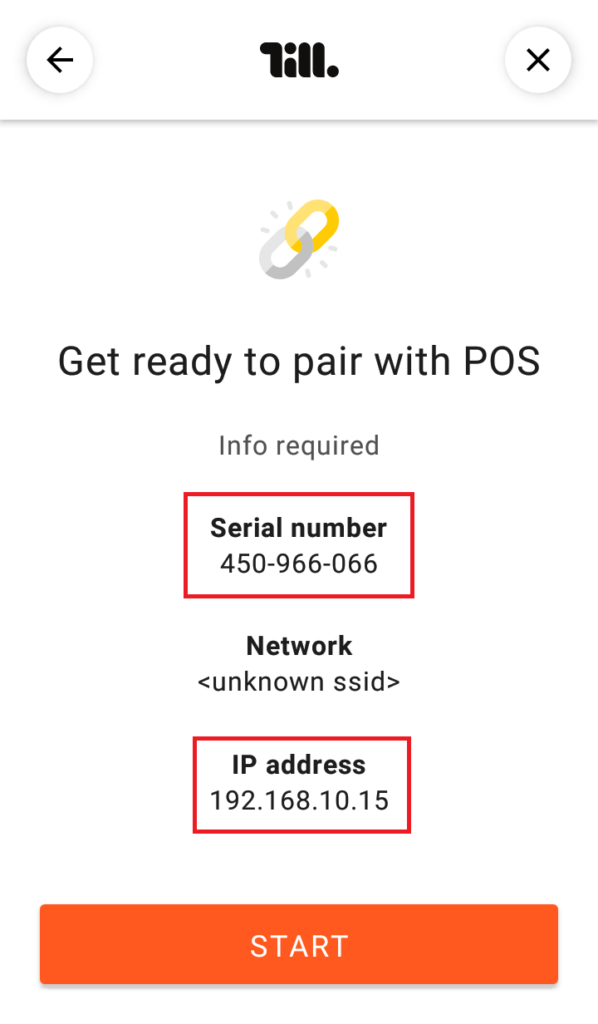
- On the POS machine, enter the EFTPOS terminal’s IP address and serial number into the EFTPOS IP Address and Serial Number fields. A keypad will appear when tapping on both fields. When entering the serial number, dashes are added automatically.
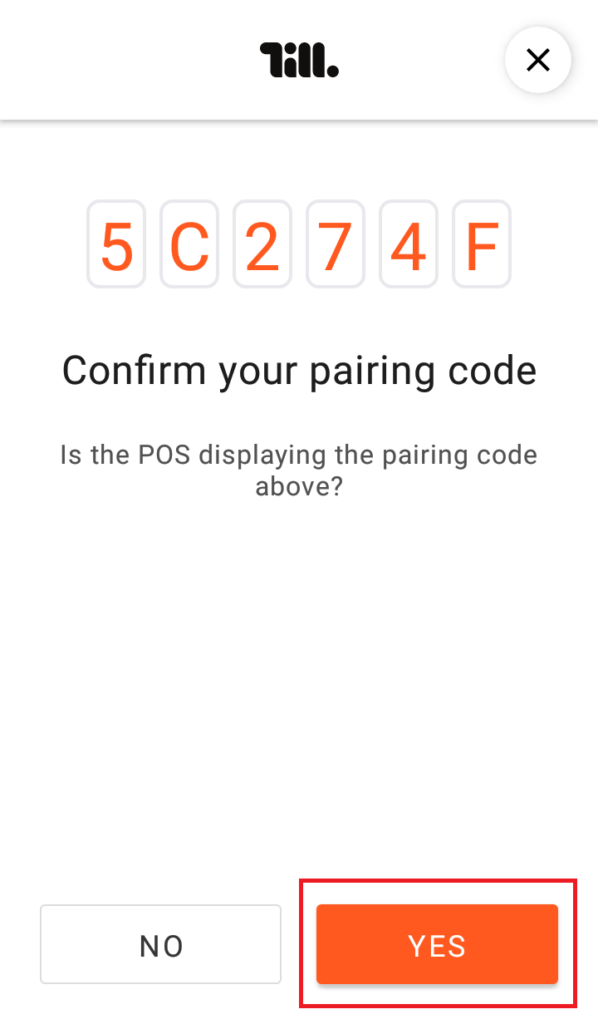
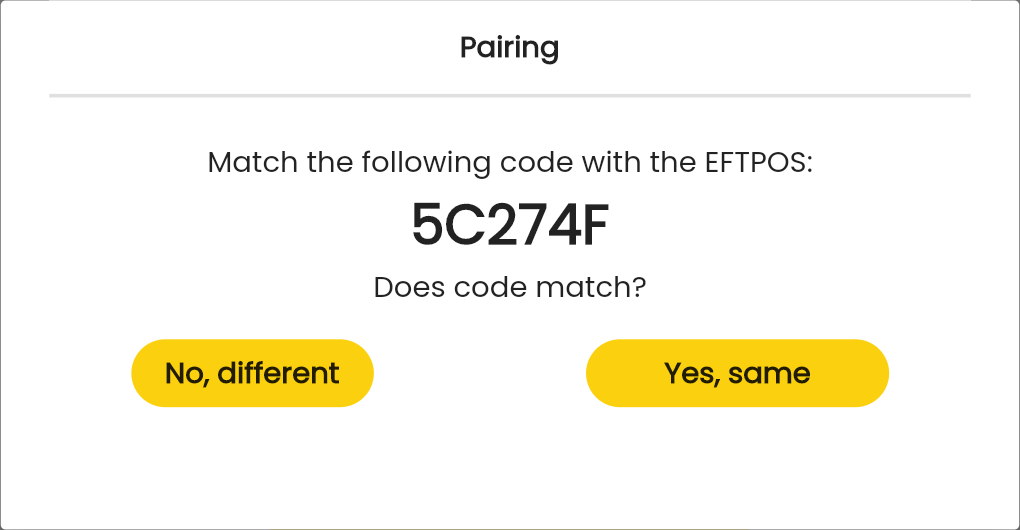
- On the EFTPOS terminal first, tap Pair, then tap Pair on the POS machine. If the connection between the POS machine and the EFTPOS terminal is working, both devices will display a 6-character code. If both codes are the same, tap Yes on the EFTPOS terminal.
- Both devices will display a ‘Pairing successful’ message. Tap Confirm on the POS machine to return to the EFTPOS Pairing screen, and tap Finish on the EFTPOS terminal.
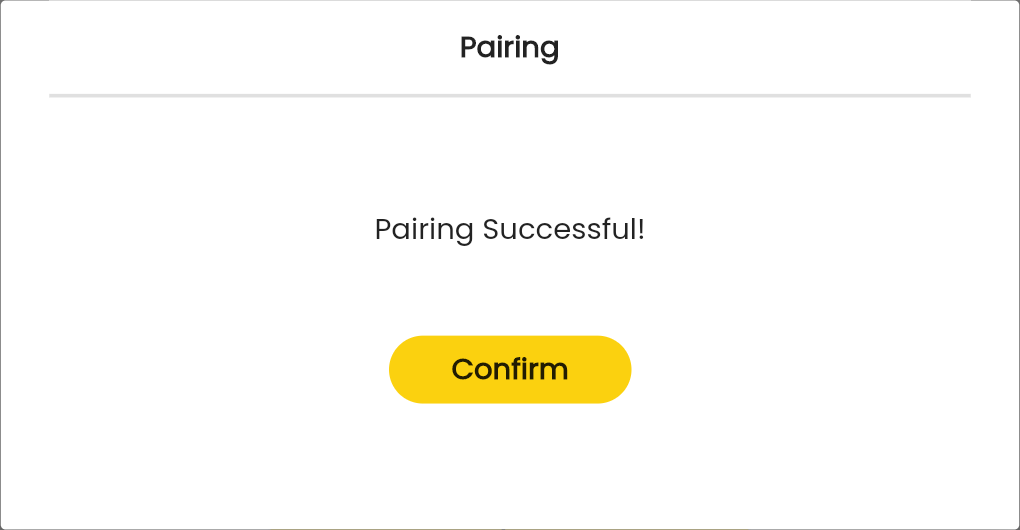

In the POS machine’s EFTPOS Pairing screen, the status now reads ‘Paired and Connected’ and the Pair button has changed to an Unpair button.
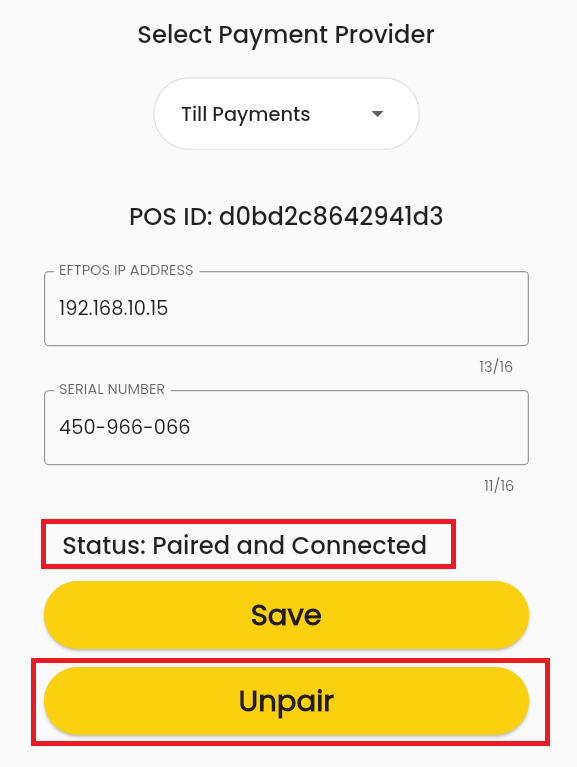
To unpair the EFTPOS terminal from the POS machine, tap Unpair in the EFTPOS Pairing screen. It will immediately unpair the two devices, and the POS machine will display an ‘Unpairing Successful!’ message. To check that the unpairing has worked, return to the POS pairing screen on the EFTPOS terminal and check that no devices are listed.
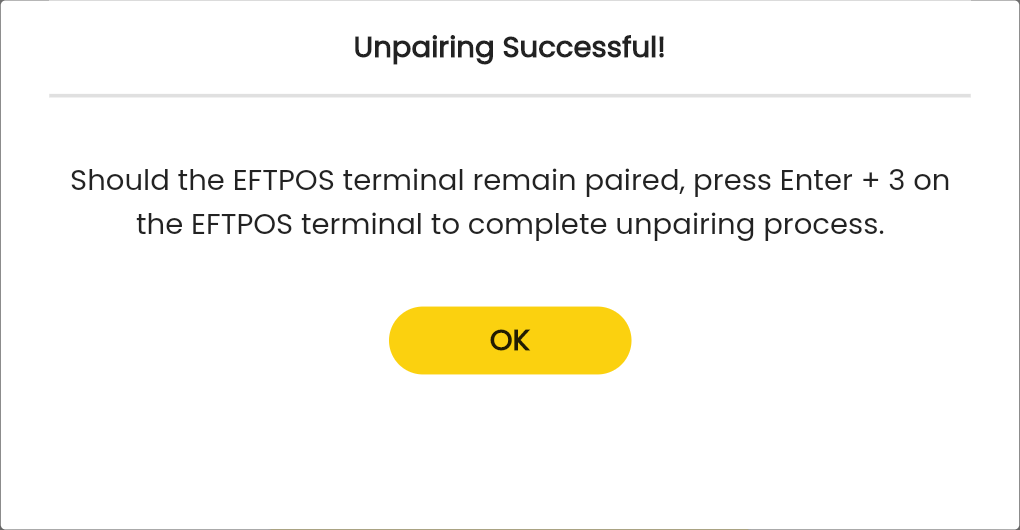
Do not start the unpair process from the EFTPOS terminal, otherwise the POS machine’s pairing status will become ‘Disconnected’ and its Unpair button will fail to unpair from the EFTPOS terminal.
Network #
In this screen, you can view the machine’s network status and test its network connection to check if there is a problem with the local network or Internet connection.
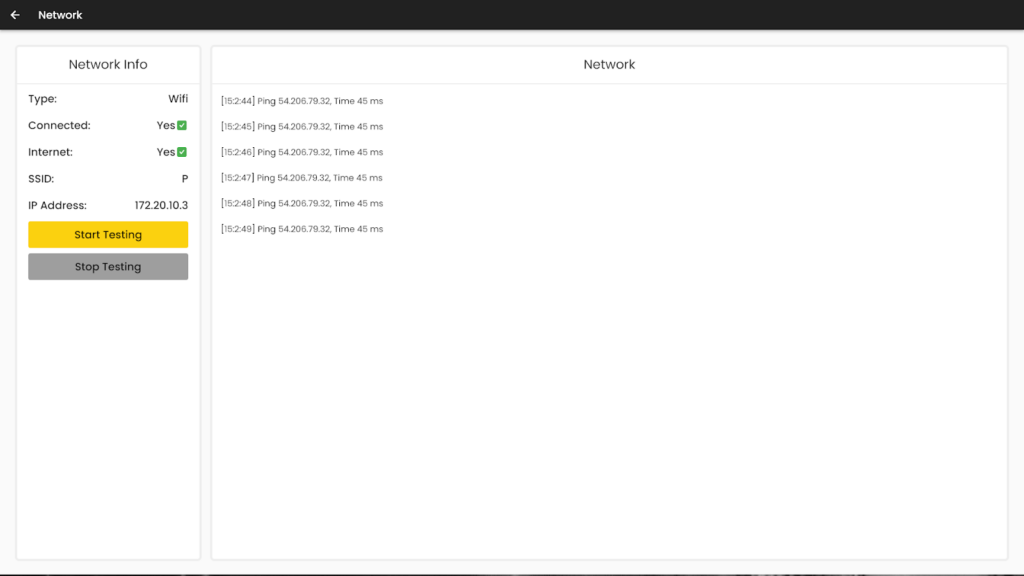
- Type: Displays the machine’s method of connection to the local network.
- Connected: If the machine is connected to the local network, this will say Yes, or No otherwise.
- Internet: If the machine is connected to the Internet, this will say Yes, or No otherwise.
- SSID: If the machine is connected via Wi-Fi, this will display the Wi-Fi network’s name.
- IP Address: If the machine has a network connection, this will show its current IP address. Each device on the network has a unique IP address.
- Start Testing/Stop Testing: Starts an Internet ping test which contacts a test server on the Internet and updates the Network panel on the right of the screen with results every second. If there is an Internet connection, the Network panel will return the time of each ping request, the server’s IP address and the time taken for each ping in milliseconds. If the ping length is constantly longer than 1000 ms, it might mean that your Internet connection is unstable. The test repeats until ‘Stop Testing’ is tapped.
Setting #
System #
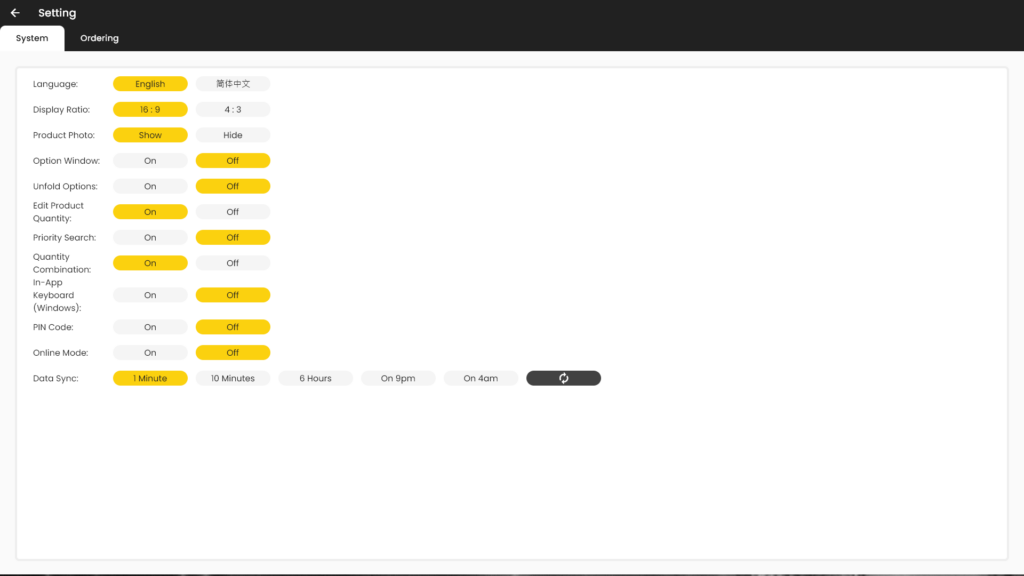
- Language
- Display Ratio
- Product Photo
- Option Window
- Unfold Options
- Edit Product Quantity
- Priority Search
- Quantity Combination
- In-App Keyboard (Windows)
- PIN Code
- Online Mode
- Data Sync
Ordering #
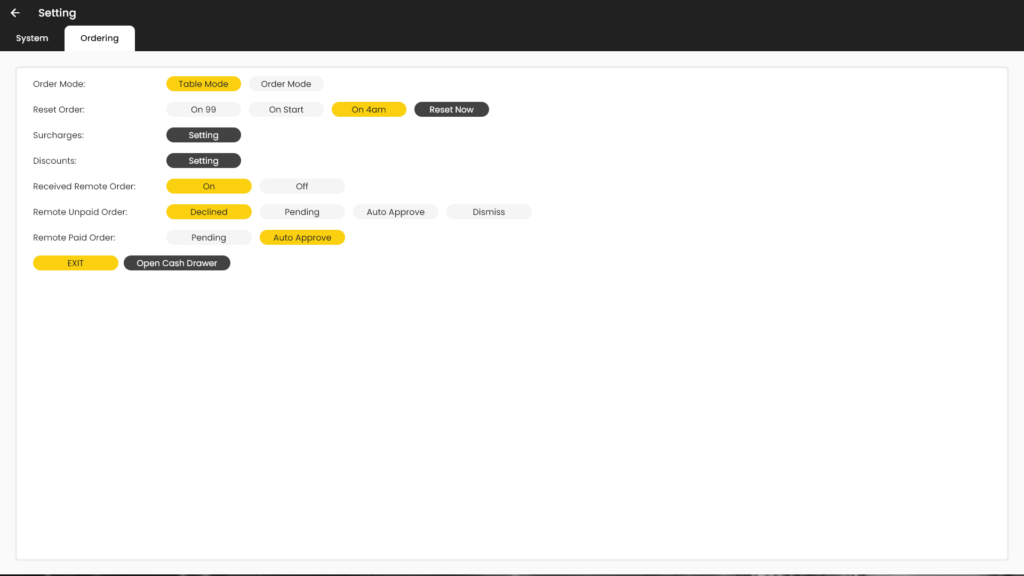
- Order Mode
- Reset Order
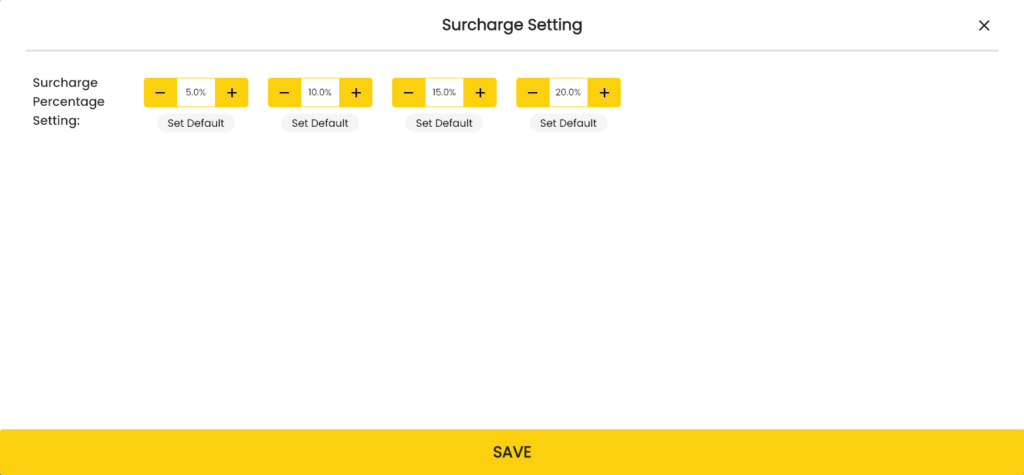
- Surcharges
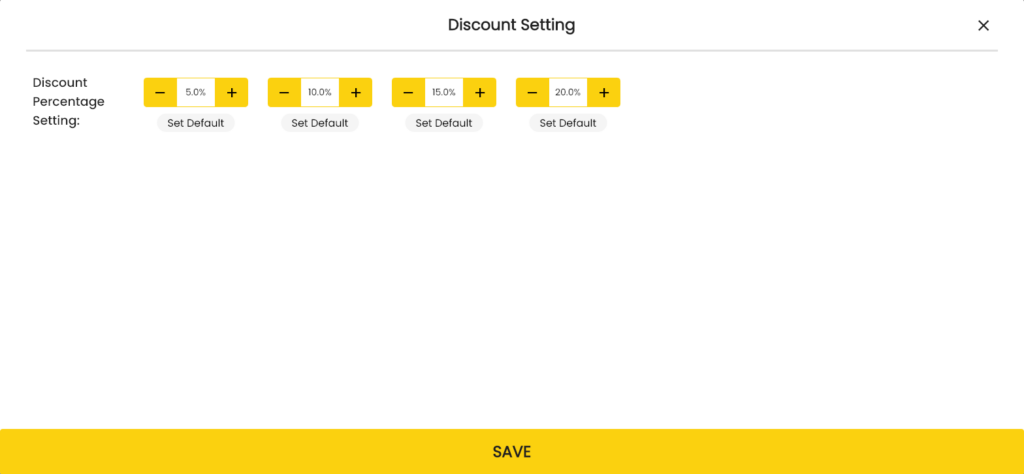
- Discounts
- Received Remote Order
- Remote Unpaid Order
- Remote Paid Order
Logout #
If you want to exit LinkPOS, or to switch to another of your stores, open the menu and tap Logout. A confirmation dialog will appear asking if you want to log out of the current store.
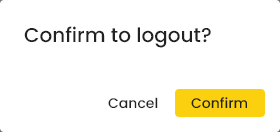
Tap Confirm to return to the login screen.

From the login screen, you can either log in to another store, or exit by pressing your Android machine’s Back button, or if using Windows, pressing the Alt + F4 keys on the keyboard.


